Applications
Chapter 12: Setting — 12.6 Applications (Installer)
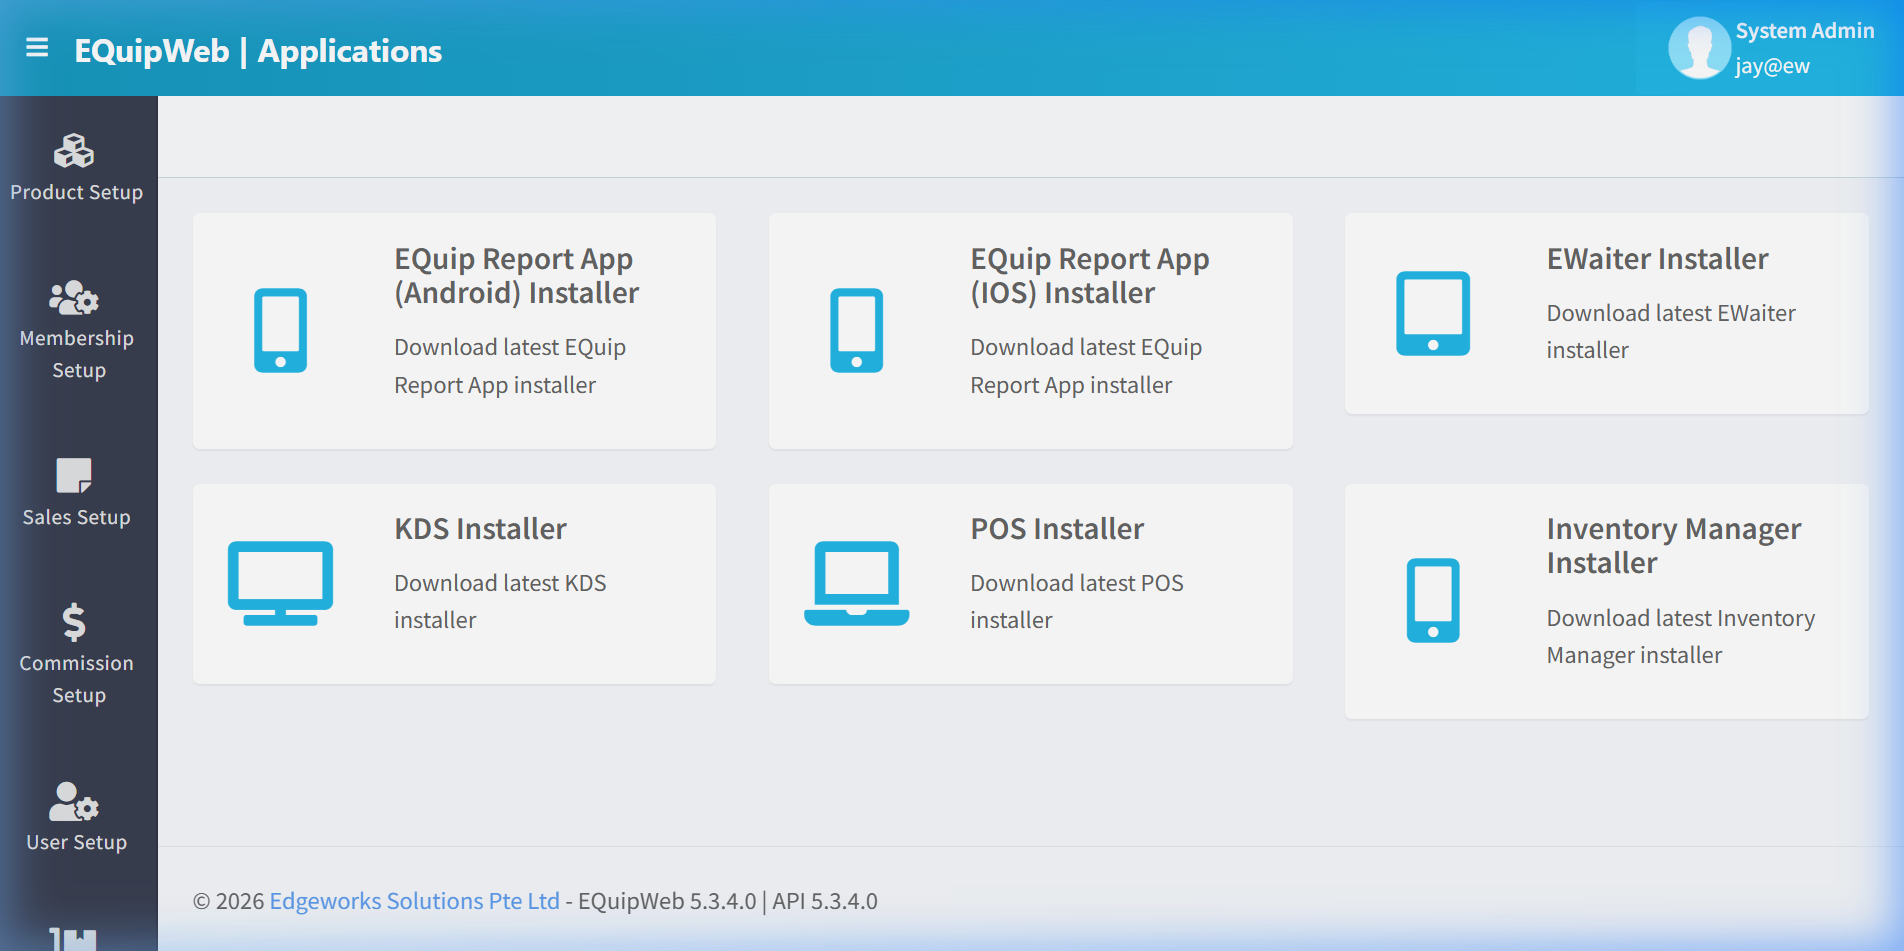
The Applications page shows all the apps and modules available for your EQuip system. From here, you can see which apps are installed, check for updates, and manage your system's capabilities.
When to use this: When you need to download or manage POS application installers for your terminals.
Prerequisites
- No prerequisites
Applications List
📝 General Description
The Applications page serves as a centralized software management hub. It lists all EQuip application modules (POS client, inventory tools, mobile apps, integrations) along with their current versions and available updates. Each module is displayed as a card or list entry with its name, description, version, and installation status.
⚙️ UI Elements
| Element | Type | Function |
|---|---|---|
| Module Cards | Card / List | Each module displayed with name, version, and status |
| Download | Button (per module) | Download the installer for the selected module |
| Search | Text Input | Filter available modules by name |
12.6.1 Available Application Modules
| Module | Description | Platform |
|---|---|---|
| WinPowerPOS (EQuipPOS) | The main POS terminal application for Windows | Windows Desktop |
| EQuipWeb | Backend management portal | Web Browser |
| Kitchen Display System (KDS) | Real-time kitchen order display for F&B | Windows / Tablet |
| Customer Display | Second-screen customer-facing display | Windows |
| Mobile Cashier | Mobile POS for tableside ordering | iOS / Android |
| Membership App | Customer-facing loyalty app with registration, points, vouchers | iOS / Android |
| Inventory Scanner | Handheld barcode scanner app for stock takes | Android |
| QR Ordering | Customer-facing QR code online ordering module | Web Browser |
12.6.2 Module Details
Clicking on a module card reveals additional details:
| Field | Description |
|---|---|
| Module Name | Display name of the application |
| Version | Current installed version (e.g., "5.3.4.0") |
| Latest Version | Newest available version for download |
| Release Date | When the latest version was published |
| Changelog | What's new in this version (bug fixes, features) |
| File Size | Download size of the installer |
| Download Link | Direct link to download the installer file |
| Requirements | System requirements (e.g., ".NET 6.0 Runtime", "Windows 10+") |
12.6.3 Module Categories
| Category | Modules |
|---|---|
| Core | WinPowerPOS, EQuipWeb — required for basic operations |
| F&B Extensions | KDS, QR Ordering, Mobile Cashier — for food & beverage businesses |
| Customer Facing | Membership App, Customer Display — enhance the customer experience |
| Operations | Inventory Scanner — streamline warehouse and stock operations |
| Integrations | Xero, E-Commerce connectors — connect with external platforms |
12.6.4 Integration Modules
Some application modules are integration connectors that require separate licensing and configuration:
| Integration | Purpose | Requires |
|---|---|---|
| Xero Sync | Push sales and payment data to Xero accounting | Xero subscription + API credentials |
| E-Commerce | Sync product catalog with online stores (Shopify, WooCommerce) | E-commerce platform account |
| GrabFood / Foodpanda | Receive online food delivery orders at POS | Delivery platform merchant account |
| Payment Gateways | Process digital payments (Stripe, PayNow, Nets) | Payment provider merchant account |
[!NOTE] Integration modules may not appear on this page until they are activated for your account. Contact your Edgeworks account manager to enable additional modules.
12.6.5 Update Workflow
1. Navigate to Applications page

2. Check for modules with "Update Available" badge

3. Click Download to get the latest installer

4. Run the installer on the target machine (POS terminal, server)
5. Restart the application after installation
6. Verify the version number matches the expected update💡 Example
Scenario: A restaurant chain needs to set up KDS (Kitchen Display System) at a new outlet. The KDS software needs to be downloaded and installed.
Steps:
- Navigate to Setting → Applications.
 2. Find "Kitchen Display System (KDS)" in the module list.
3. Check the version — latest is
2. Find "Kitchen Display System (KDS)" in the module list.
3. Check the version — latest is 5.3.4.0.
 4. Click Download to get the installer.
 5. Copy the installer to the kitchen display tablet/PC.
6. Run the installer, follow the setup wizard.
7. Configure the KDS to connect to the outlet's EQuipWeb instance.
8. The KDS starts receiving orders from the linked POS terminals.
5. Copy the installer to the kitchen display tablet/PC.
6. Run the installer, follow the setup wizard.
7. Configure the KDS to connect to the outlet's EQuipWeb instance.
8. The KDS starts receiving orders from the linked POS terminals.
[!IMPORTANT] Always coordinate application updates with your IT team. POS client updates should be deployed during off-peak hours to avoid disrupting sales operations. Test the update on one terminal first before rolling out to all.
[!TIP] Keep all modules on the same major version (e.g., all on 5.3.x) to avoid compatibility issues between the POS client and the EQuipWeb backend.
Access & Permissions
| Role | View | Create | Edit | Delete |
|---|---|---|---|---|
| Admin | Yes | Yes | Yes | Yes |
| Supervisor | Yes | Yes | Yes | No |
| Cashier | No backend access | — | — | — |
[!NOTE] Exact permissions depend on the Privileges Setup configured for each role. Contact your administrator if you cannot access this page.
Expected Result: Changes are saved successfully and reflected across the system after the next POS sync.
Business Rules
- Records that are linked to active transactions or other modules cannot be permanently deleted
- Changes made here will take effect on POS terminals after the next sync
- Deleted records can be restored from the list using the Show Deleted filter
- All changes are logged with the user who made them and the timestamp
How to View Installed Applications
- Navigate to Setting > Applications from the sidebar menu.
- The list shows all installed and available applications/modules for your EQuipWeb instance.
- Click on an application name to view its details, version, and configuration.
How to Enable or Disable an Application
- Navigate to Setting > Applications.
- Find the application you want to enable or disable.
- Click the toggle switch or Enable/Disable button next to the application.
- Confirm the action when prompted.
- Click Save to apply.
Expected Result: The application is enabled or disabled. Some applications may require a system restart or POS sync to take effect.
[!WARNING] Disabling an application may affect dependent features. Check the application description for dependencies before disabling.
FAQ
Q: Why are my setting changes not taking effect on POS? A: Settings need to sync to POS terminals. Check Terminal Status for sync timing, or trigger a manual sync.
Q: Can I revert a setting change? A: Yes. Simply toggle the setting back to its previous value and save. Changes take effect after the next POS sync.
Q: Who should configure these settings? A: Most settings should be configured by an administrator. Pages marked as "IT Admin only" (App Command, Webhook) require technical knowledge.
Troubleshooting
| Issue | Possible Cause | Solution |
|---|---|---|
| Setting changes not reflected in POS | POS has not synced since the change | Trigger a manual sync or wait for the next automatic sync |
| Toggle not saving | Page not fully loaded or session expired | Refresh the page and try again. Re-login if needed |
| Cannot access this setting | Insufficient permissions | Contact your administrator to check your role privileges |
| Setting reverts after saving | Conflicting setting in another module | Check related settings pages for overriding configurations |
| Page shows blank or error | Browser compatibility issue | Try a different browser (Chrome recommended) or clear cache |
Related Menus
- Master Data > Company Setup — company information
- User Setup > Privileges Setup — permission configuration
- Master Data > POS Setup — POS terminal settings
Open Questions / Confirmation Needed
[!NOTE] The following items may vary depending on your system version and configuration:
- Exact permission settings depend on your Privileges Setup configuration
- Sync timing to POS terminals depends on network conditions and sync schedule
- Some features may require additional licensing or module activation
- Field behavior may differ between EQuip versions
If you encounter behavior not described in this manual, contact your system administrator or EQuip support team.
Related Articles
Main Portal
? Backend — EQuipWebRetail ModeChapter 1: Getting Started Backend Login — Main Portal Dashboard The Main Portal is the first page you see after logging into EQuipWeb. It provides a high-level overview of your business with key metrics, quick-access ...Terminal Status
? Backend — EQuipWebRetail ModeMaster Data Setup Chapter 8: Master Data Setup — 8.1 Terminal Status The Terminal Status page shows you the live status of all your POS terminals — which ones are online, which are offline, and when they last synced. ...