Referral Setup
Chapter 3: Membership Setup — 3.4 Referral Setup
Use Referral Setup to reward your existing members when they bring in new customers. Set up the reward — like bonus points or a discount — and the system tracks who referred whom automatically.
When to use this: When you want to reward members for bringing in new customers.
Prerequisites
- Membership Setup completed
- Reward rules defined
Referral Program List
📝 General Description
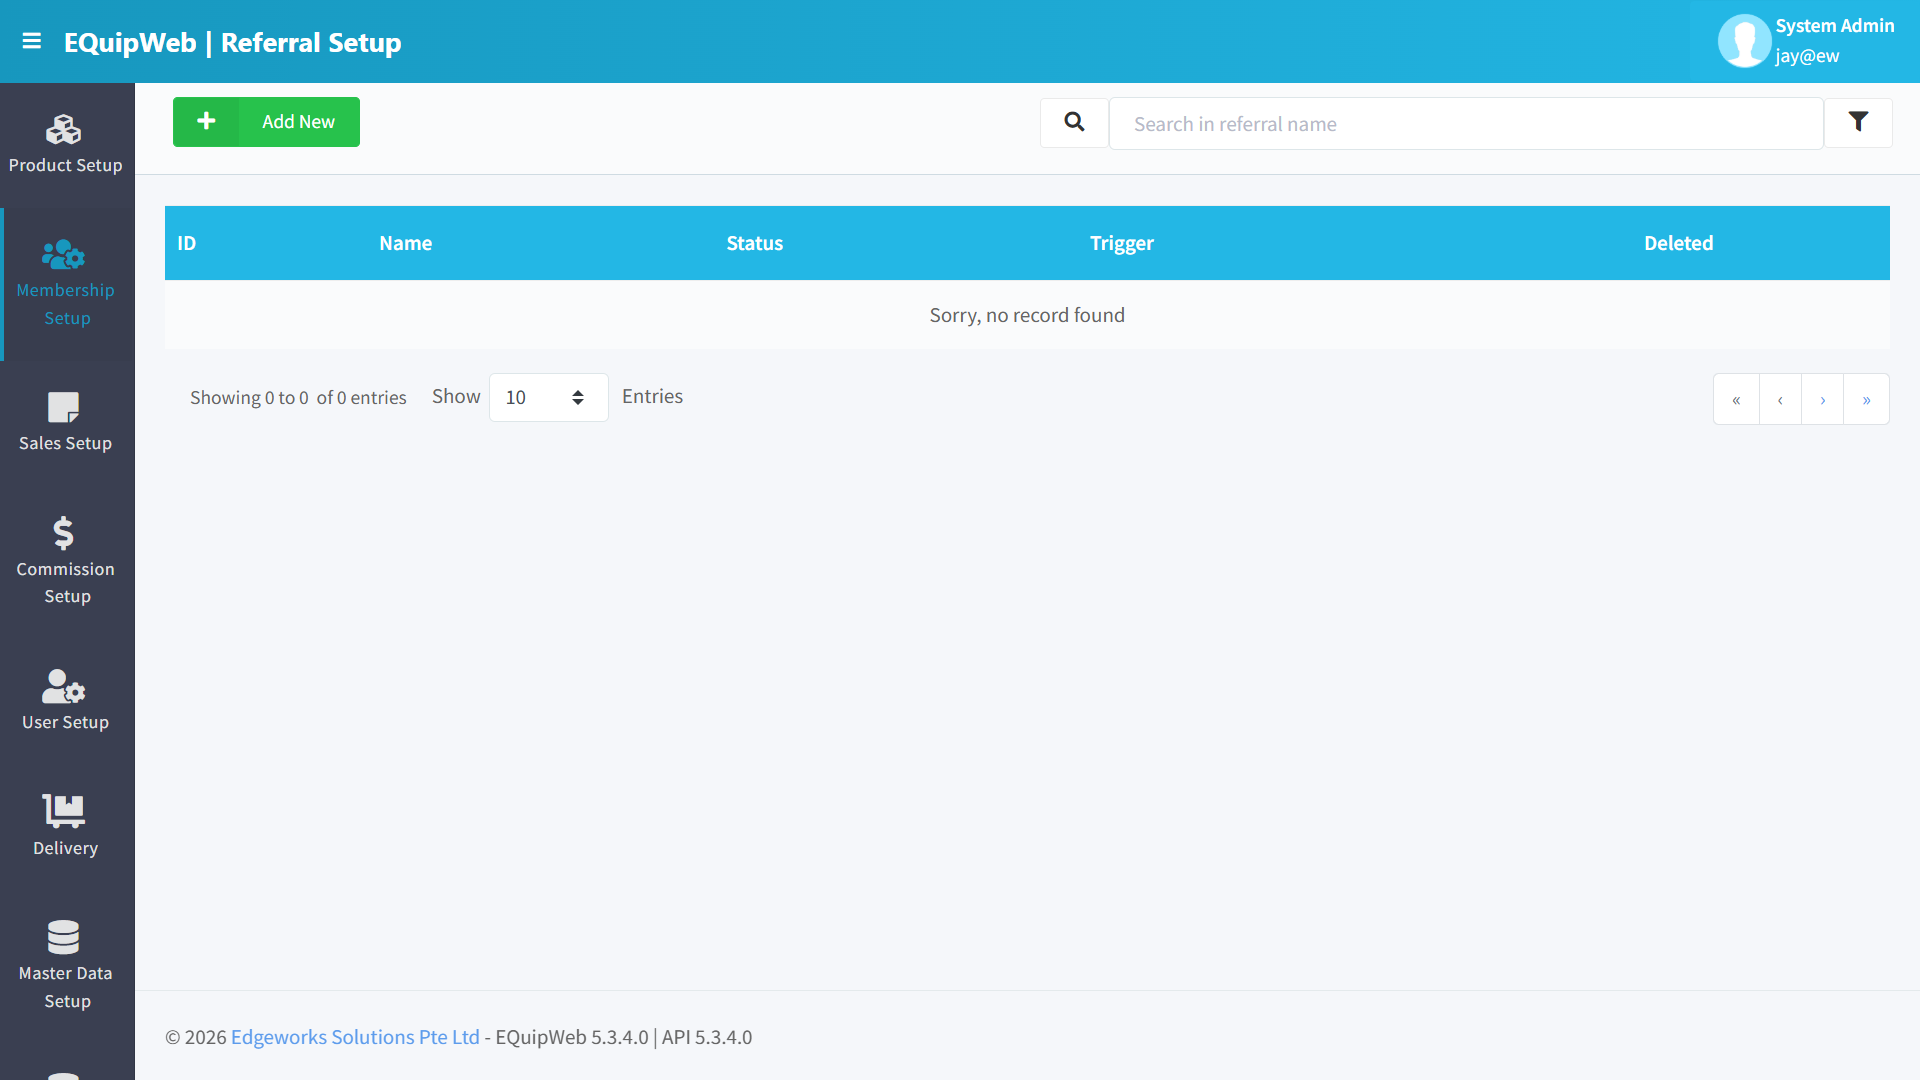
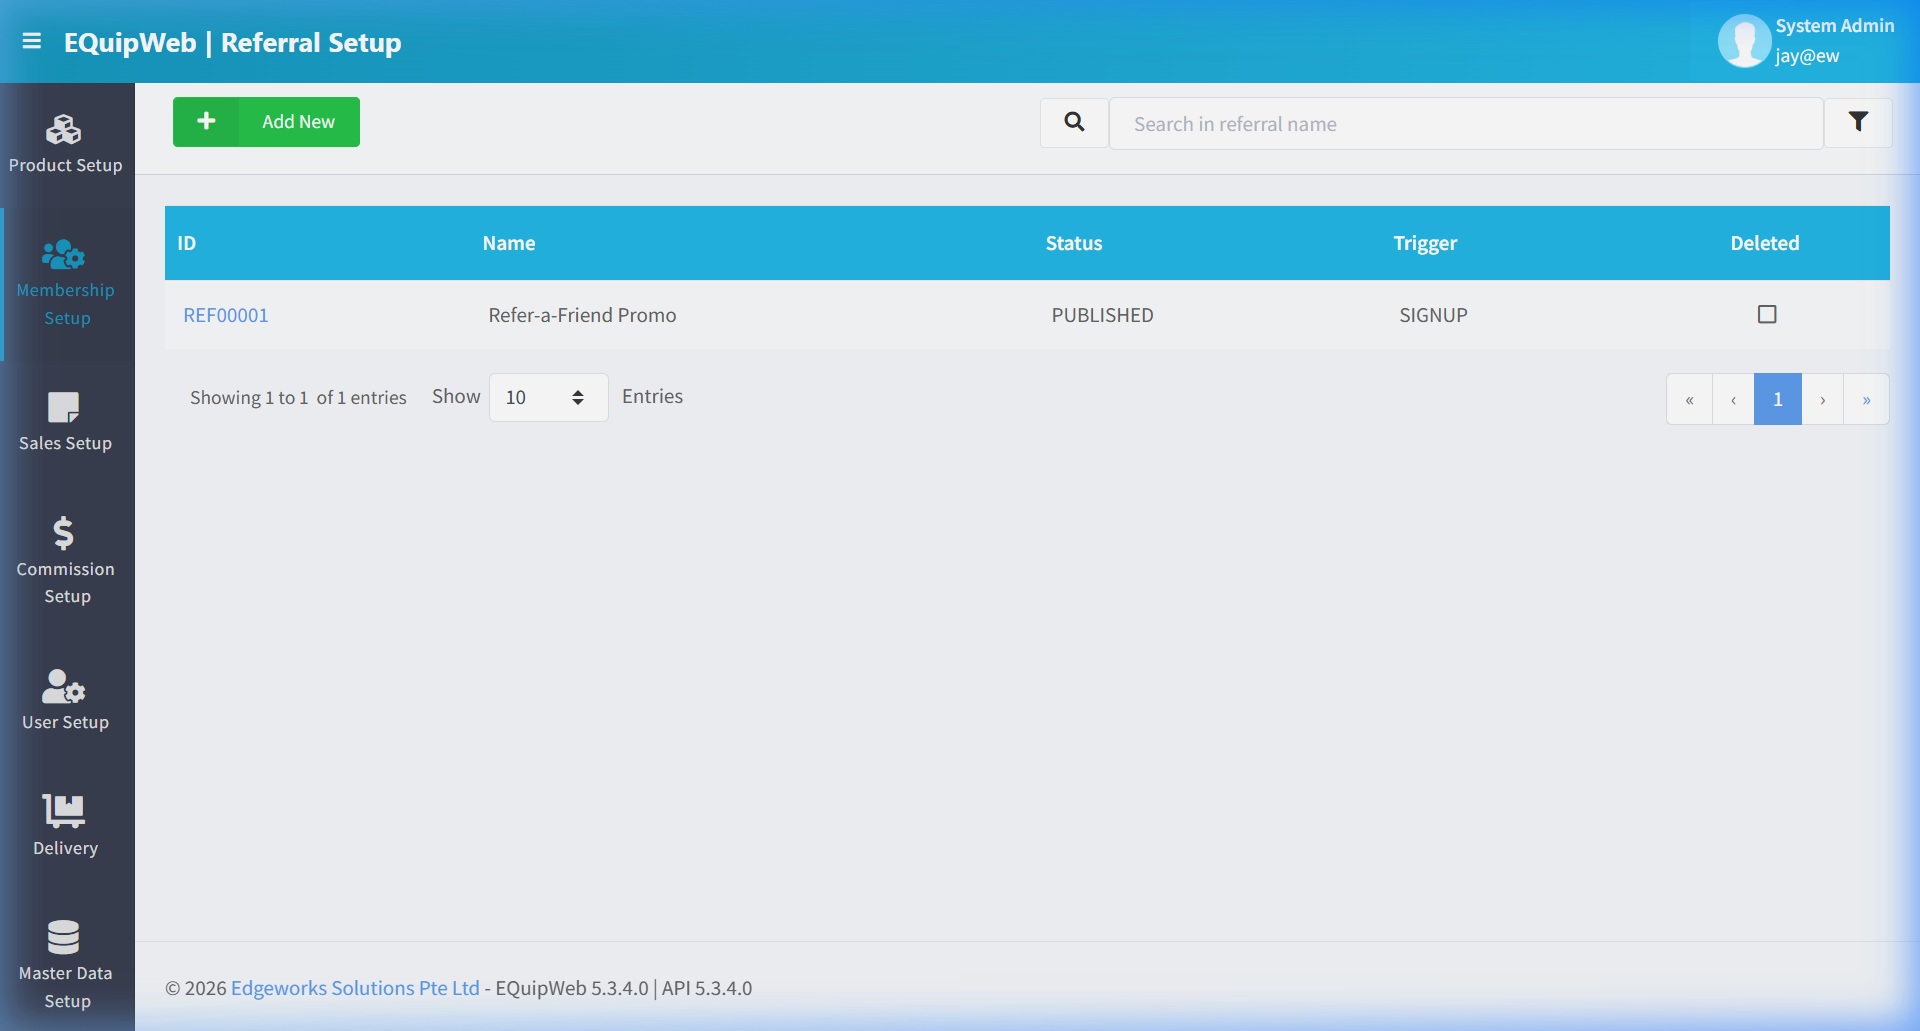
The Referral list shows all configured referral programs. Each program defines what rewards are given, to whom, and for how long. Referral programs are an effective tool for organic member growth — existing loyal customers do the recruiting.
⚙️ UI Elements
| Element | Type | Function |
|---|---|---|
| + Add New | Green Button | Create a new referral program |
| Search Bar | Text Input | Filter by referral program name |
3.4.1 Data Grid Columns
| Column | Description |
|---|---|
| ID | System-generated referral program ID |
| Name | Program name (clickable → opens edit form) |
| Status | Active / Inactive |
| Trigger | What event completes the referral and unlocks the reward |
| Deleted | Hidden/deleted status |
3.4.2 Add / Edit Referral Program
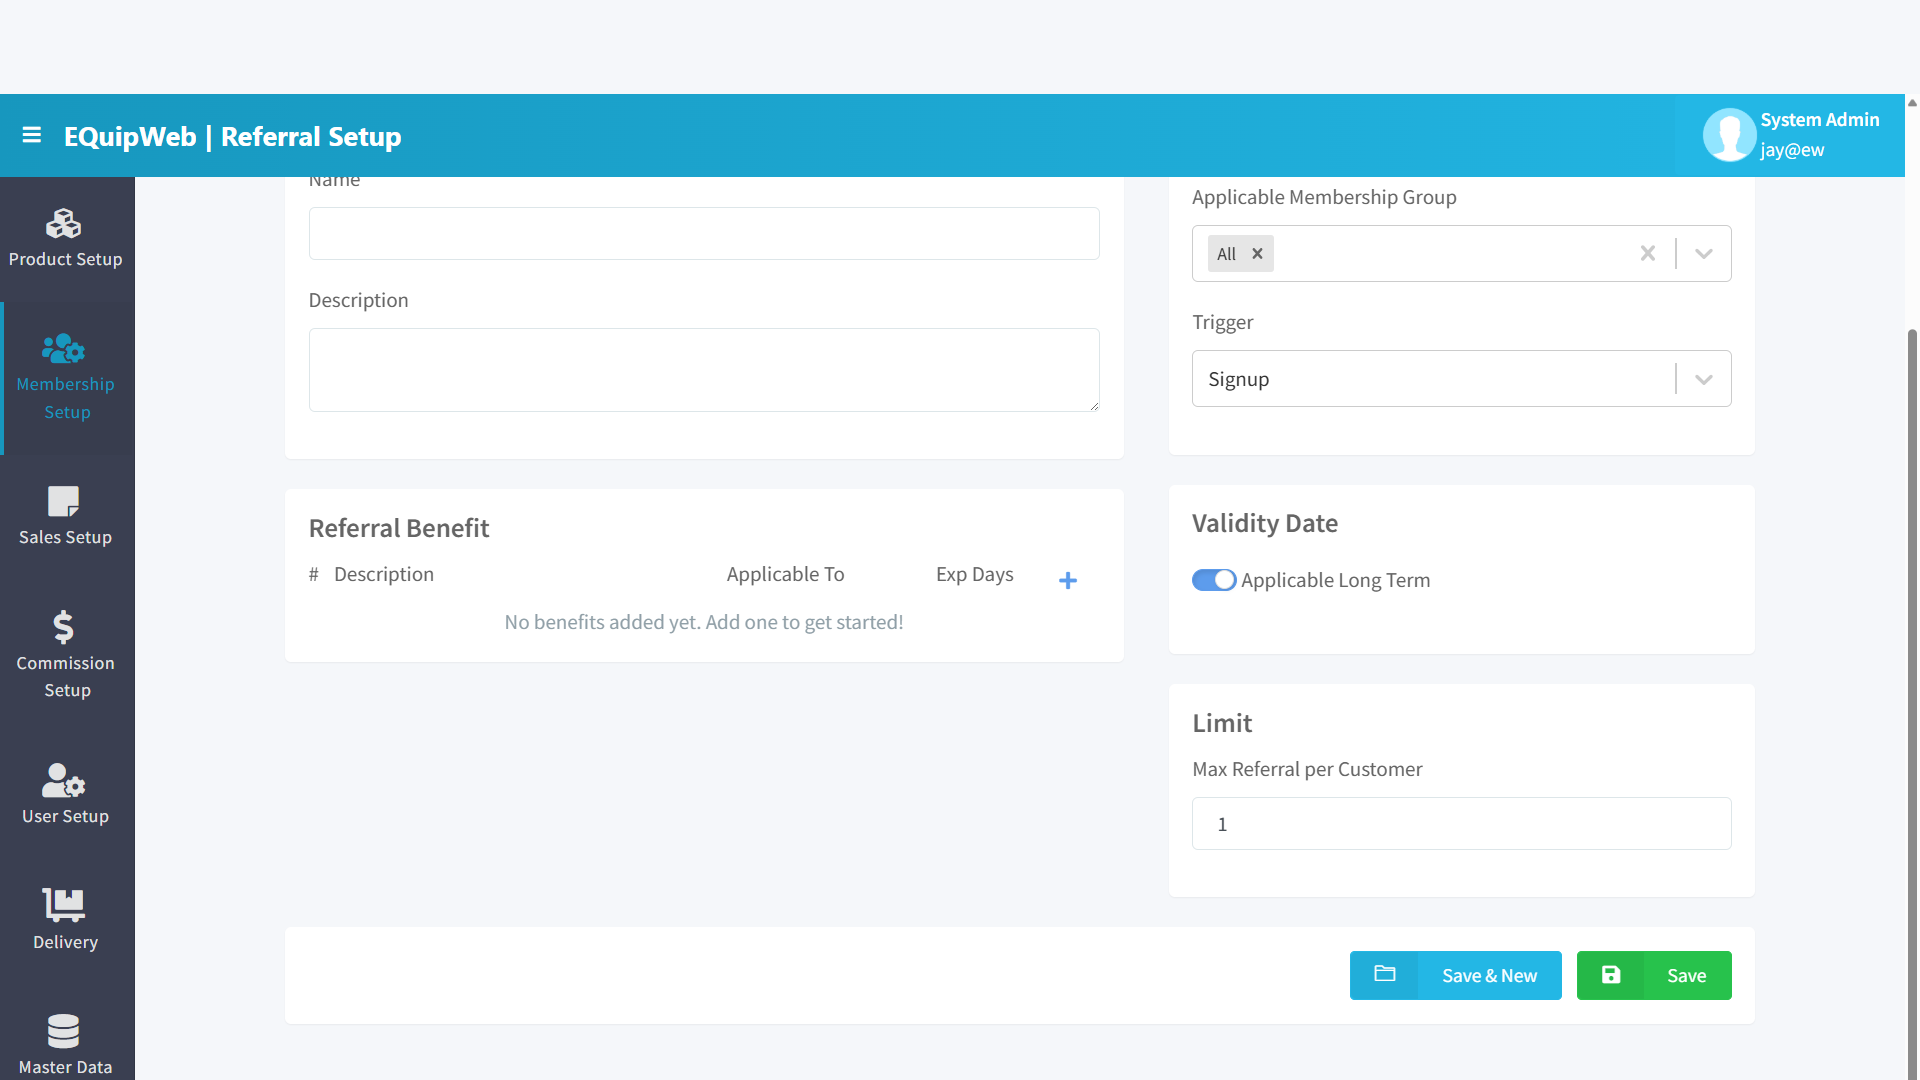
Form Fields
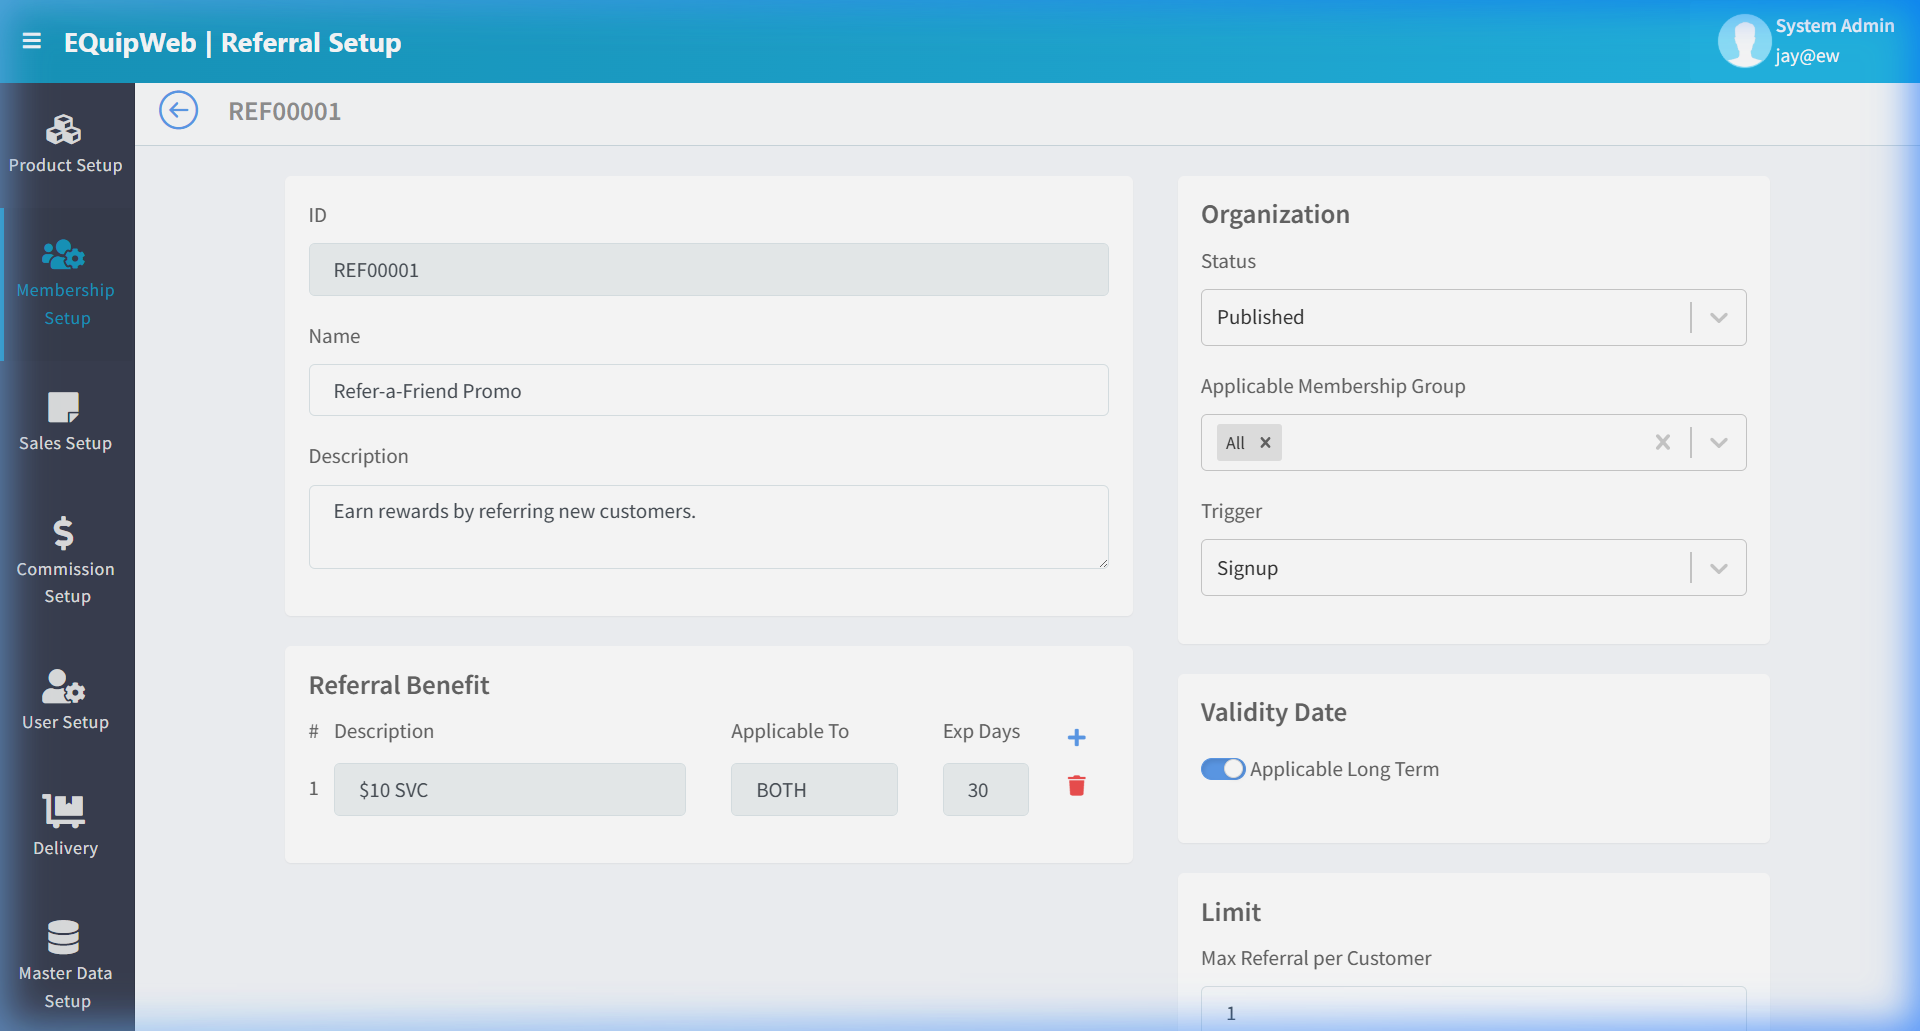
| Field | Type | Required | Description |
|---|---|---|---|
| Program Name | Text | ✅ Yes | Display name (e.g., "Refer a Friend", "VIP Referral") |
| Referrer Reward | Config | No | What the referring member receives (points, voucher, or cash credit) |
| Referee Reward | Config | No | What the new member receives upon joining via this referral |
| Start Date | Date Picker | No | When the program goes live |
| End Date | Date Picker | No | When the program expires |
| Max Referrals | Number | No | Maximum number of successful referrals per member |
Toggle Settings
| Toggle | When ON | When OFF |
|---|---|---|
| Is Active | Program is live — referral links and codes are active | Program is paused — no new referrals are processed |
Trigger Options
The trigger defines when the referral reward is actually issued:
| Trigger | Reward Issued When... |
|---|---|
| On Signup | The new member successfully registers |
| On First Purchase | The new member completes their first transaction |
| On Spend Threshold | The new member reaches a minimum spend amount |
3.4.3 Referral Cap Interaction
The Referral Invitation Cap configured in the Membership Group (Section 3.2) acts as a ceiling on the total referral rewards a member can accumulate across all programs.
Example:
- Gold Group has Referral Invitation Cap = $100
- "Refer a Friend" program gives referrer $20 per successful referral
- A Gold member can earn at most 5 successful referral rewards ($100 ÷ $20) before the cap is hit
[!NOTE] The cap works across ALL active referral programs. Once a member hits the cap for their group, they no longer earn referral rewards — even if they successfully recruit more members.
How to Edit a referral program
- In the Referral Setup page, find the referral program you want to change.
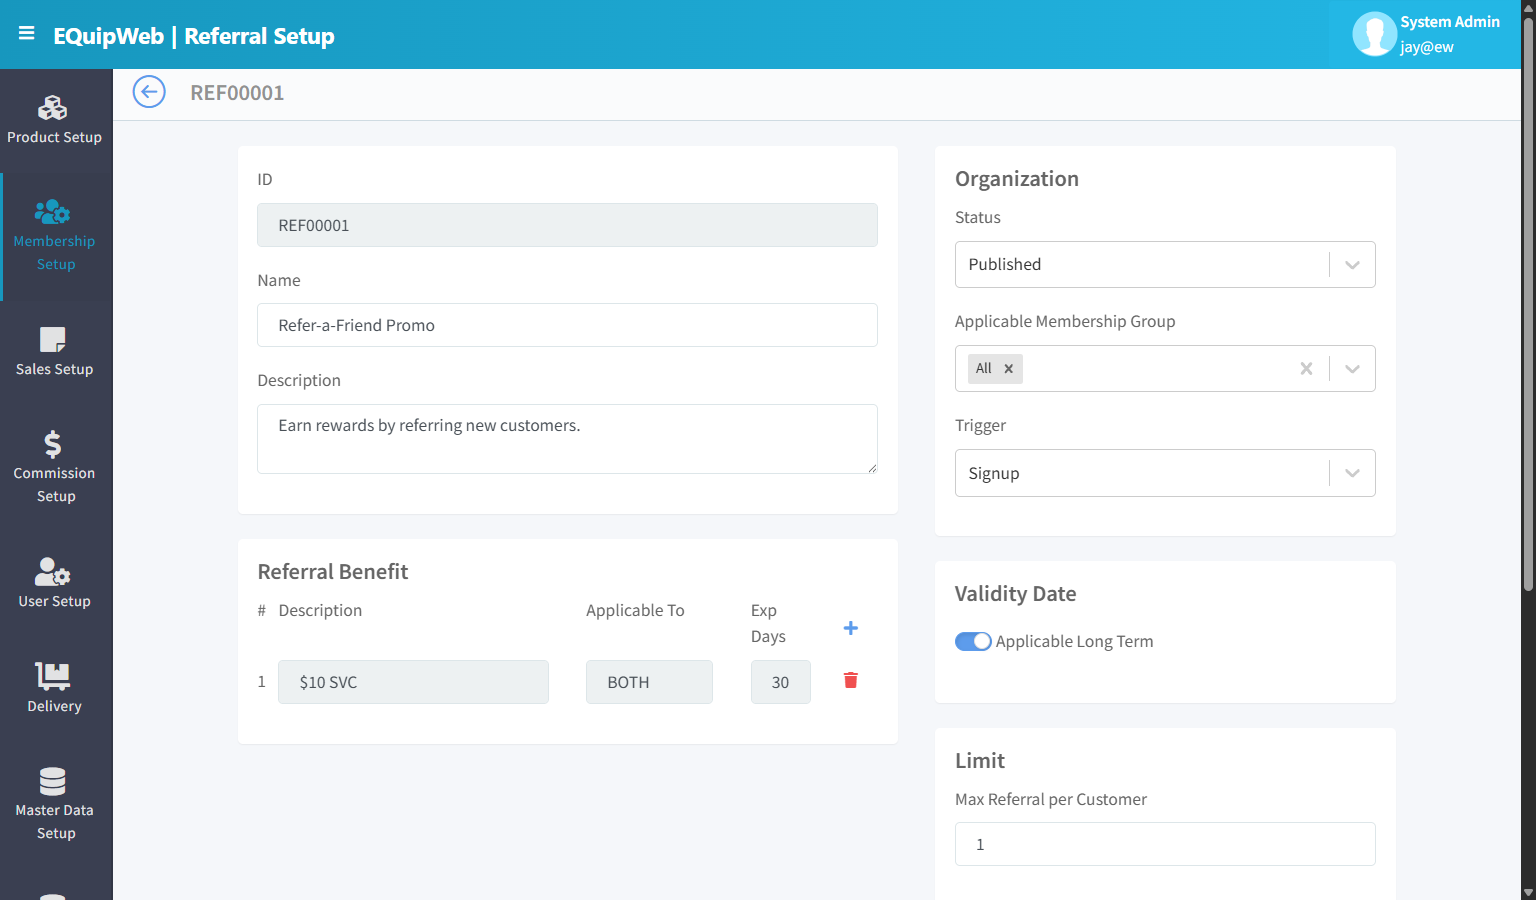
- Click the blue program name link. The edit form opens — it looks the same as the "Add New" form, but all fields are already filled in with the current values.
-
Change the fields you need to update.
-
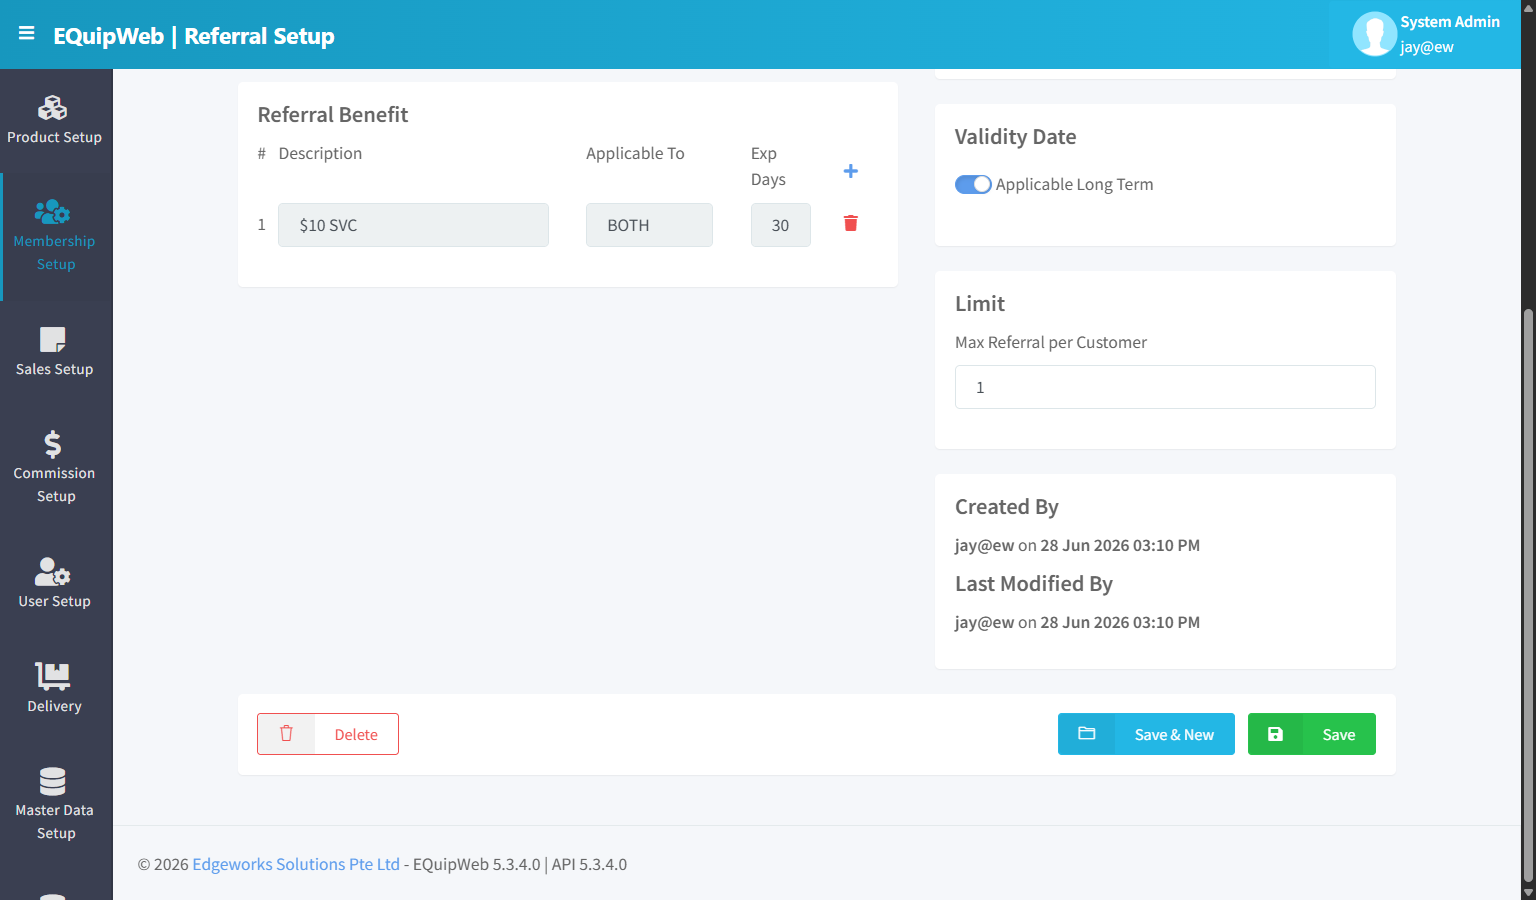
Click Save to apply your changes.
✅ Expected Result: The referral program settings are saved.
[!TIP] To make changes, just click the name of any referral program in the list — the same form opens with everything already filled in. Change what you need and click Save.
💡 Example
Scenario: A fashion retailer launches a "Refer a Friend" campaign for 2 months.
Setup:
- Name: "July–Aug Referral Drive"
- Referrer Reward: 50 bonus points per successful referral
- Referee Reward: $5 welcome voucher on signup
- Trigger: On Signup
- Max Referrals: 10 per member
- Duration: July 1 – August 31, 2026
How it works:
- Gold member Sarah receives a unique referral link/code via the loyalty app.
- Sarah shares it with friend Alex.
- Alex clicks the link and registers as a new member.
 4. Immediately on registration:
- Alex receives a $5 welcome voucher (valid 30 days)
- Sarah receives 50 bonus points credited to her account
- Sarah can refer up to 10 friends during the campaign period.
[!TIP] Referral programs work best when paired with Auto Drive SIGNUP triggers (Section 3.8) to automatically send the referee's welcome voucher and referrer's points confirmation via SMS or push notification — all without manual follow-up.
Access & Permissions
| Role | View | Create | Edit | Delete |
|---|---|---|---|---|
| Admin | Yes | Yes | Yes | Yes |
| Supervisor | Yes | Yes | Yes | No |
| Cashier | No backend access | — | — | — |
[!NOTE] Exact permissions depend on the Privileges Setup configured for each role. Contact your administrator if you cannot access this page.
Business Rules
- Records that are linked to active transactions or other modules cannot be permanently deleted
- Changes made here will take effect on POS terminals after the next sync
- Deleted records can be restored from the list using the Show Deleted filter
- All changes are logged with the user who made them and the timestamp
How to Delete a Referral
- Navigate to Referral Setup from the sidebar menu.
2. Click the name or code link (blue text) of the record you want to delete.
3. In the edit form, scroll down to the bottom.
4. Click the Delete button (red button).
5. A confirmation dialog appears — click Yes to confirm deletion.
Expected Result: The record is soft-deleted — it is hidden from the active list and POS terminals but can be restored later using the "Show Deleted" filter.
[!WARNING] Records linked to active transactions or other modules cannot be deleted. The system will display an error if deletion is not allowed.
How to Add a New Referral
- Navigate to Referral Setup from the sidebar menu.
-
Click the + Add New button (green button).
-
Fill in the required fields in the form.
-
Fill in any optional fields as needed.
-
Click Save to create the new referral.
✅ Expected Result: The new referral appears in the list and is available for use across the system.
FAQ
Q: Why is the member not receiving points? A: Check that the member's group has benefit rules configured in Membership Benefit. Also verify the transaction qualifies (minimum spend, eligible products).
Q: Can I merge duplicate member records? A: This must be done by your system administrator. Contact support with both member IDs for assistance.
Q: How do I transfer a member to a different group? A: Edit the member record and change the Membership Group field. The change takes effect immediately.
Troubleshooting
| Issue | Possible Cause | Solution |
|---|---|---|
| Cannot save the record | Required fields are empty or invalid | Check all fields marked with * and fill in valid data |
| Record not appearing in POS | POS terminal has not synced yet | Wait for the next sync cycle or manually trigger sync from Terminal Status |
| Cannot delete the record | Record is being used by other modules | Check if the record is linked to active transactions, products, or other settings |
| Changes not taking effect | Browser cache showing old data | Refresh the page (Ctrl+F5) or clear browser cache |
| "Duplicate" error on save | A record with the same name/code already exists | Search the list (including deleted records) for duplicates |
| Page not loading | Session expired or network issue | Log out and log back in. Check your internet connection |
Related Menus
- Product Setup > Promotion Setup — member-only promotions
- Sales Setup > Discount Setup — member discount types
- Sales Setup > Voucher Setup — voucher redemption for members
- Setting > Membership Compulsory — require membership at checkout
Open Questions / Confirmation Needed
[!NOTE] The following items may vary depending on your system version and configuration:
- Exact permission settings depend on your Privileges Setup configuration
- Sync timing to POS terminals depends on network conditions and sync schedule
- Some features may require additional licensing or module activation
- Field behavior may differ between EQuip versions
If you encounter behavior not described in this manual, contact your system administrator or EQuip support team.
Related Articles
Membership Group Setup
? Backend — EQuipWebRetail ModeMembership Setup Chapter 3: Membership Setup — 3.2 Membership Group Setup Use Membership Group Setup to create your loyalty tiers — like Regular, Gold, Platinum, or Diamond. Each tier can have different benefits, ...Privileges Setup
? Backend — EQuipWebRetail ModeUser Setup Chapter 6: User Setup — 6.4 Privileges Setup Use Setup to manage and configure this feature in your EQuipWeb system. Privileges Setup is the master list of all permissions available in the system. Each ...Company Setup
? Backend — EQuipWebRetail ModeMaster Data Setup Chapter 8: Master Data Setup — 8.9 Company Setup Use Company Setup (under Master Data) to enter your company's official business details — company name, registration number, address, and contact ...Role Setup
? Backend — EQuipWebRetail ModeUser Setup Chapter 6: User Setup — 6.2 Role Setup Use Role Setup to create job roles for your team — like "Cashier", "Supervisor", "Manager", or "Admin". Each role determines what a user can see and do in the system. ...Currency Setup
? Backend — EQuipWebRetail ModeSales Setup Chapter 4: Sales Setup — 4.8 Currency Setup Use Currency Setup to add the currencies your business accepts. If you only accept one currency (e.g., SGD), it's already set up for you. Multi-currency ...