Category Setup
Chapter 2: Product Setup — 2.3 Category Setup
Use Category Setup to organize your products into groups — like "Beverages", "Snacks", or "Electronics". When your products are neatly categorized, your staff can find items faster at the POS, and your reports become easier to read.
When to use this: When you need to create or manage product categories (e.g., Food, Beverages, Accessories).
Prerequisites
- Department Setup completed (categories belong to departments)
- GST Setup completed if tax rules apply to categories
Category List
📝 General Description
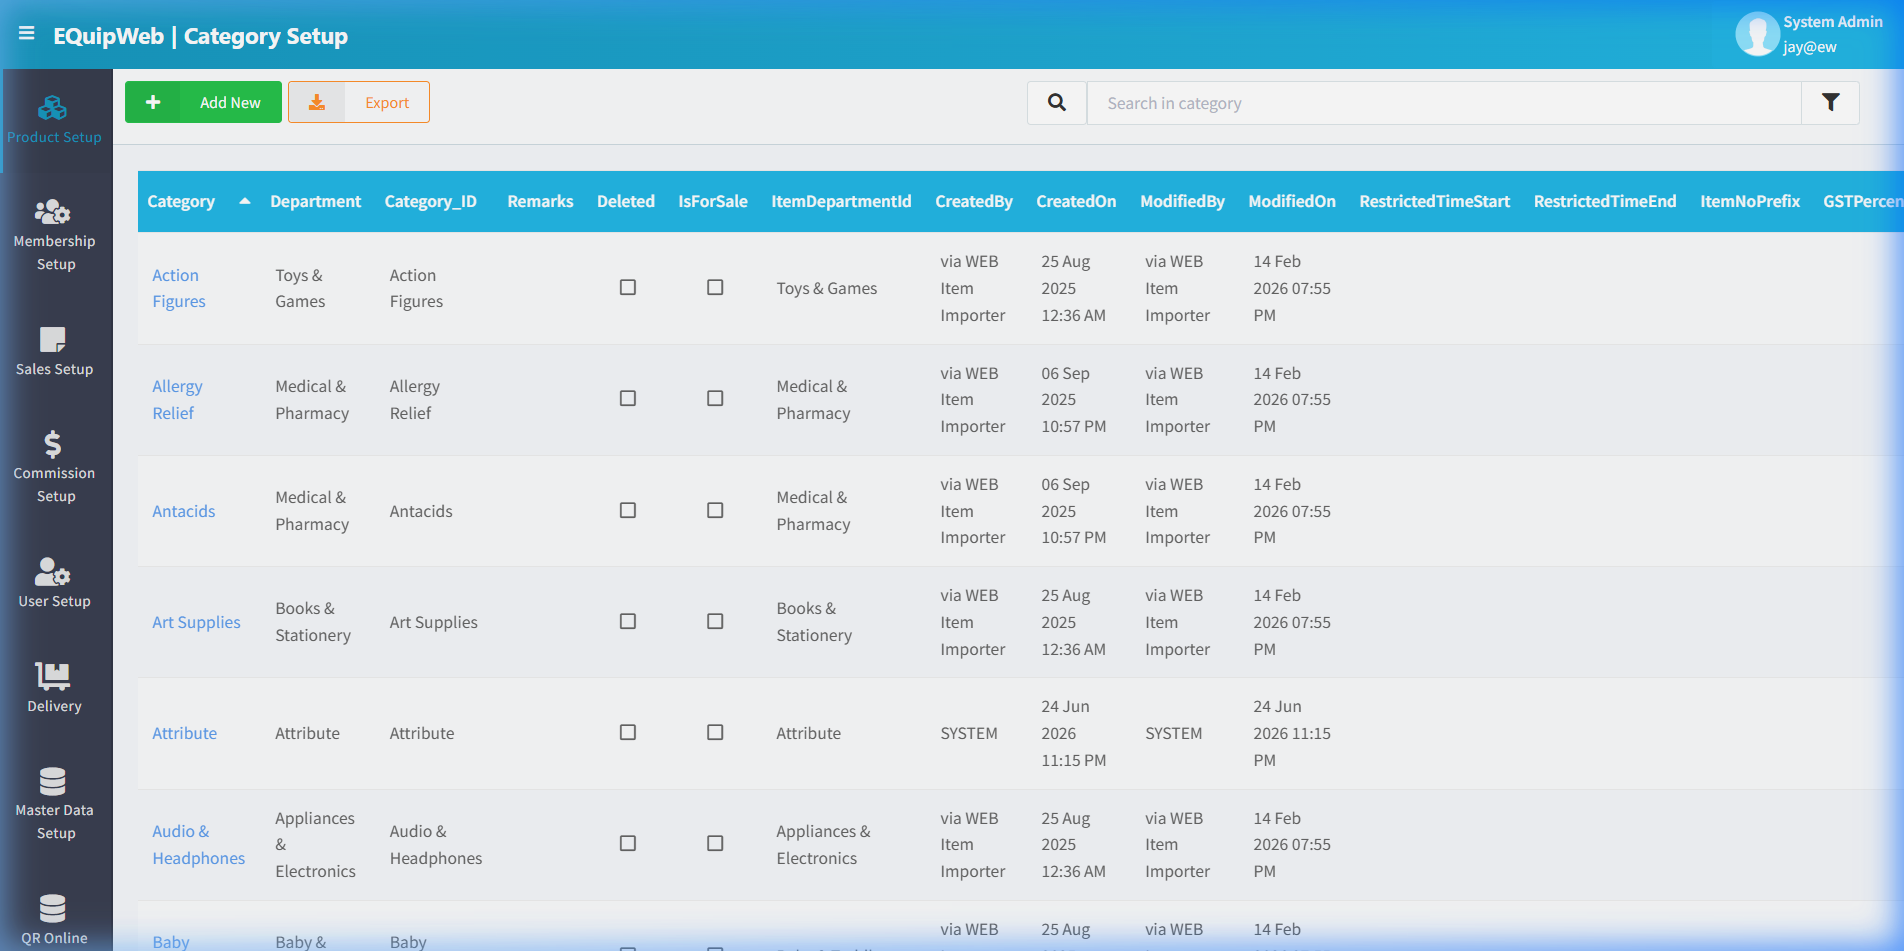
The Category list displays all product categories in a data grid. Each category has a unique code, a display name, and an optional image. Categories are used throughout EQuipWeb for filtering products, reporting, and POS display organization.
⚙️ UI Elements
| Element | Type | Function |
|---|---|---|
| + Add New | Green Button | Create a new category |
| Export | Orange Button | Download category list as Excel |
| Search Bar | Text Input | Filter categories by name |
| 🔽 Filter | Funnel Icon | Opens the Column Visibility Panel — toggle columns ON/OFF to customize the data grid view |
2.3.1 Column Visibility Filter Panel
Click the 🔽 funnel icon (top-right of the toolbar) to open the Column Visibility Panel. This panel lets you control which columns are displayed in the data grid. Each toggle switches a column ON (visible, blue) or OFF (hidden, grey).
[!NOTE] After toggling columns, click Save to persist your column preferences. Click Clear Filter to reset all columns to default, or Search to apply filter criteria.
Default Visible Columns (🔵 ON by default)
| Toggle | Column Name | Description |
|---|---|---|
| 🔵 Category | Category | Category display name (clickable → opens edit form). Always keep ON for navigation. |
| 🔵 Department | Department | Shows the parent department this category belongs to (e.g., "Toys & Games", "Medical & Pharmacy"). |
| 🔵 Category_ID | Category_ID | System-generated category code matching the internal ID. Useful for cross-referencing with imports. |
| 🔵 Remarks | Remarks | Free-text notes field. Shows any description or remarks entered on the category form. |
| 🔵 Deleted | Deleted | Soft-delete checkbox. When checked (☑), the category has been deleted but can be restored. |
| 🔵 IsForSale | IsForSale | Whether products in this category are available for sale at POS. Unchecked = internal/non-sellable category. |
| 🔵 IsGST | IsGST | Indicates whether this category has GST applied. |
| 🔵 AccountCategory | AccountCategory | Accounting integration category code (for Xero/accounting software mapping). Can be reordered with ▲▼ arrows. |
| 🔵 ItemDepartmentId | ItemDepartmentId | Shows the linked department ID value (matches the Department Setup ID). |
| 🔵 CreatedBy | CreatedBy | User who created this category (e.g., "via WEB Item Importer", "jay@ew"). |
| 🔵 CreatedOn | CreatedOn | Date and time the category was first created. |
| 🔵 ModifiedBy | ModifiedBy | User who last modified this category. |
| 🔵 ModifiedOn | ModifiedOn | Date and time of the last modification. |
| 🔵 RestrictedTimeStart | RestrictedTimeStart | Start time of the selling restriction window (if Use Selling Restriction is enabled on the form). |
| 🔵 RestrictedTimeEnd | RestrictedTimeEnd | End time of the selling restriction window. |
Hidden Columns (⚪ OFF by default)
These columns are available but hidden by default. Toggle them ON to see additional data:
| Toggle | Column Name | When ON (Visible) | When OFF (Hidden) |
|---|---|---|---|
| ⚪ IsDiscountable | IsDiscountable | Shows whether products in this category can receive discounts at POS | Column hidden — discount eligibility not visible in grid |
| ⚪ IsSellingRestriction | IsSellingRestriction | Shows the selling restriction flag (true/false) per category | Column hidden |
| ⚪ IsOverrideGST | IsOverrideGST | Shows whether this category overrides the system GST rate | Column hidden |
| ⚪ PAMedifundCap | PAMedifundCap | MediFund cap amount (healthcare/government-specific field) | Column hidden |
| ⚪ SMFCap | SMFCap | SMF cap amount (healthcare/government-specific field) | Column hidden |
| ⚪ GSTPercentage | GSTPercentage | Shows the custom GST percentage if Override GST is enabled | Column hidden |
| ⚪ ItemNoPrefix | ItemNoPrefix | Auto-prefix appended to item numbers created under this category | Column hidden |
| ⚪ AgeRestrictedItems | AgeRestrictedItems | Whether items in this category require age verification at POS (e.g., alcohol, tobacco) | Column hidden |
| ⚪ userfld10 | userfld10 | Custom user-defined text field 10 | Column hidden |
| ⚪ userflag3–5 | userflag3, userflag4, userflag5 | Custom user-defined boolean flags | Column hidden |
| ⚪ userfloat1, userfloat5 | userfloat1, userfloat5 | Custom user-defined decimal fields | Column hidden |
| ⚪ userint2–5 | userint2, userint3, userint4, userint5 | Custom user-defined integer fields | Column hidden |
[!TIP] The userfld, userflag, userfloat, and userint columns are custom fields — they are reserved for client-specific data that varies per implementation. If your business uses custom fields (e.g., "userflag3" = "Halal Certified"), enable the relevant toggle to see them in the grid.
2.3.2 Data Grid Columns (Default View)
The data grid shows the following columns by default. Additional columns can be enabled via the Column Visibility Filter Panel above.
| Column | Description |
|---|---|
| Category | Category display name (clickable → opens edit form) |
| Department | Parent department this category belongs to |
| Category_ID | System-generated category code |
| Remarks | Optional notes |
| Deleted | Hidden/deleted status |
| IsForSale | Whether products in this category are sellable |
| ItemDepartmentId | Linked department ID |
| CreatedBy / CreatedOn | Audit trail |
| ModifiedBy / ModifiedOn | Last modification audit |
| RestrictedTimeStart / End | Selling time restriction window |
2.3.3 Add / Edit Category
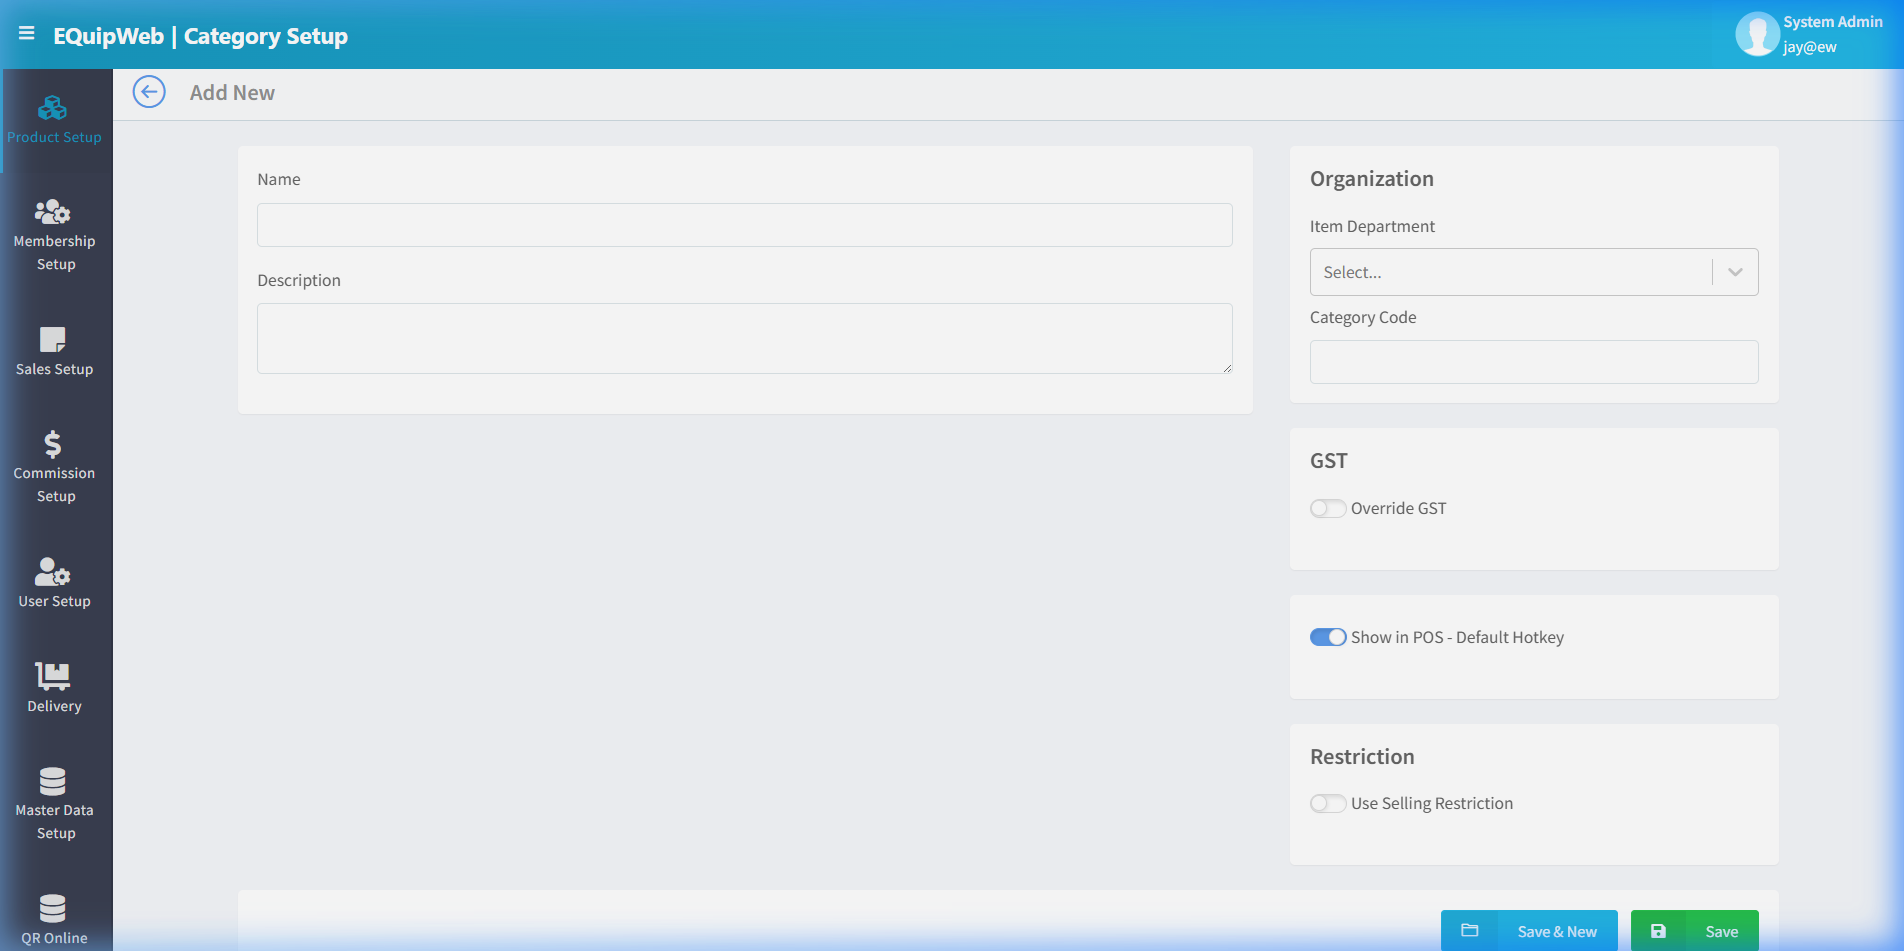
Main Card (Left)
| Field | Type | Required | Description |
|---|---|---|---|
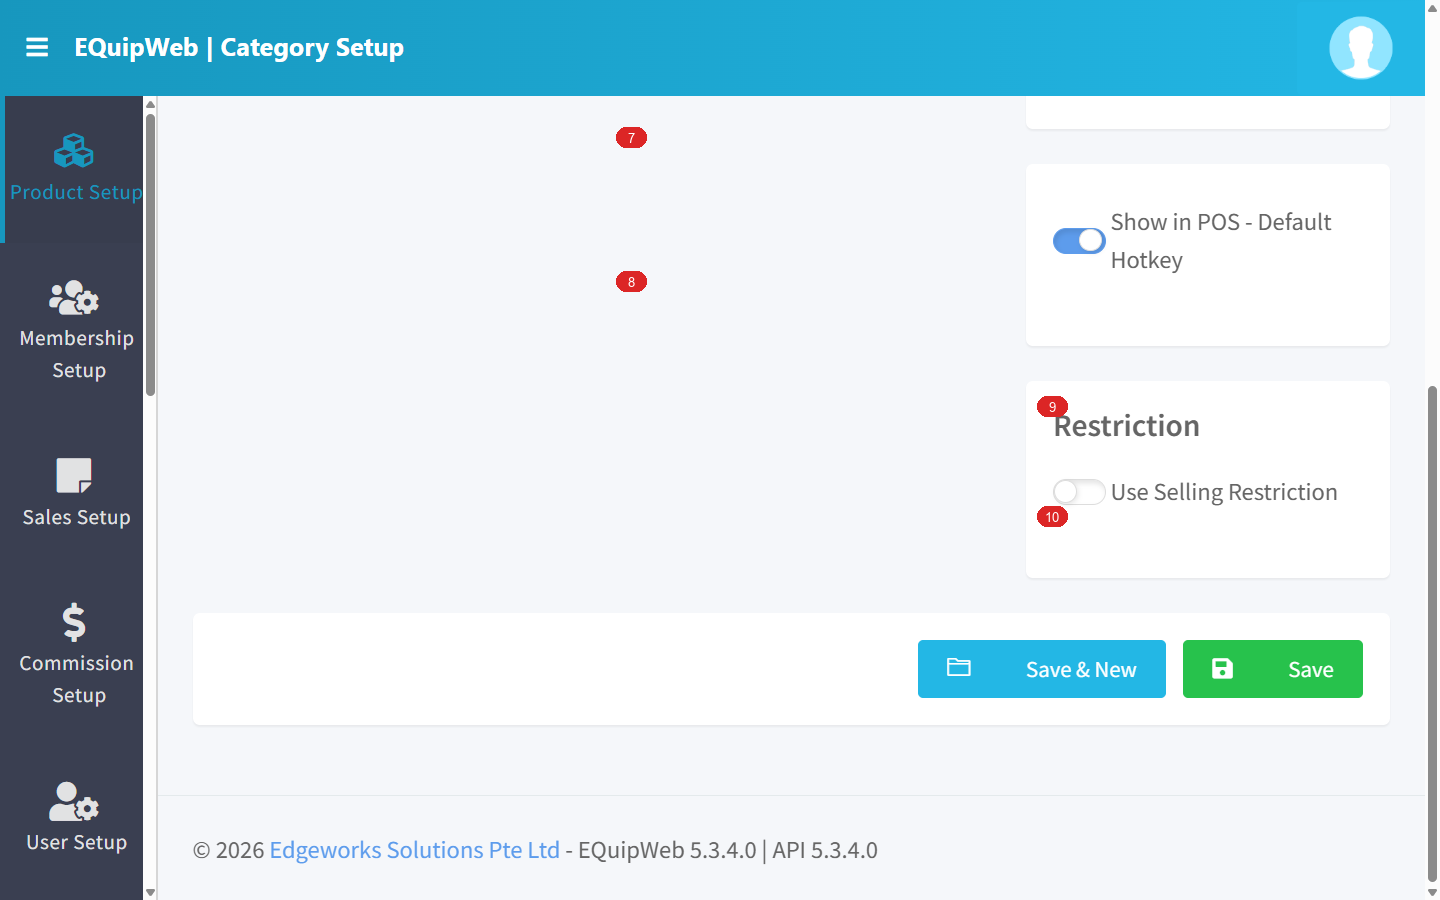
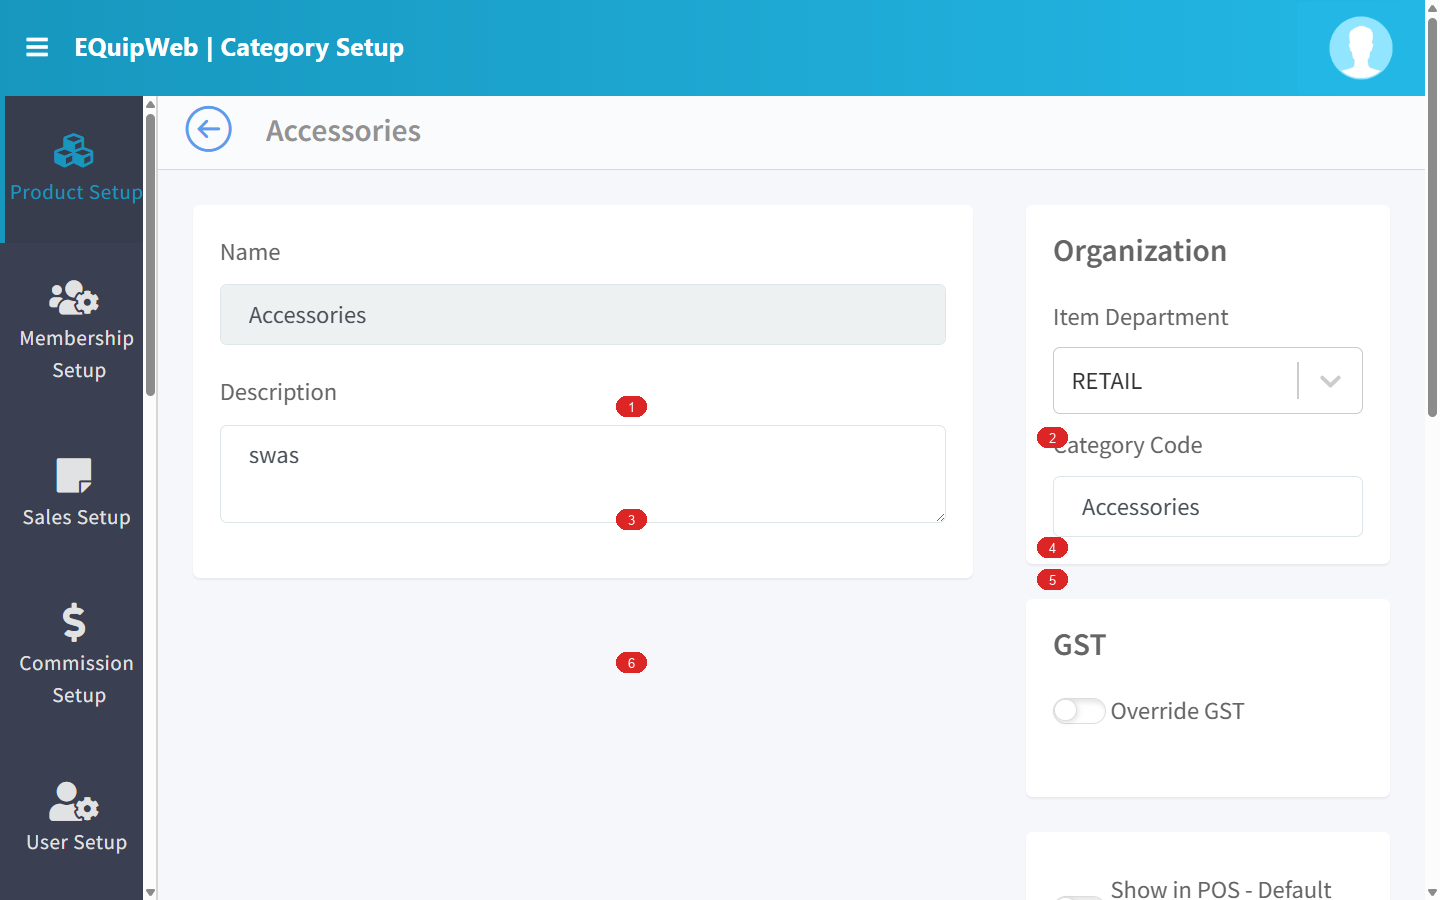
| Name | Text | ✅ Yes | Category display name (e.g., "Action Figures", "Beverages", "Hot Drinks") |
| Description | Textarea | No | Notes or remarks about this category |
Organization Card (Right)
| Field | Type | Required | Description |
|---|---|---|---|
| Item Department | Dropdown | No | Parent department this category belongs to (e.g., "Toys & Games", "Food & Beverage") |
| Category Code | Text | No | Custom category code for internal reference |
GST Card
| Toggle | When ON | When OFF |
|---|---|---|
| Override GST | Allows setting a custom GST percentage for all products in this category, overriding the system-wide GST | Products in this category use the default system GST rate |
POS Display
| Toggle | When ON | When OFF |
|---|---|---|
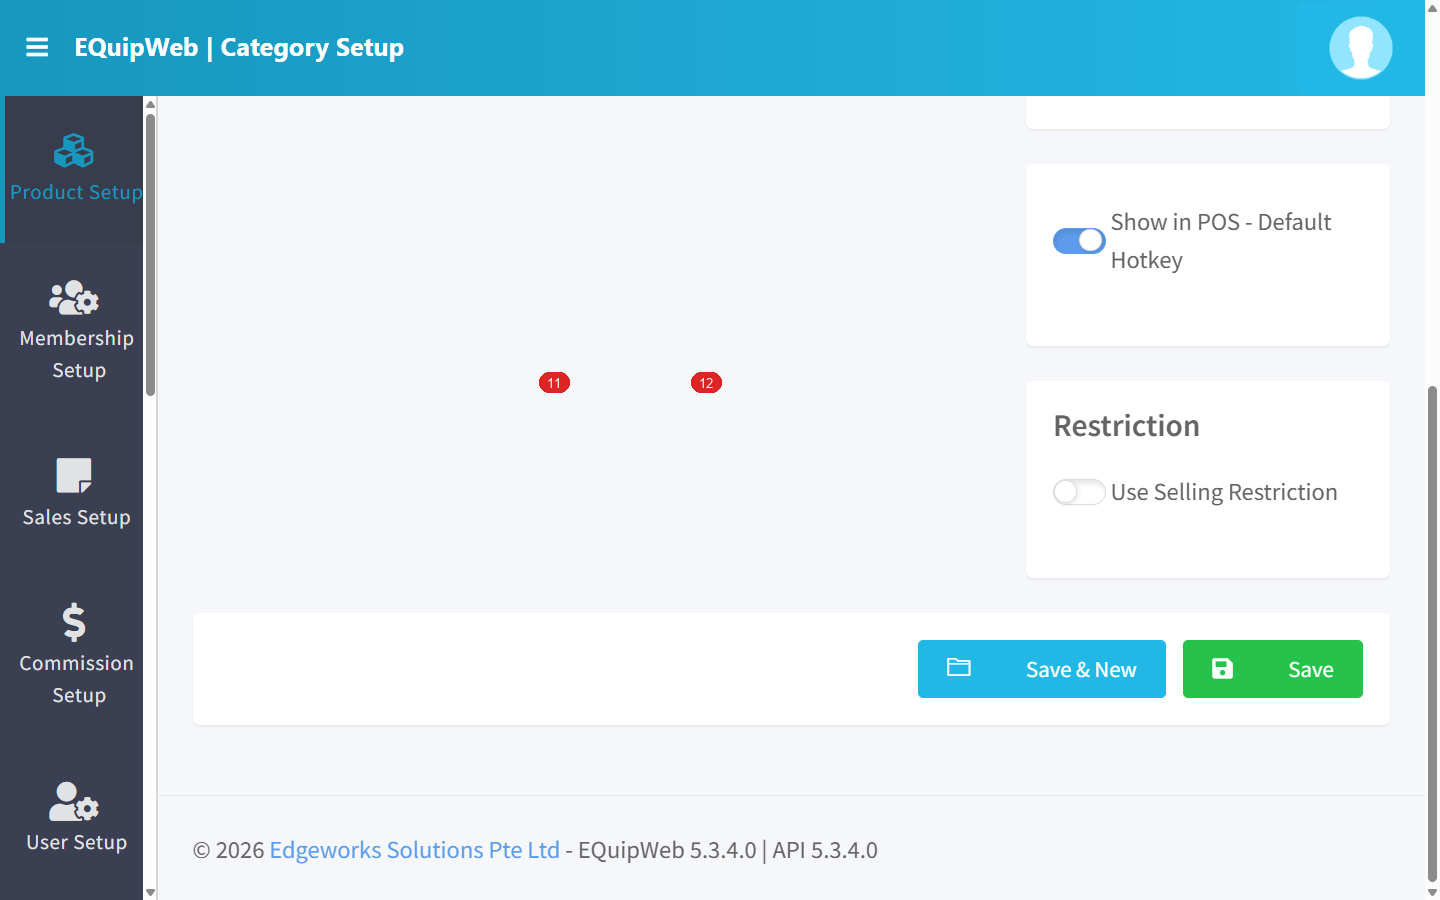
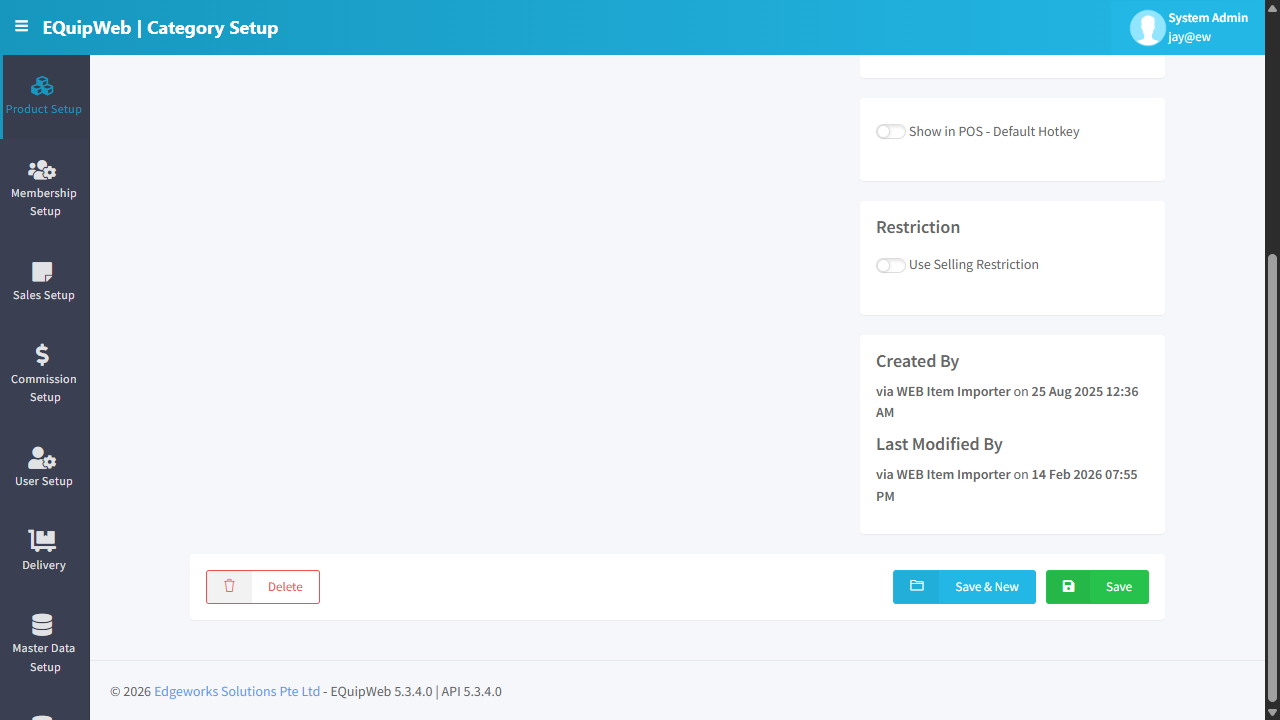
| Show in POS - Default Hotkey | Category appears as a hotkey button on the POS screen for quick product filtering | Category is hidden from POS hotkey display |
Restriction Card
| Toggle | When ON | When OFF |
|---|---|---|
| Use Selling Restriction | Products in this category can only be sold during specified time windows (e.g., lunch menu 11AM–2PM) | No time restriction — products are available for sale at any time |
How to Edit a category
- In the Category Setup page, find the category you want to change.
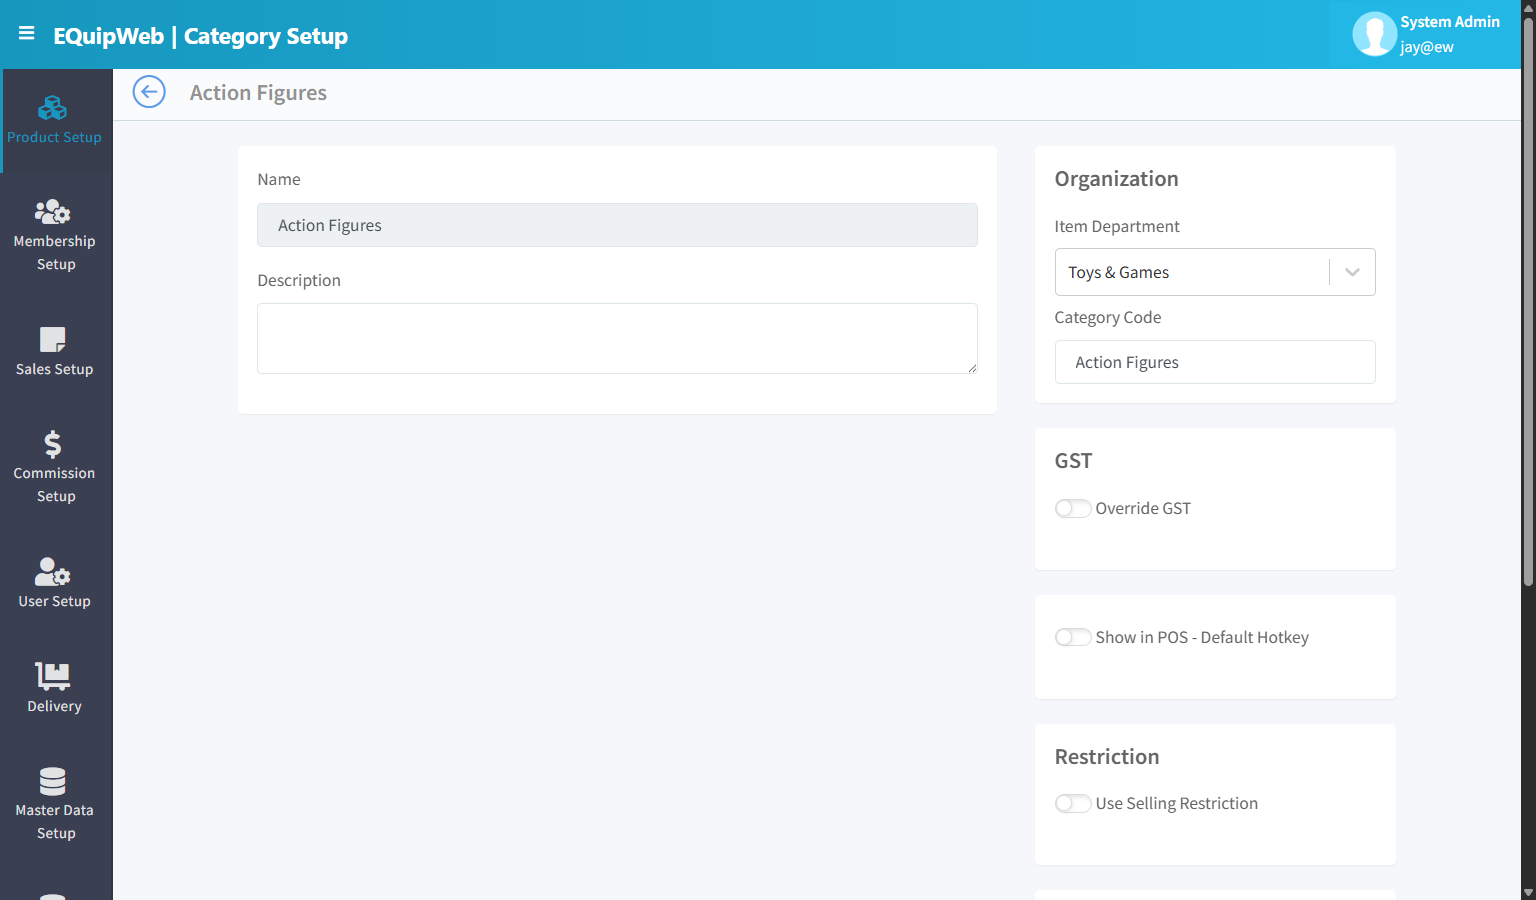
- Click the blue category name link. The edit form opens — it looks the same as the "Add New" form, but all fields are already filled in with the current values.
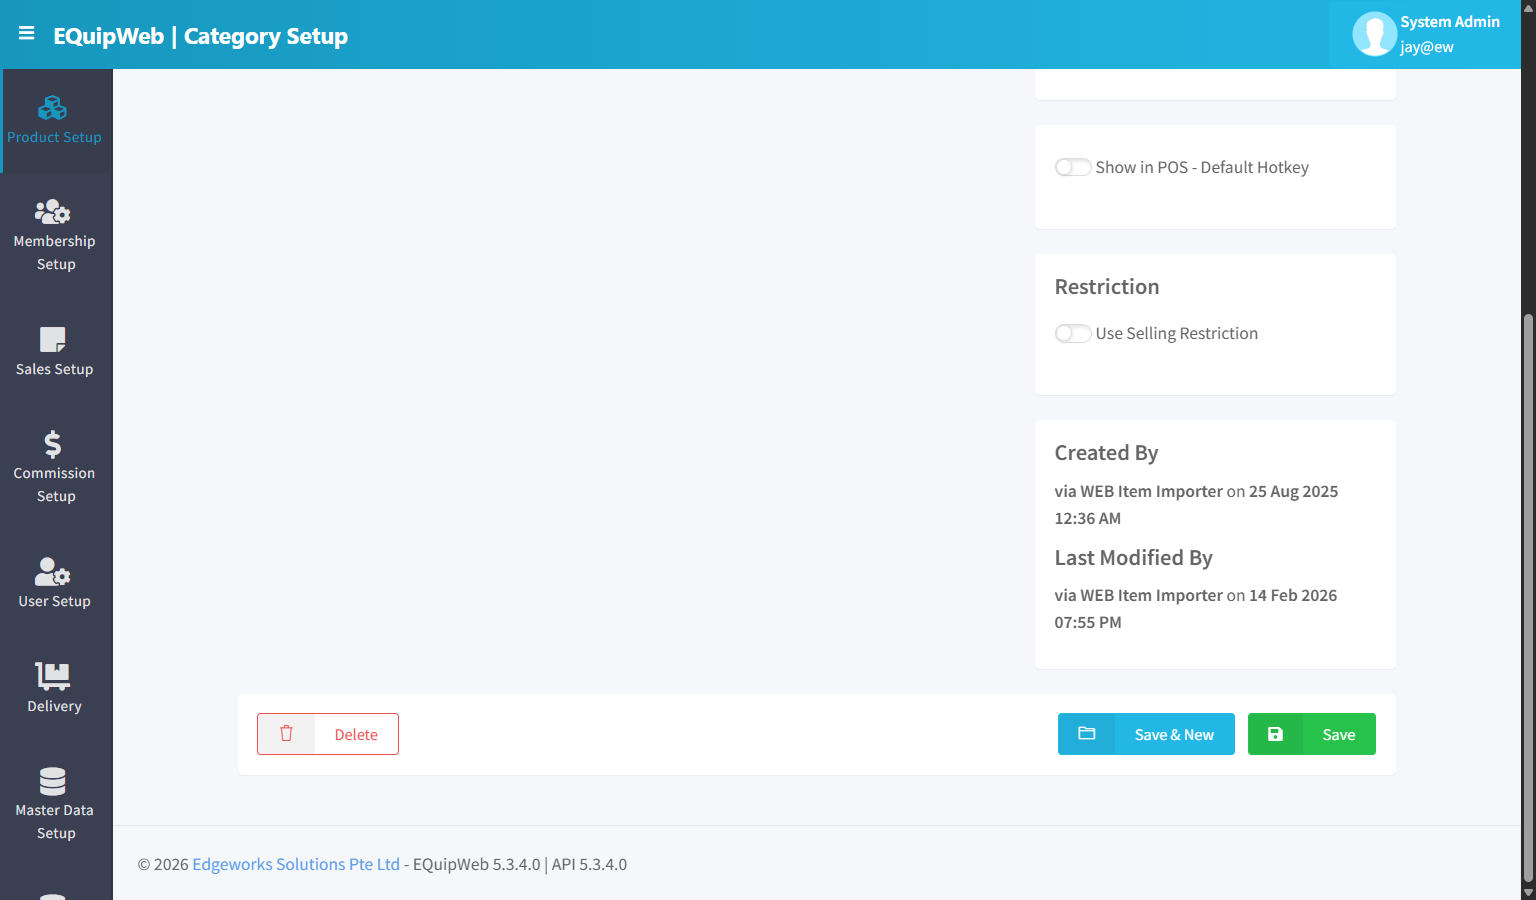
- Change the fields you need to update.
- Click Save to apply your changes.
✅ Expected Result: The category is saved and available for product assignment.
[!TIP] To make changes, just click the name of any category in the list — the same form opens with everything already filled in. Change what you need and click Save.
2.3.3 Category Hierarchy
Categories in EQuip are flat (single-level). There is no parent-child nesting. For hierarchical classification, use the combination of:
- Department → Broad grouping (e.g., "Food & Beverage")
- Category → Specific group within department (e.g., "Hot Drinks", "Cold Drinks")
💡 Example
Scenario: A café needs to organize its menu.
| Department | Category | Products |
|---|---|---|
| Food & Beverage | Hot Drinks | Americano, Latte, Cappuccino |
| Food & Beverage | Cold Drinks | Iced Latte, Frappe, Smoothie |
| Food & Beverage | Pastries | Croissant, Muffin, Danish |
| Retail | Merchandise | Tumblers, Coffee Beans, Gift Cards |
- Create 4 categories: Hot Drinks, Cold Drinks, Pastries, Merchandise
 2. Assign each product to its category during product creation
3. On POS, the cashier sees products organized by these categories
2. Assign each product to its category during product creation
3. On POS, the cashier sees products organized by these categories
[!TIP] Keep category names short and clear — they appear on POS buttons. Use 1-2 words maximum (e.g., "Hot Drinks" instead of "Hot Beverages and Coffee Products").
Access & Permissions
| Role | View | Create | Edit | Delete |
|---|---|---|---|---|
| Admin | Yes | Yes | Yes | Yes |
| Supervisor | Yes | Yes | Yes | No |
| Cashier | No backend access | — | — | — |
[!NOTE] Exact permissions depend on the Privileges Setup configured for each role. Contact your administrator if you cannot access this page.
How to Delete a Category
- Navigate to Category Setup from the sidebar menu.
2. Click the name or code link (blue text) of the record you want to delete.
3. In the edit form, scroll down to the bottom.
4. Click the Delete button (red button).
5. A confirmation dialog appears — click Yes to confirm deletion.
Expected Result: The record is soft-deleted — it is hidden from the active list and POS terminals but can be restored later using the "Show Deleted" filter.
[!WARNING] Records linked to active transactions or other modules cannot be deleted. The system will display an error if deletion is not allowed.
How to Add a New Category
- Navigate to Category Setup from the sidebar menu.
-
Click the + Add New button (green button).
-
Fill in the required fields in the form.
-
Fill in any optional fields as needed.
-
Click Save to create the new category.
✅ Expected Result: The new category appears in the list and is available for use across the system.
FAQ
Q: Why is my product not showing on the POS? A: The POS needs to sync first. Check Terminal Status to see the last sync time. Also verify the product is not deleted and is assigned to the correct outlet.
Q: Can I delete a product that has sales history? A: You can soft-delete it (it will be hidden from active lists and POS), but it cannot be permanently removed because it is linked to transaction records.
Q: How do I update prices for multiple products at once? A: Use the Data Importer > Product Importer to bulk update. Export the current list, modify prices in the spreadsheet, then re-import.
Troubleshooting
| Issue | Possible Cause | Solution |
|---|---|---|
| Cannot save the record | Required fields are empty or invalid | Check all fields marked with * and fill in valid data |
| Record not appearing in POS | POS terminal has not synced yet | Wait for the next sync cycle or manually trigger sync from Terminal Status |
| Cannot delete the record | Record is being used by other modules | Check if the record is linked to active transactions, products, or other settings |
| Changes not taking effect | Browser cache showing old data | Refresh the page (Ctrl+F5) or clear browser cache |
| "Duplicate" error on save | A record with the same name/code already exists | Search the list (including deleted records) for duplicates |
| Page not loading | Session expired or network issue | Log out and log back in. Check your internet connection |
Related Menus
- Category Setup — product categorization
- Department Setup — reporting hierarchy
- Sales Setup > GST Setup — tax rates for products
- Data Importer > Product Importer — bulk product upload
- Sales Setup > Payment Mode — payment methods at POS
Open Questions / Confirmation Needed
[!NOTE] The following items may vary depending on your system version and configuration:
- Exact permission settings depend on your Privileges Setup configuration
- Sync timing to POS terminals depends on network conditions and sync schedule
- Some features may require additional licensing or module activation
- Field behavior may differ between EQuip versions
If you encounter behavior not described in this manual, contact your system administrator or EQuip support team.
Related Articles
Privileges Setup
? Backend — EQuipWebRetail ModeUser Setup Chapter 6: User Setup — 6.4 Privileges Setup Use Setup to manage and configure this feature in your EQuipWeb system. Privileges Setup is the master list of all permissions available in the system. Each ...Feature Setup
? Backend — EQuipWebRetail ModeSetting Setting — 12.5 Feature Setup: Toggle product features, pricing display, and system options Use Feature Setup to turn features on or off across your system. Each feature has a simple toggle switch — flip it ON ...Layout Setup
? Backend — EQuipWebRetail ModeQR Online Ordering Setup Chapter 9: QR Online Ordering — 9.5 Layout Setup Use Layout Setup to customize how your QR ordering page looks — your logo, brand colors, fonts, and images. Make it match your brand so ...Department Setup
? Backend — EQuipWebRetail ModeProduct Setup Chapter 2: Product Setup — 2.4 Department Setup Use Department Setup to create broad groupings for your products — like "Food & Beverage", "Retail", or "Services". Departments sit above categories, giving ...Menu Setup
? Backend — EQuipWebRetail ModeQR Online Ordering Setup Chapter 9: QR Online Ordering — 9.1 Menu Setup Use Menu Setup to create menu presets for your QR ordering system. Each preset is a collection of products grouped and ordered the way you want ...