Feature Setup
Setting — 12.5 Feature Setup: Toggle product features, pricing display, and system options
Use Feature Setup to turn features on or off across your system. Each feature has a simple toggle switch — flip it ON to enable, OFF to disable. Changes take effect on POS terminals after the next sync.
When to use this: When you want to show or hide specific fields on product forms, enable extra price tiers, or toggle commission tracking.
Prerequisites
- No prerequisites — feature toggles are foundational
Feature Setup Overview
📝 General Description
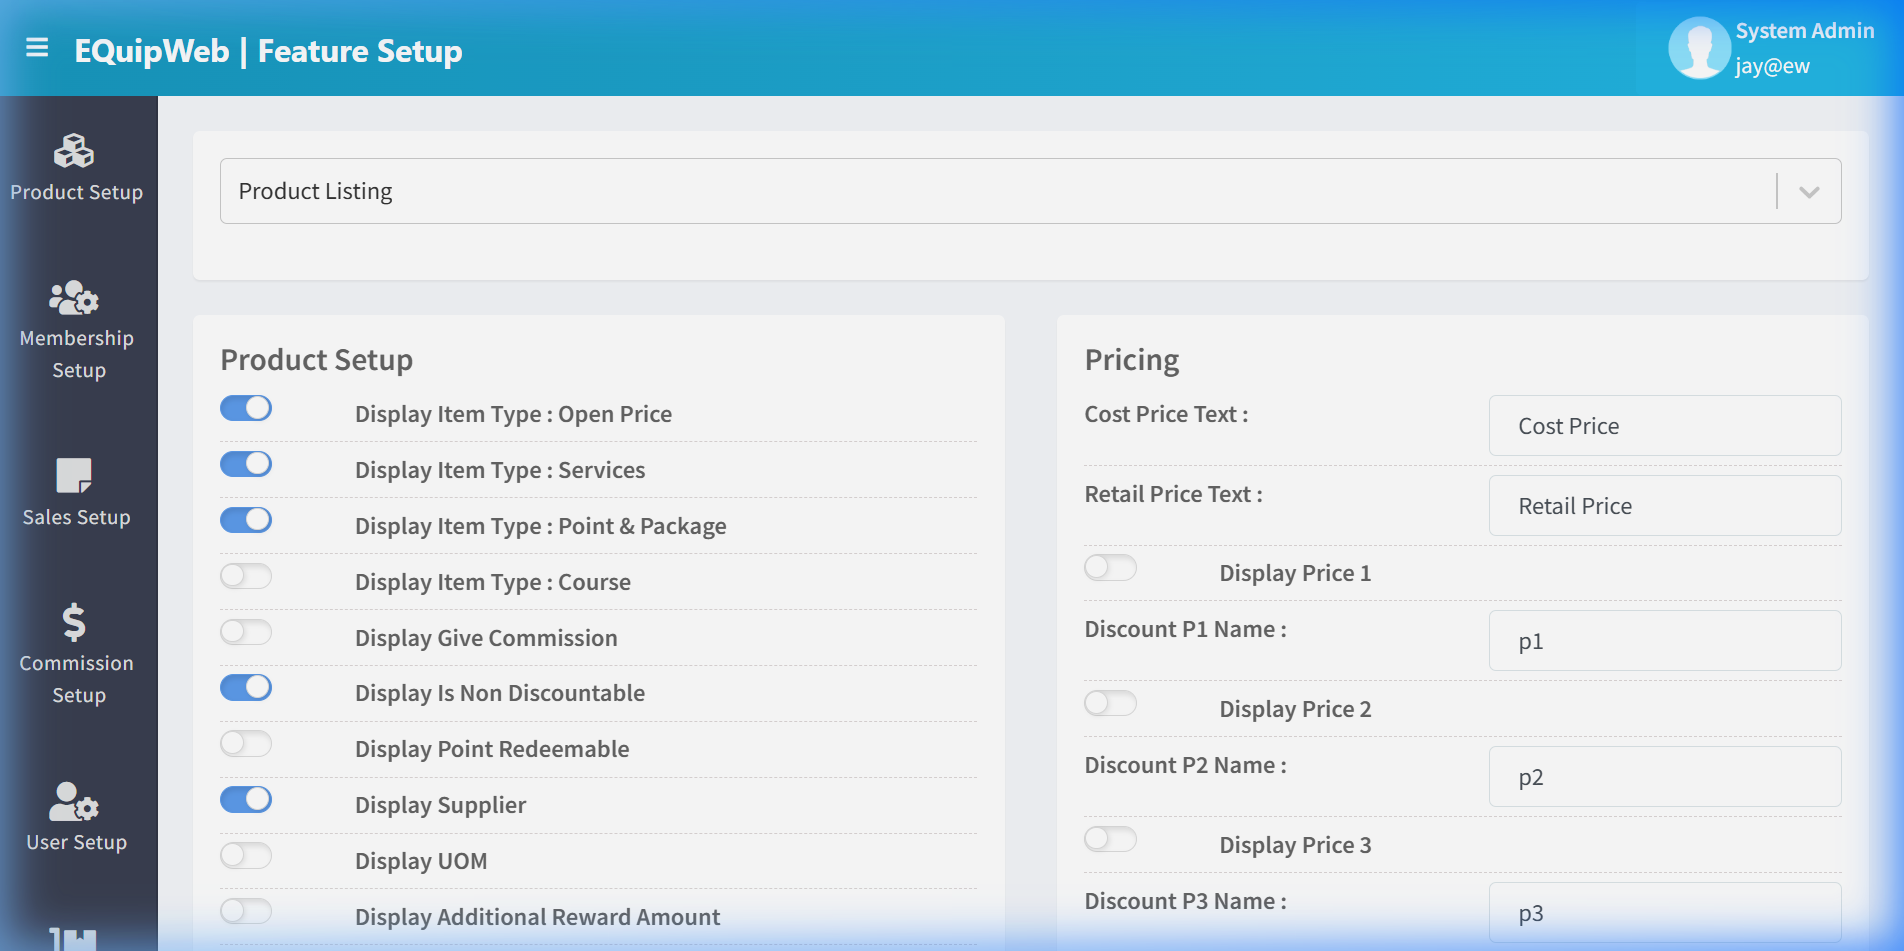
Feature Setup is organized into sections. At the top, a dropdown selector allows you to choose which feature category to configure (e.g., "Product Listing"). Each section contains toggle switches that can be turned ON (blue) or OFF (grey).
Product Setup Toggles
These toggles control which product-type options and fields are visible in the Product Setup module:
| Toggle | Default | Description |
|---|---|---|
| Display Item Type: Open Price | ON | Show "Open Price" as a product type option (price entered at POS) |
| Display Item Type: Services | ON | Show "Services" as a product type option |
| Display Item Type: Point & Package | ON | Show "Point & Package" as a product type option |
| Display Item Type: Course | OFF | Show "Course" as a product type option (for F&B course management) |
| Display Give Commission | OFF | Show the commission toggle on product forms |
| Display Is Non Discountable | ON | Show the "Non Discountable" toggle on product forms |
| Display Point Redeemable | OFF | Show the point redemption toggle on product forms |
| Display Supplier | ON | Show supplier field on product forms |
| Display UOM | OFF | Show Unit of Measurement field on product forms |
| Display Additional Reward Amount | OFF | Show additional reward points field on product forms |
Pricing Toggles
These settings control pricing display and discount configurations:
| Toggle / Field | Default | Description |
|---|---|---|
| Cost Price Text | "Cost Price" | Customize the label for the cost price field |
| Retail Price Text | "Retail Price" | Customize the label for the retail/selling price field |
| Display Price 1 | OFF | Enable a secondary price tier |
| Discount P1 Name | "p1" | Label for discount price 1 |
| Display Price 2 | OFF | Enable a third price tier |
| Discount P2 Name | "p2" | Label for discount price 2 |
| Display Price 3 | OFF | Enable a fourth price tier |
| Discount P3 Name | "p3" | Label for discount price 3 |
How to Update Feature Settings
- Navigate to Setting > Feature Setup.
- Toggle the features you want to enable or disable.
- Click Save to apply your changes.
Expected Result: The feature settings are saved and take effect across the system.
💾 Save Actions
| Button | Function |
|---|---|
| Save | Saves all toggle changes immediately |
[!IMPORTANT] Changes to Feature Setup affect all users across the system. Turning off a feature hides it from the interface but does not delete existing data. For example, disabling "Display Supplier" hides the supplier field but does not remove existing supplier links.
[!TIP] Use the dropdown at the top of the page to switch between different feature categories. Each category has its own set of toggle switches.
Access & Permissions
| Role | View | Create | Edit | Delete |
|---|---|---|---|---|
| Admin | Yes | Yes | Yes | Yes |
| Supervisor | Yes | Yes | Yes | No |
| Cashier | No backend access | — | — | — |
[!NOTE] Exact permissions depend on the Privileges Setup configured for each role. Contact your administrator if you cannot access this page.
Field Reference
| Field | Required | Description |
|---|---|---|
| Name / Title | Yes | The display name for this record |
| Status / Active | — | Whether this record is active in the system |
| Created Date | Auto | System-generated creation timestamp |
| Modified Date | Auto | System-generated last modification timestamp |
[!NOTE] Additional fields specific to this page are documented in the sections above. The table above shows common fields present across most pages.
Business Rules
- Records that are linked to active transactions or other modules cannot be permanently deleted
- Changes made here will take effect on POS terminals after the next sync
- Deleted records can be restored from the list using the Show Deleted filter
- All changes are logged with the user who made them and the timestamp
How to Enable or Disable a Feature
- Navigate to Setting > Feature Setup from the sidebar menu.
- The page shows all available system features organized by category.
- Find the feature you want to toggle using the search or by scrolling.
- Click the toggle switch to enable (ON/blue) or disable (OFF/grey) the feature.
- Click Save to apply the changes.
Expected Result: The feature is enabled or disabled system-wide. Changes take effect on POS terminals after the next sync.
[!WARNING] Disabling critical features (e.g., Membership, Promotions) will immediately affect POS operations after sync. Always verify the impact before disabling.
FAQ
Q: Why are my setting changes not taking effect on POS? A: Settings need to sync to POS terminals. Check Terminal Status for sync timing, or trigger a manual sync.
Q: Can I revert a setting change? A: Yes. Simply toggle the setting back to its previous value and save. Changes take effect after the next POS sync.
Q: Who should configure these settings? A: Most settings should be configured by an administrator. Pages marked as "IT Admin only" (App Command, Webhook) require technical knowledge.
Troubleshooting
| Issue | Possible Cause | Solution |
|---|---|---|
| Setting changes not reflected in POS | POS has not synced since the change | Trigger a manual sync or wait for the next automatic sync |
| Toggle not saving | Page not fully loaded or session expired | Refresh the page and try again. Re-login if needed |
| Cannot access this setting | Insufficient permissions | Contact your administrator to check your role privileges |
| Setting reverts after saving | Conflicting setting in another module | Check related settings pages for overriding configurations |
| Page shows blank or error | Browser compatibility issue | Try a different browser (Chrome recommended) or clear cache |
Related Menus
- Master Data > Company Setup — company information
- User Setup > Privileges Setup — permission configuration
- Master Data > POS Setup — POS terminal settings
Open Questions / Confirmation Needed
[!NOTE] The following items may vary depending on your system version and configuration:
- Exact permission settings depend on your Privileges Setup configuration
- Sync timing to POS terminals depends on network conditions and sync schedule
- Some features may require additional licensing or module activation
- Field behavior may differ between EQuip versions
If you encounter behavior not described in this manual, contact your system administrator or EQuip support team.
Related Articles
Privileges Setup
? Backend — EQuipWebRetail ModeUser Setup Chapter 6: User Setup — 6.4 Privileges Setup Use Setup to manage and configure this feature in your EQuipWeb system. Privileges Setup is the master list of all permissions available in the system. Each ...Role Setup
? Backend — EQuipWebRetail ModeUser Setup Chapter 6: User Setup — 6.2 Role Setup Use Role Setup to create job roles for your team — like "Cashier", "Supervisor", "Manager", or "Admin". Each role determines what a user can see and do in the system. ...User Setup
? Backend — EQuipWebRetail ModeUser Setup Chapter 6: User Setup — 6.1 User List Use List to manage and configure this feature in your EQuipWeb system. The User List shows everyone who has access to your EQuip system — from cashiers to managers. Here ...Currency Setup
? Backend — EQuipWebRetail ModeSales Setup Chapter 4: Sales Setup — 4.8 Currency Setup Use Currency Setup to add the currencies your business accepts. If you only accept one currency (e.g., SGD), it's already set up for you. Multi-currency ...Ordering Setup
? Backend — EQuipWebRetail ModeQR Online Ordering Setup Chapter 9: QR Online Ordering — 9.3 Ordering Setup Use Ordering Setup to turn on QR ordering for each of your outlets and configure how it works — order availability, table numbers, pickup ...