Ordering Setup
Chapter 9: QR Online Ordering — 9.3 Ordering Setup
Use Ordering Setup to turn on QR ordering for each of your outlets and configure how it works — order availability, table numbers, pickup options, and more. Each outlet can have its own settings.
When to use this: When you want to enable or configure QR ordering for an outlet.
Prerequisites
- Online Menu configured
- Outlet Setup completed
Ordering Setup List
📝 General Description
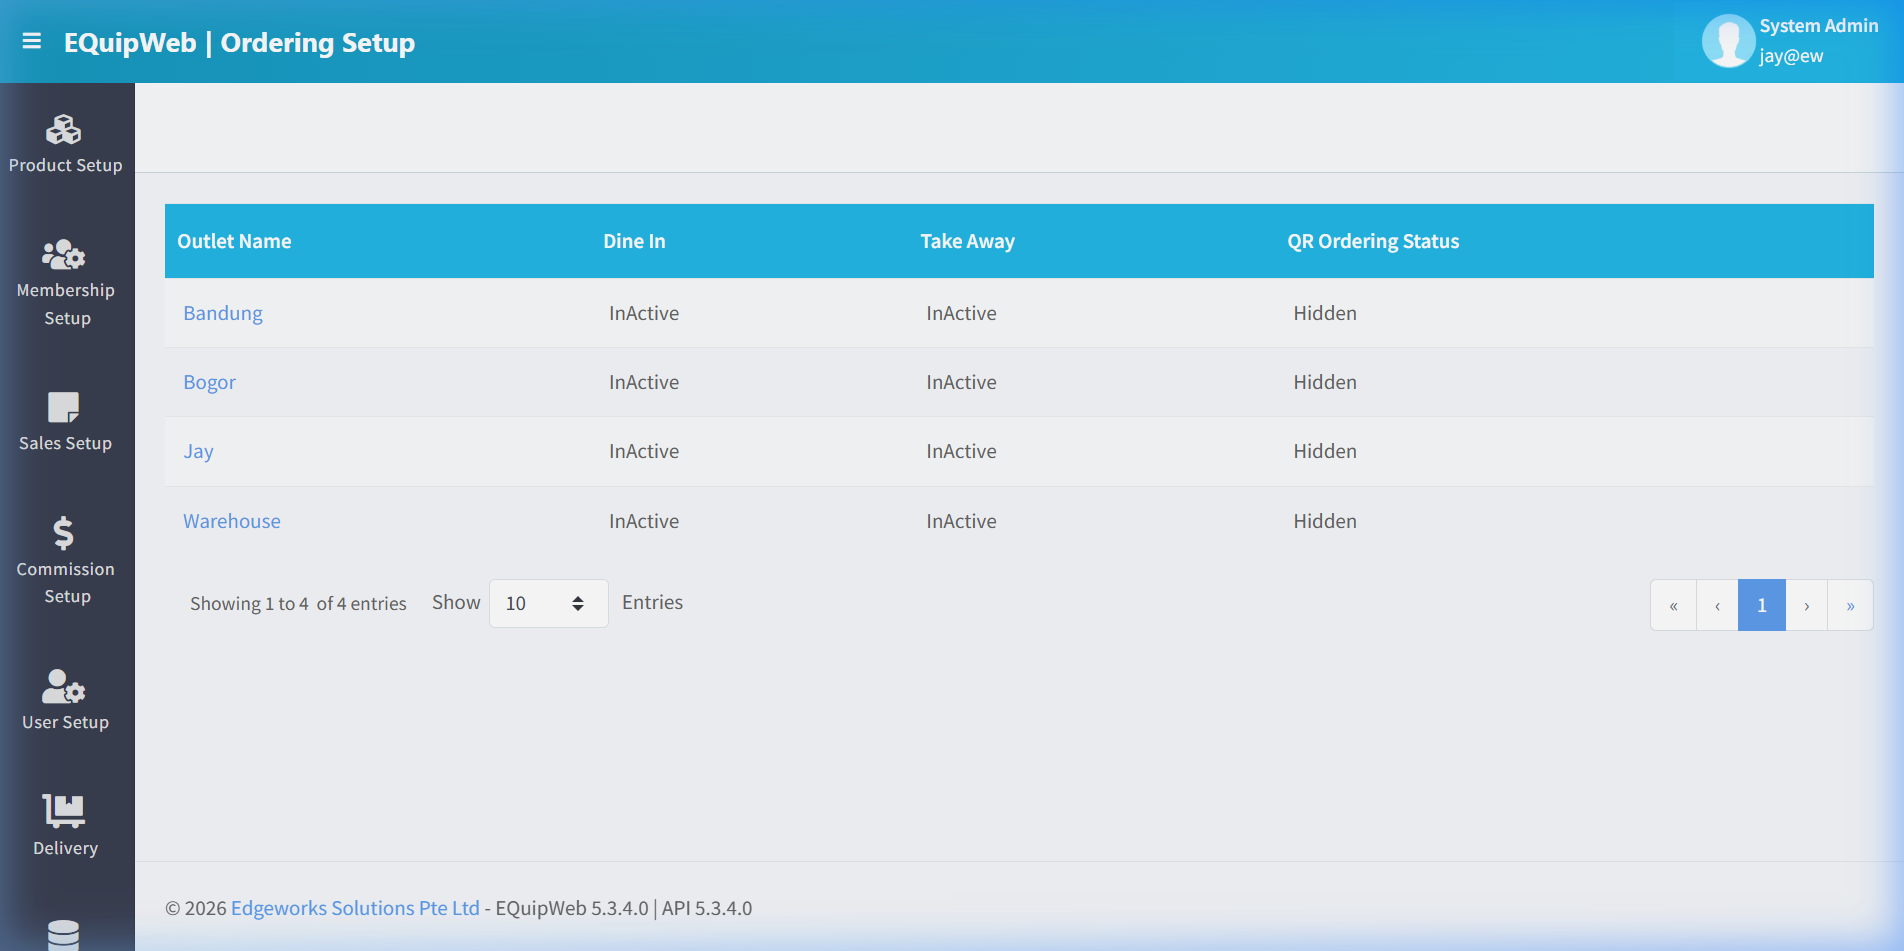
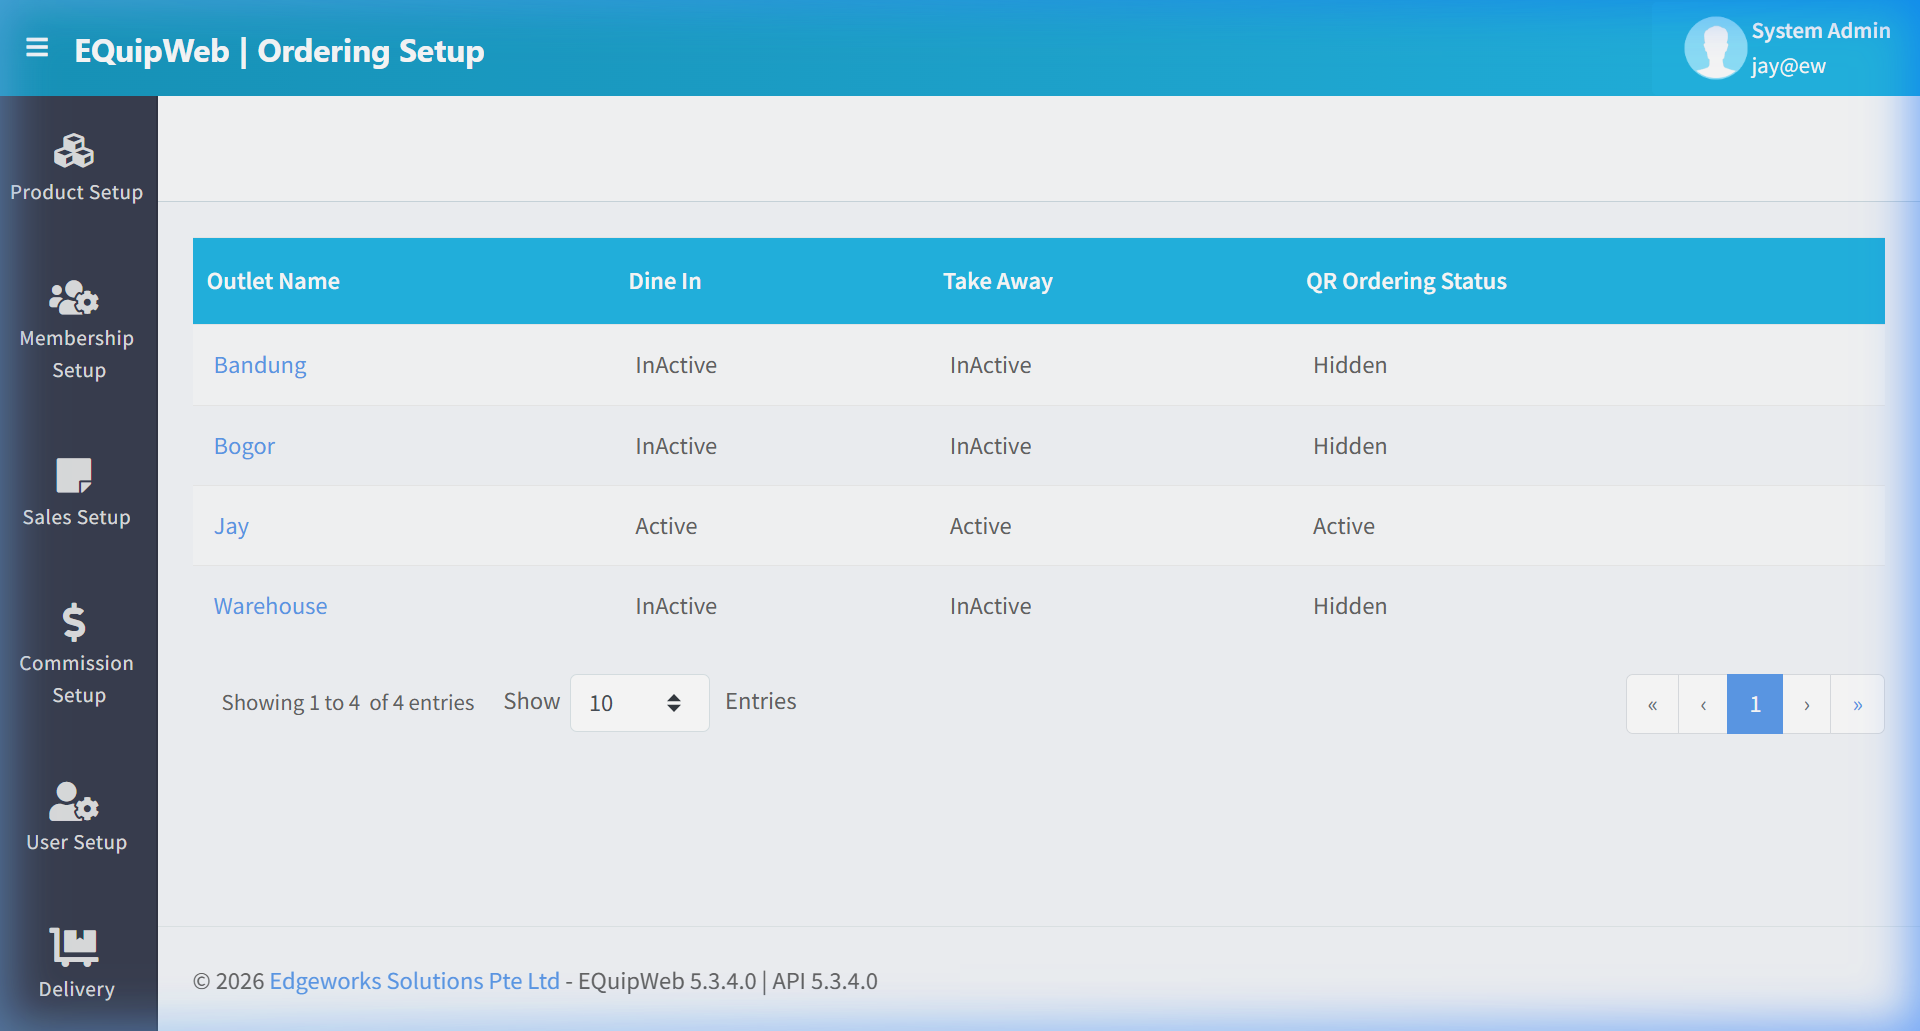
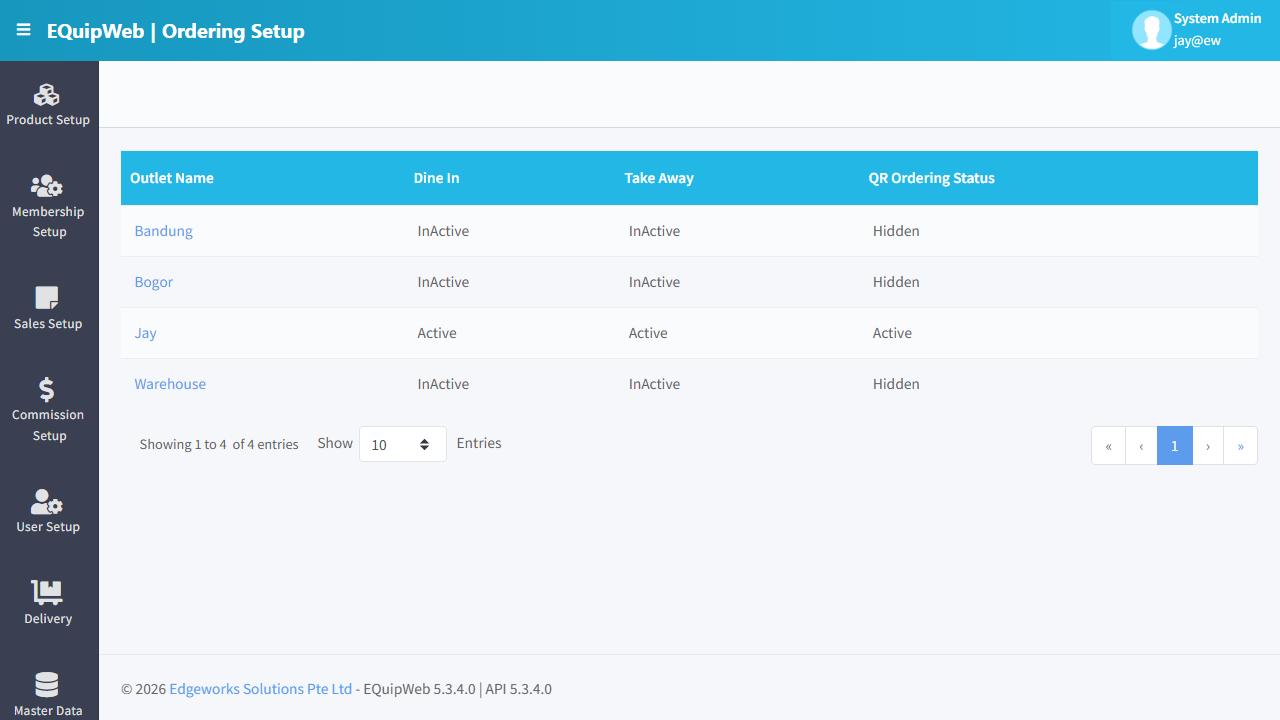
The Ordering Setup list shows all outlets with their current QR ordering configuration. Each row displays the outlet name and its dine-in, takeaway, and QR ordering status. Click on an outlet name to configure its ordering settings.
⚙️ UI Elements
| Element | Type | Function |
|---|---|---|
| Outlet Name | Link | Click to open the outlet's ordering configuration form |
9.3.1 Data Grid Columns
| Column | Description |
|---|---|
| Outlet Name | Outlet name (clickable → opens ordering setup form) |
| Dine In | Whether dine-in QR ordering is enabled for this outlet |
| Take Away | Whether takeaway QR ordering is enabled for this outlet |
| QR Ordering Status | Current ordering availability status (Active / InActive / Hidden) |
9.3.2 Outlet Ordering Configuration Form
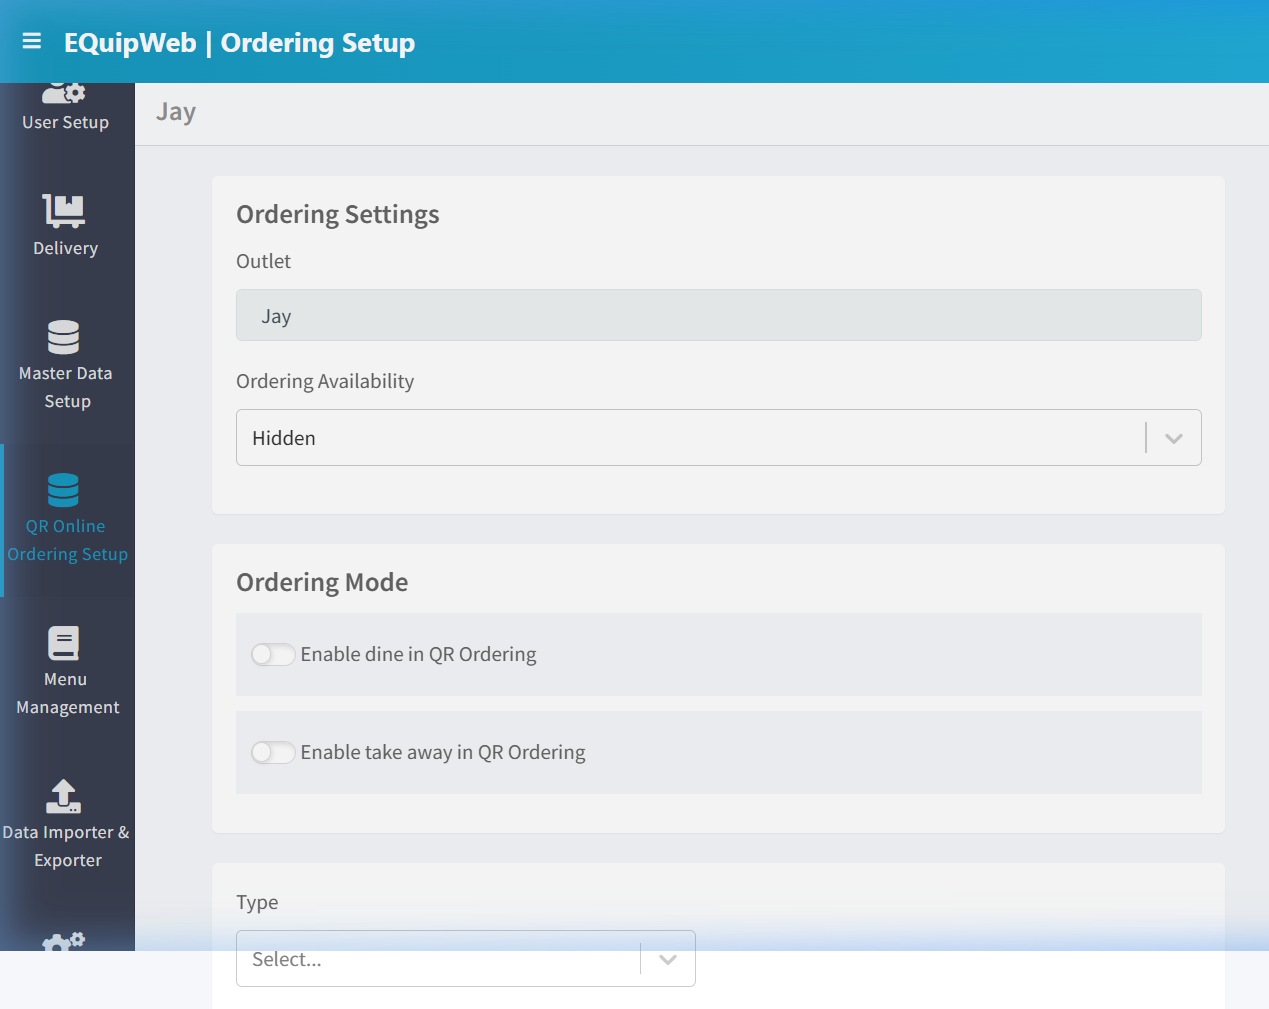
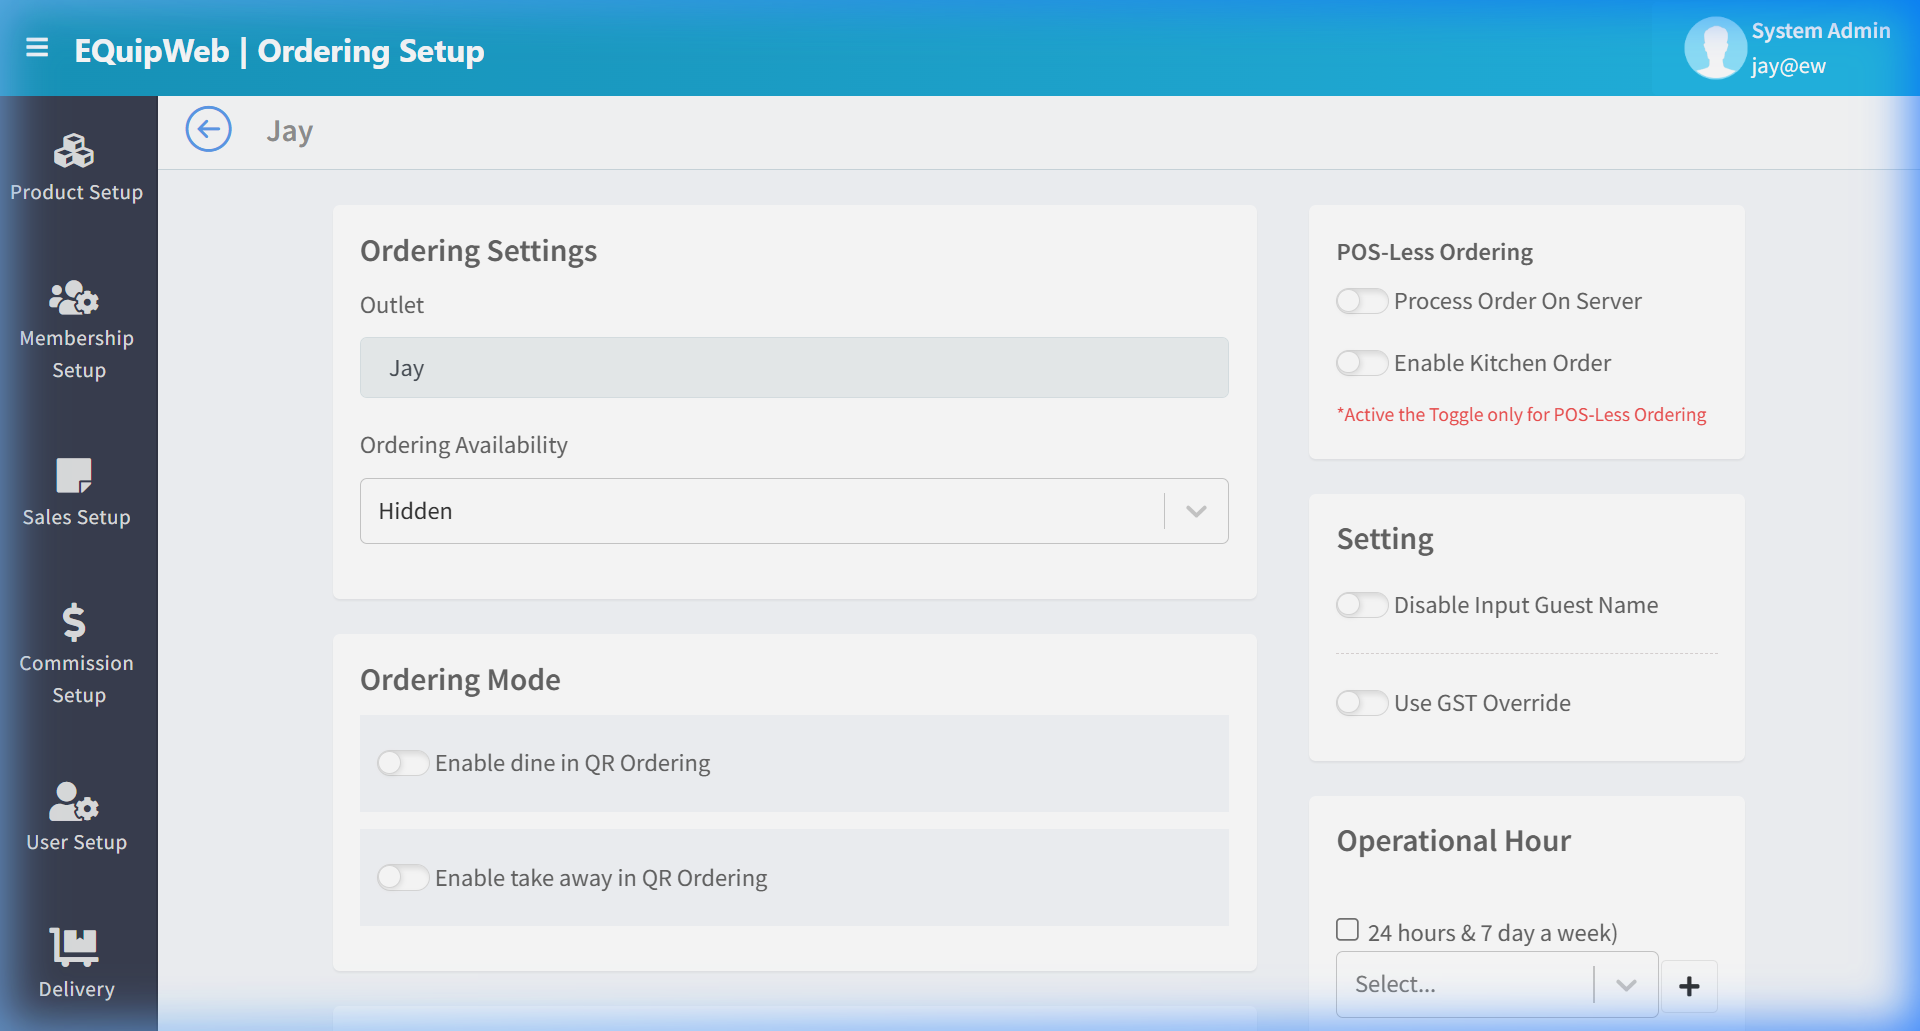
Clicking on an outlet name opens the configuration form with the following sections:
Ordering Settings
| Field | Type | Description |
|---|---|---|
| Outlet | Text (read-only) | The outlet being configured (e.g., "Jay") |
| Ordering Availability | Dropdown | Controls the ordering page visibility: Active (live for customers), InActive (disabled), or Hidden (URL exists but not visible) |
Ordering Mode
| Toggle | When ON | When OFF |
|---|---|---|
| Enable dine in in QR Ordering | Customers can place dine-in orders via QR code | Dine-in option is hidden from the ordering page |
| Enable take away in QR Ordering | Customers can place takeaway orders via QR code | Takeaway option is hidden from the ordering page |
Order Type
| Field | Type | Description |
|---|---|---|
| Type | Dropdown | Select the order processing type for this outlet |
9.3.3 How to Enable QR Ordering for an Outlet
- Navigate to QR Online Ordering Setup → Ordering Setup.
 2. Click on the outlet name (e.g., "Jay").
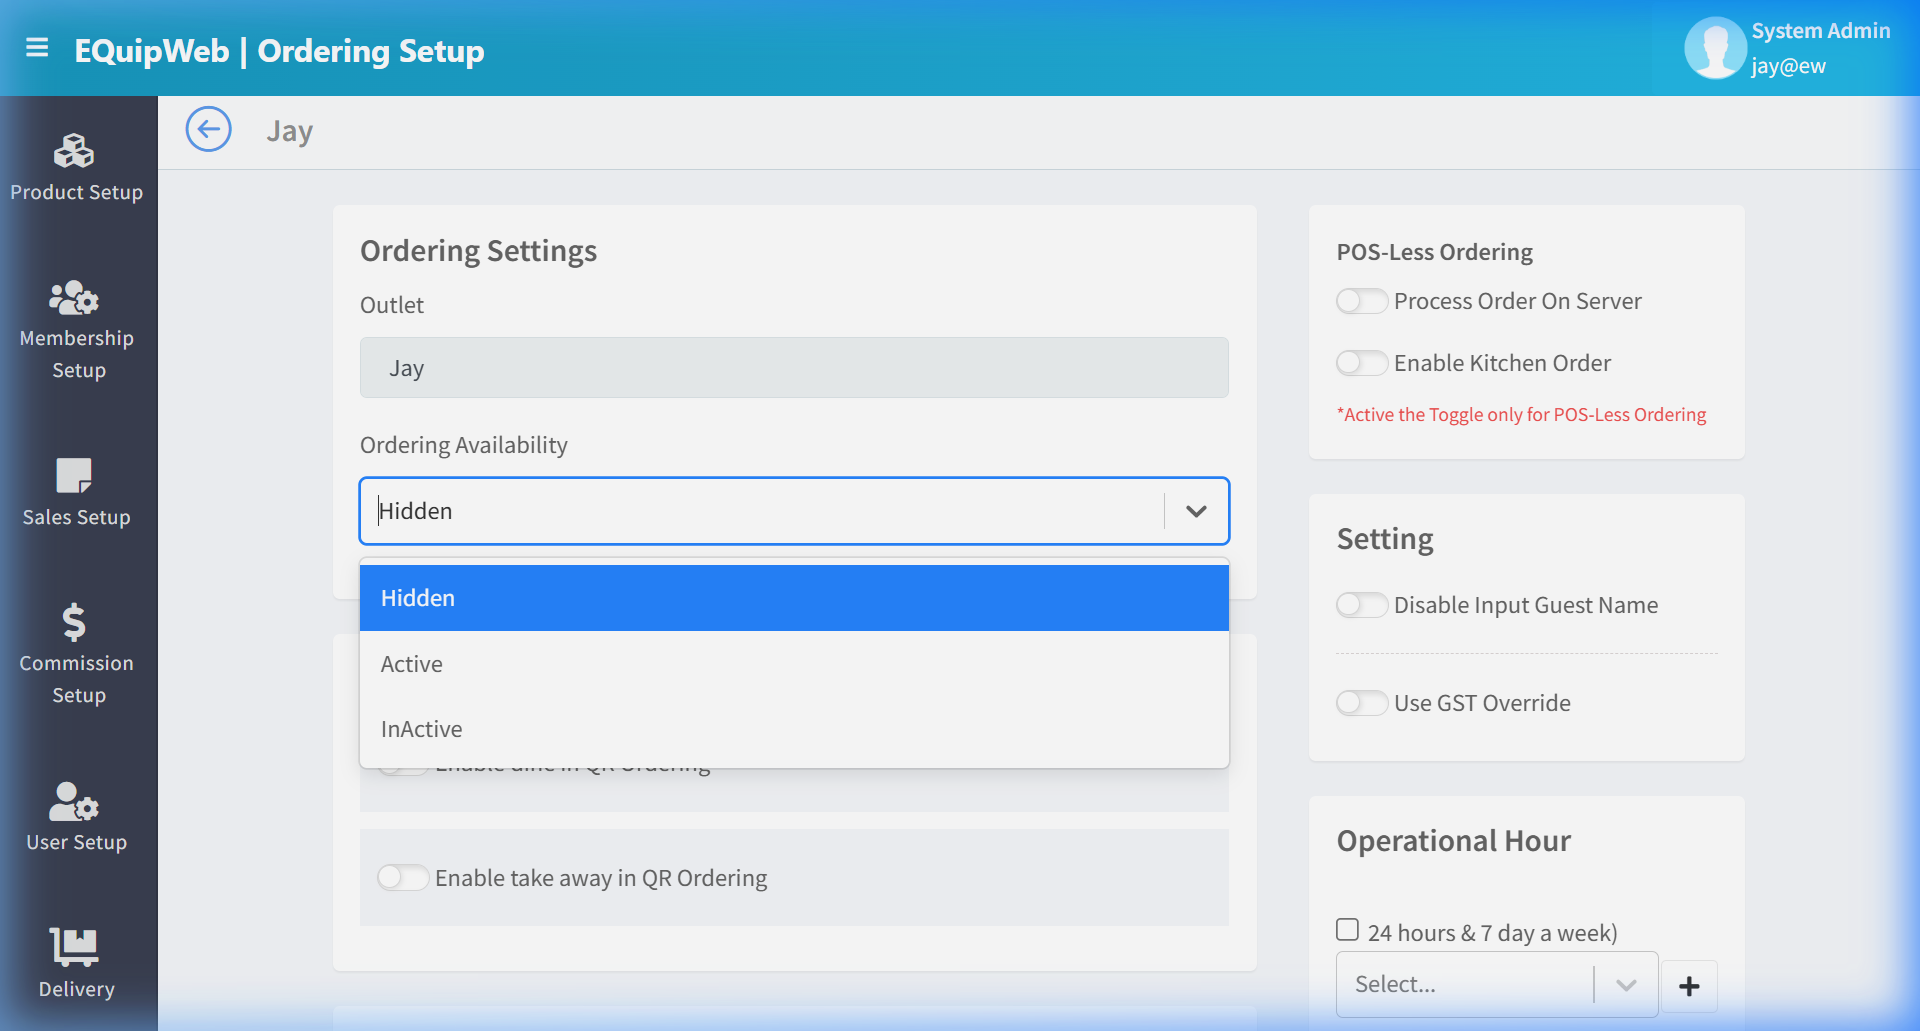 3. Set Ordering Availability → Active.
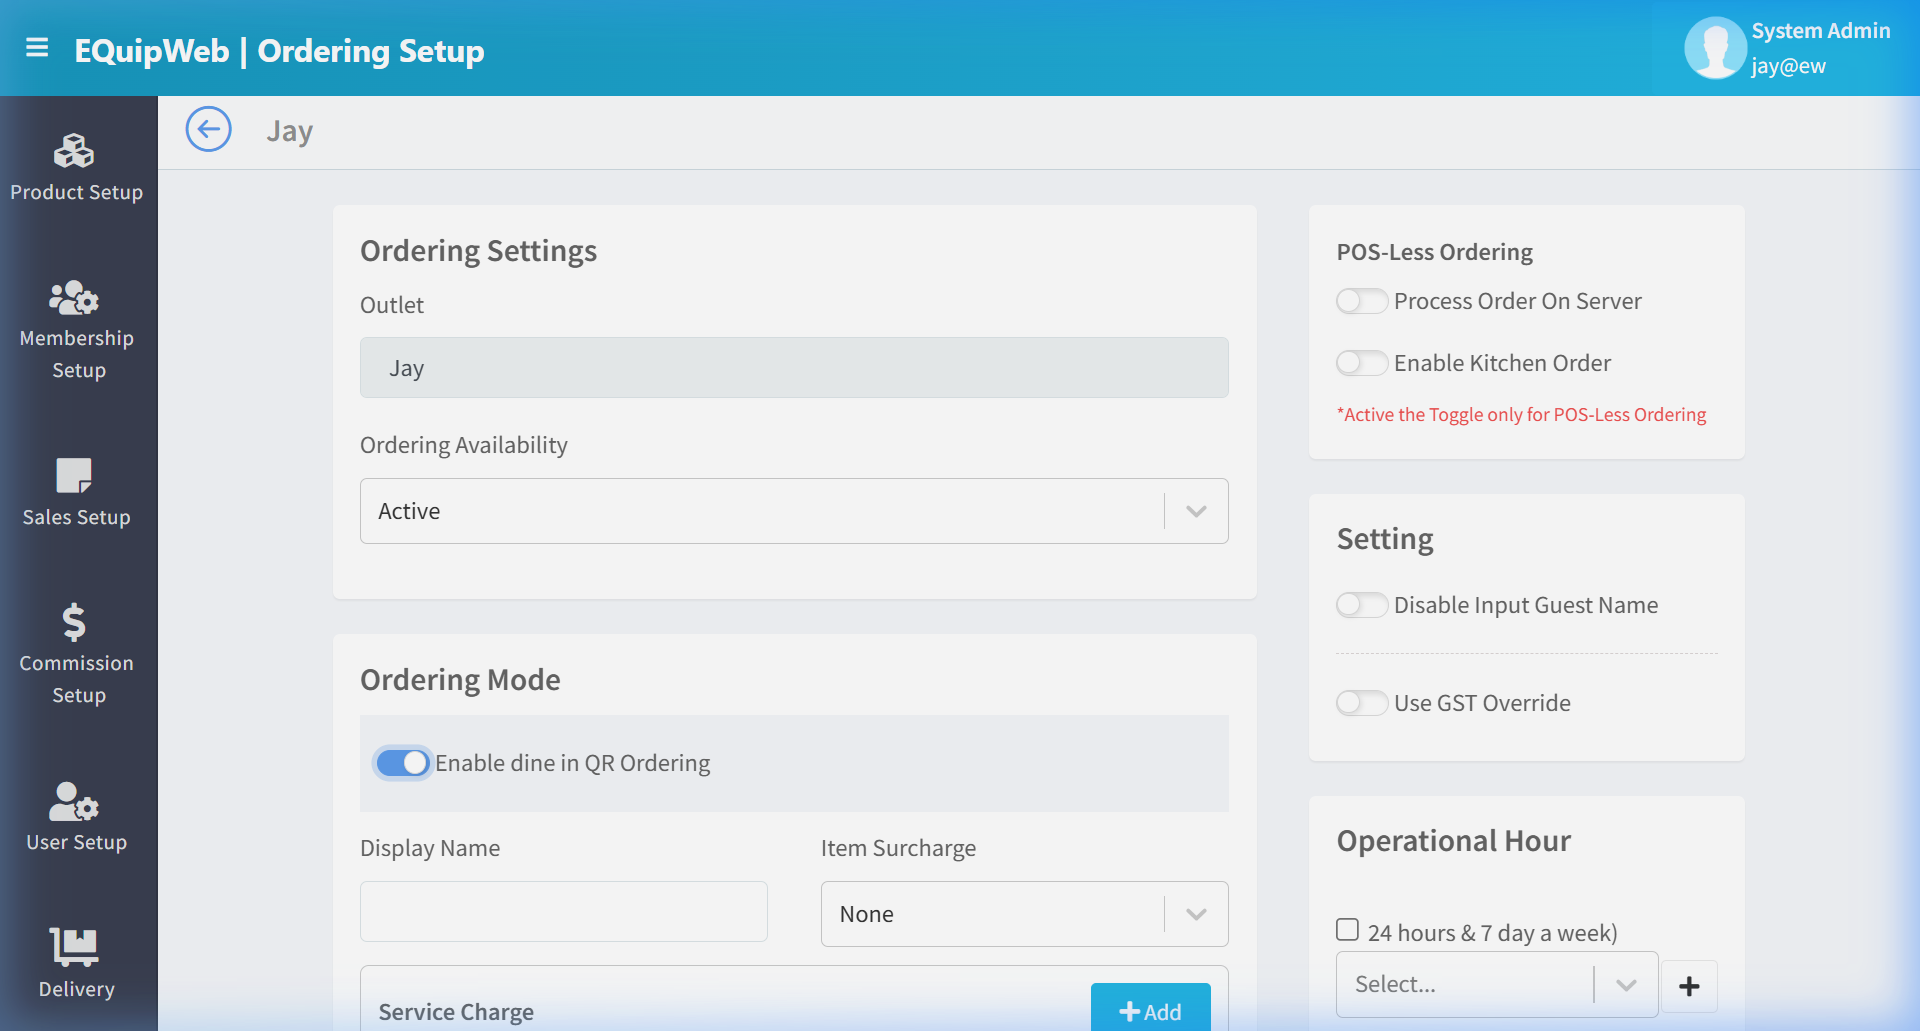 4. Toggle Enable dine in in QR Ordering → ON (if offering dine-in).
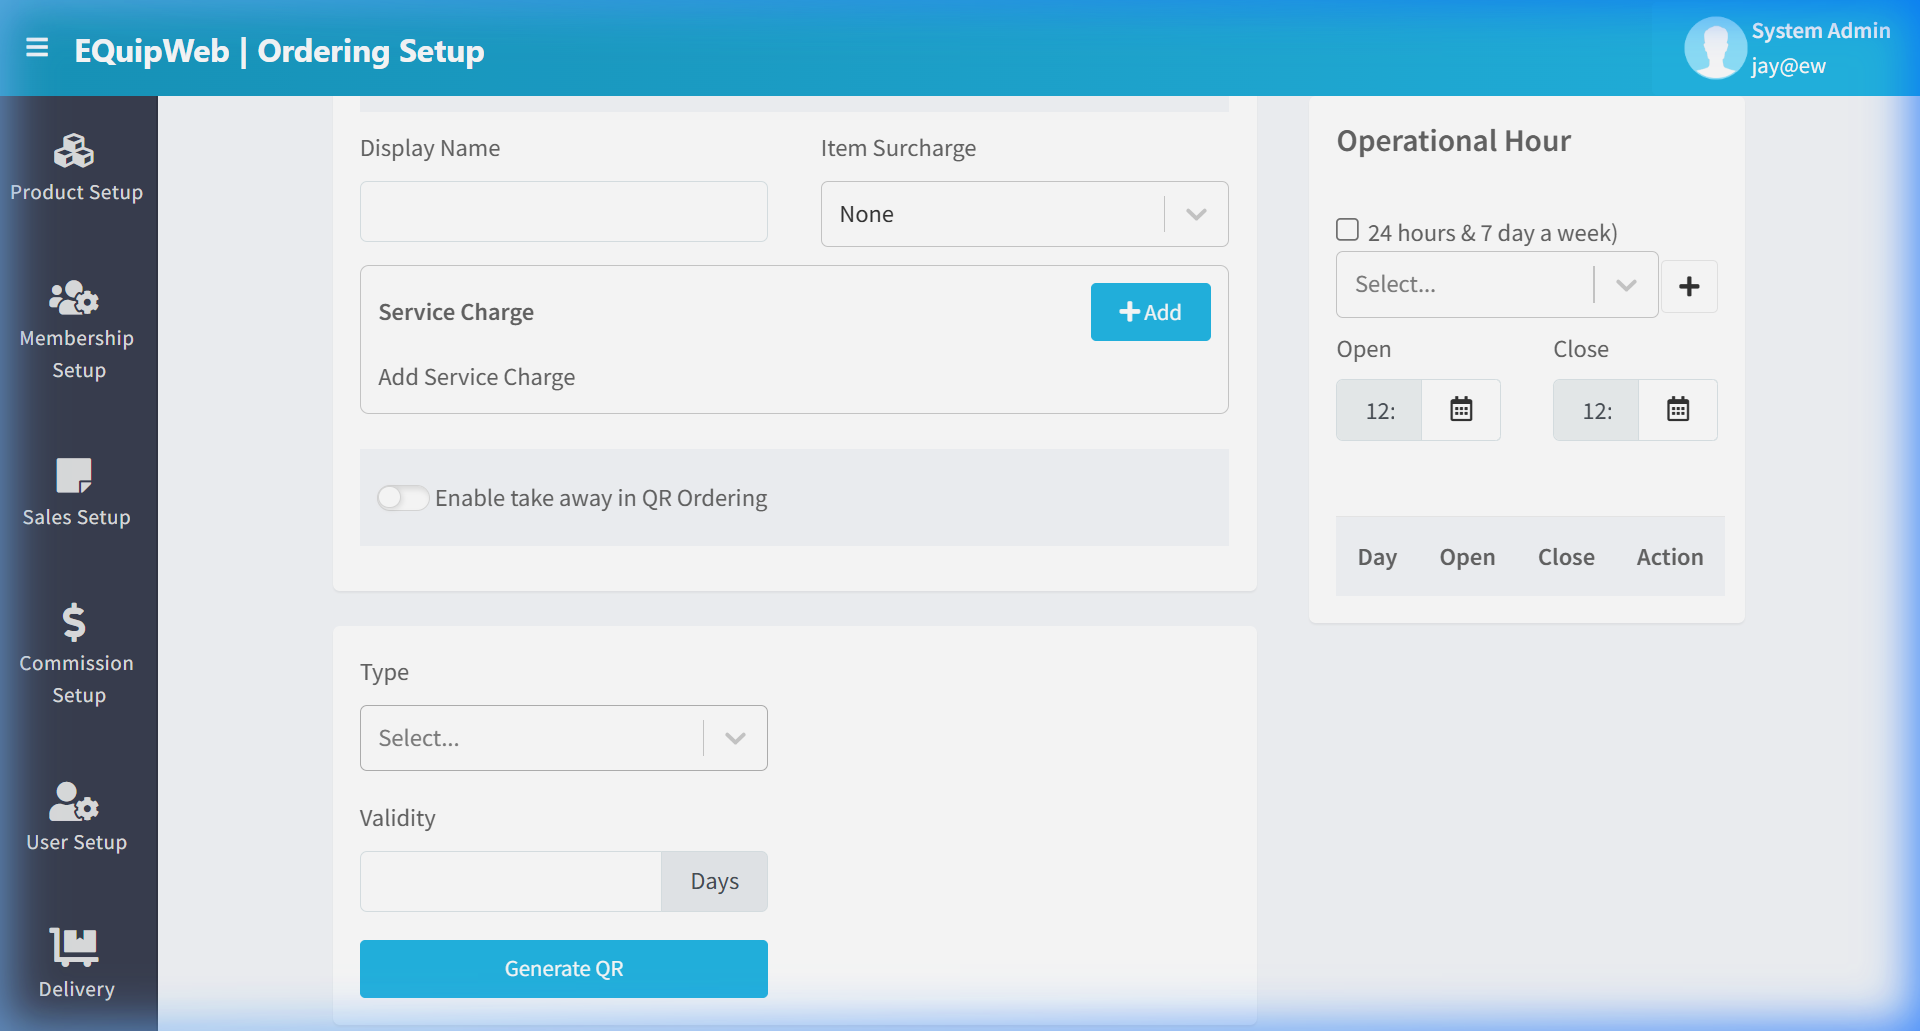 5. Toggle Enable take away in QR Ordering → ON (if offering takeaway).
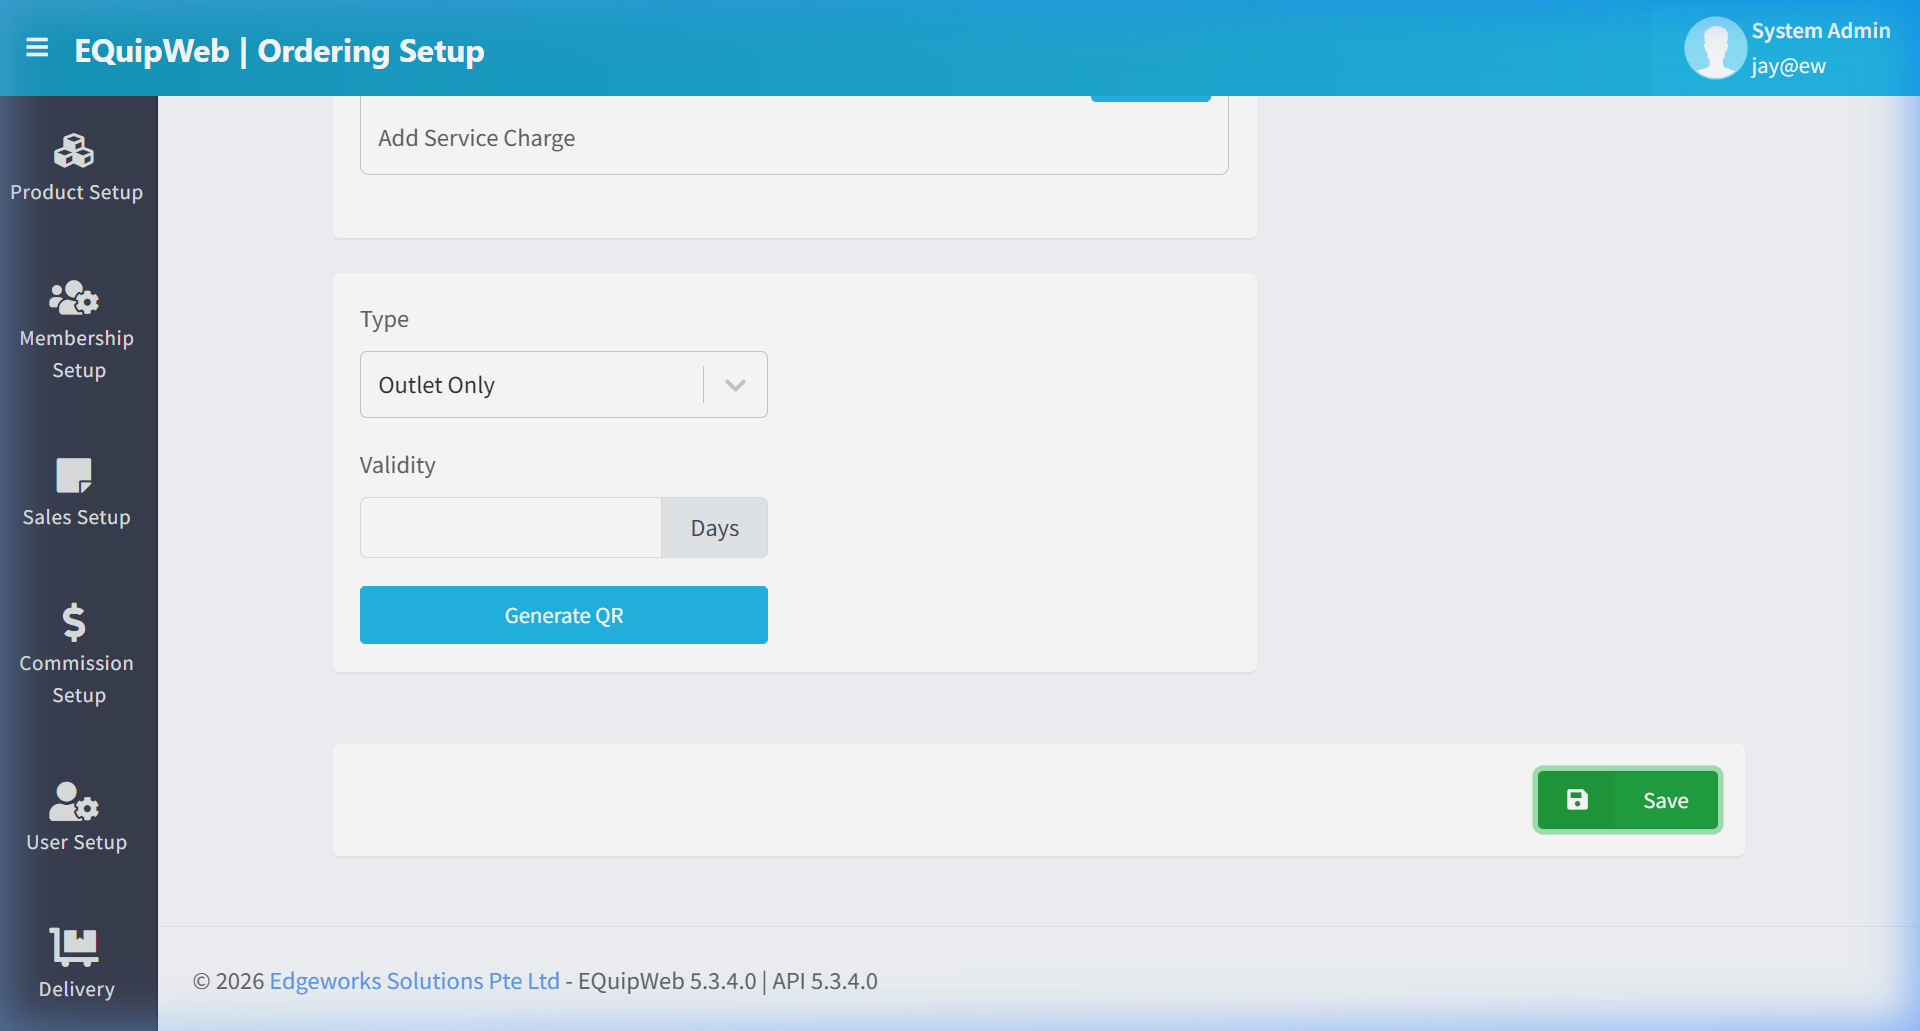 6. Select the appropriate Type from the dropdown.
 7. Click Save.
Expected Result: The ordering settings are saved.
9.3.4 How to Temporarily Disable QR Ordering
- Click on the outlet name.
2. Set Ordering Availability → InActive or Hidden.
3. Click Save.
4. Customers scanning the QR code will see an unavailability message.
9.3.5 Ordering Availability Options
| Status | Customer Experience |
|---|---|
| Active | QR ordering page is live — customers can browse menu and place orders |
| InActive | QR ordering is disabled — customers see an "ordering is not available" message |
| Hidden | QR ordering page URL exists but is not publicly discoverable (useful for testing) |
💡 Example
Scenario: A restaurant chain has 4 outlets. They want to enable QR ordering only for the main branch (Jay) with dine-in and takeaway, while keeping other branches inactive.
Setup:
- Click outlet Jay → Ordering Availability: Active, Dine In: ON, Take Away: ON → Save.
2. Click outlet Bandung → Ordering Availability: InActive → Save.
3. Click outlet Bogor → Ordering Availability: InActive → Save.
4. Click outlet Warehouse → Ordering Availability: Hidden → Save.
[!TIP] Use Hidden status when testing QR ordering before going live. The page works but won't appear in public listings.
[!IMPORTANT] Both the Ordering Availability and the individual dine-in / take away toggles must be configured. Setting availability to Active but leaving both mode toggles OFF means the ordering page loads but customers cannot place any orders.
Access & Permissions
| Role | View | Create | Edit | Delete |
|---|---|---|---|---|
| Admin | Yes | Yes | Yes | Yes |
| Supervisor | Yes | Yes | Yes | No |
| Cashier | No backend access | — | — | — |
[!NOTE] Exact permissions depend on the Privileges Setup configured for each role. Contact your administrator if you cannot access this page.
Business Rules
- Records that are linked to active transactions or other modules cannot be permanently deleted
- Changes made here will take effect on POS terminals after the next sync
- Deleted records can be restored from the list using the Show Deleted filter
- All changes are logged with the user who made them and the timestamp
How to Edit Ordering Setup
- Navigate to Ordering Setup from the sidebar menu.
- The current settings are displayed on the page.
- Modify the fields you want to change.
- Click Save to apply your changes.
Expected Result: Settings are updated immediately. Changes sync to POS terminals on the next data refresh.
FAQ
Q: Why is the QR menu not updating for customers? A: Changes to the online menu require a save and may take a few minutes to propagate. Clear the browser cache if testing.
Q: Can I have different menus for different outlets? A: Yes. Each outlet can have its own menu configuration in Menu Setup.
Q: How do I temporarily disable QR ordering? A: Toggle the ordering feature off in Ordering Setup for the specific outlet.
Troubleshooting
| Issue | Possible Cause | Solution |
|---|---|---|
| Cannot save the record | Required fields are empty or invalid | Check all fields marked with * and fill in valid data |
| Record not appearing in POS | POS terminal has not synced yet | Wait for the next sync cycle or manually trigger sync from Terminal Status |
| Cannot delete the record | Record is being used by other modules | Check if the record is linked to active transactions, products, or other settings |
| Changes not taking effect | Browser cache showing old data | Refresh the page (Ctrl+F5) or clear browser cache |
| "Duplicate" error on save | A record with the same name/code already exists | Search the list (including deleted records) for duplicates |
| Page not loading | Session expired or network issue | Log out and log back in. Check your internet connection |
Related Menus
- Product Setup > Product List — menu item source
- Sales Setup > Payment Gateway — online payment setup
- Master Data > Outlet Setup — outlet-specific QR settings
- Menu Management > Menu Builder — kitchen display integration
Open Questions / Confirmation Needed
[!NOTE] The following items may vary depending on your system version and configuration:
- Exact permission settings depend on your Privileges Setup configuration
- Sync timing to POS terminals depends on network conditions and sync schedule
- Some features may require additional licensing or module activation
- Field behavior may differ between EQuip versions
If you encounter behavior not described in this manual, contact your system administrator or EQuip support team.
Related Articles
Layout Setup
? Backend — EQuipWebRetail ModeQR Online Ordering Setup Chapter 9: QR Online Ordering — 9.5 Layout Setup Use Layout Setup to customize how your QR ordering page looks — your logo, brand colors, fonts, and images. Make it match your brand so ...Company Setup
? Backend — EQuipWebRetail ModeMaster Data Setup Chapter 8: Master Data Setup — 8.9 Company Setup Use Company Setup (under Master Data) to enter your company's official business details — company name, registration number, address, and contact ...Privileges Setup
? Backend — EQuipWebRetail ModeUser Setup Chapter 6: User Setup — 6.4 Privileges Setup Use Setup to manage and configure this feature in your EQuipWeb system. Privileges Setup is the master list of all permissions available in the system. Each ...Menu Setup
? Backend — EQuipWebRetail ModeQR Online Ordering Setup Chapter 9: QR Online Ordering — 9.1 Menu Setup Use Menu Setup to create menu presets for your QR ordering system. Each preset is a collection of products grouped and ordered the way you want ...Outlet Setup
? Backend — EQuipWebRetail ModeMaster Data Setup Chapter 8: Master Data Setup — 8.3 Outlet Setup Use Outlet Setup to add and manage your store locations. Each outlet has its own address, contact details, operating hours, and receipt settings. When ...