Delivery Order List
Chapter 7: Delivery — 7.1 Delivery Order
Use Order to manage and configure this feature in your EQuipWeb system.
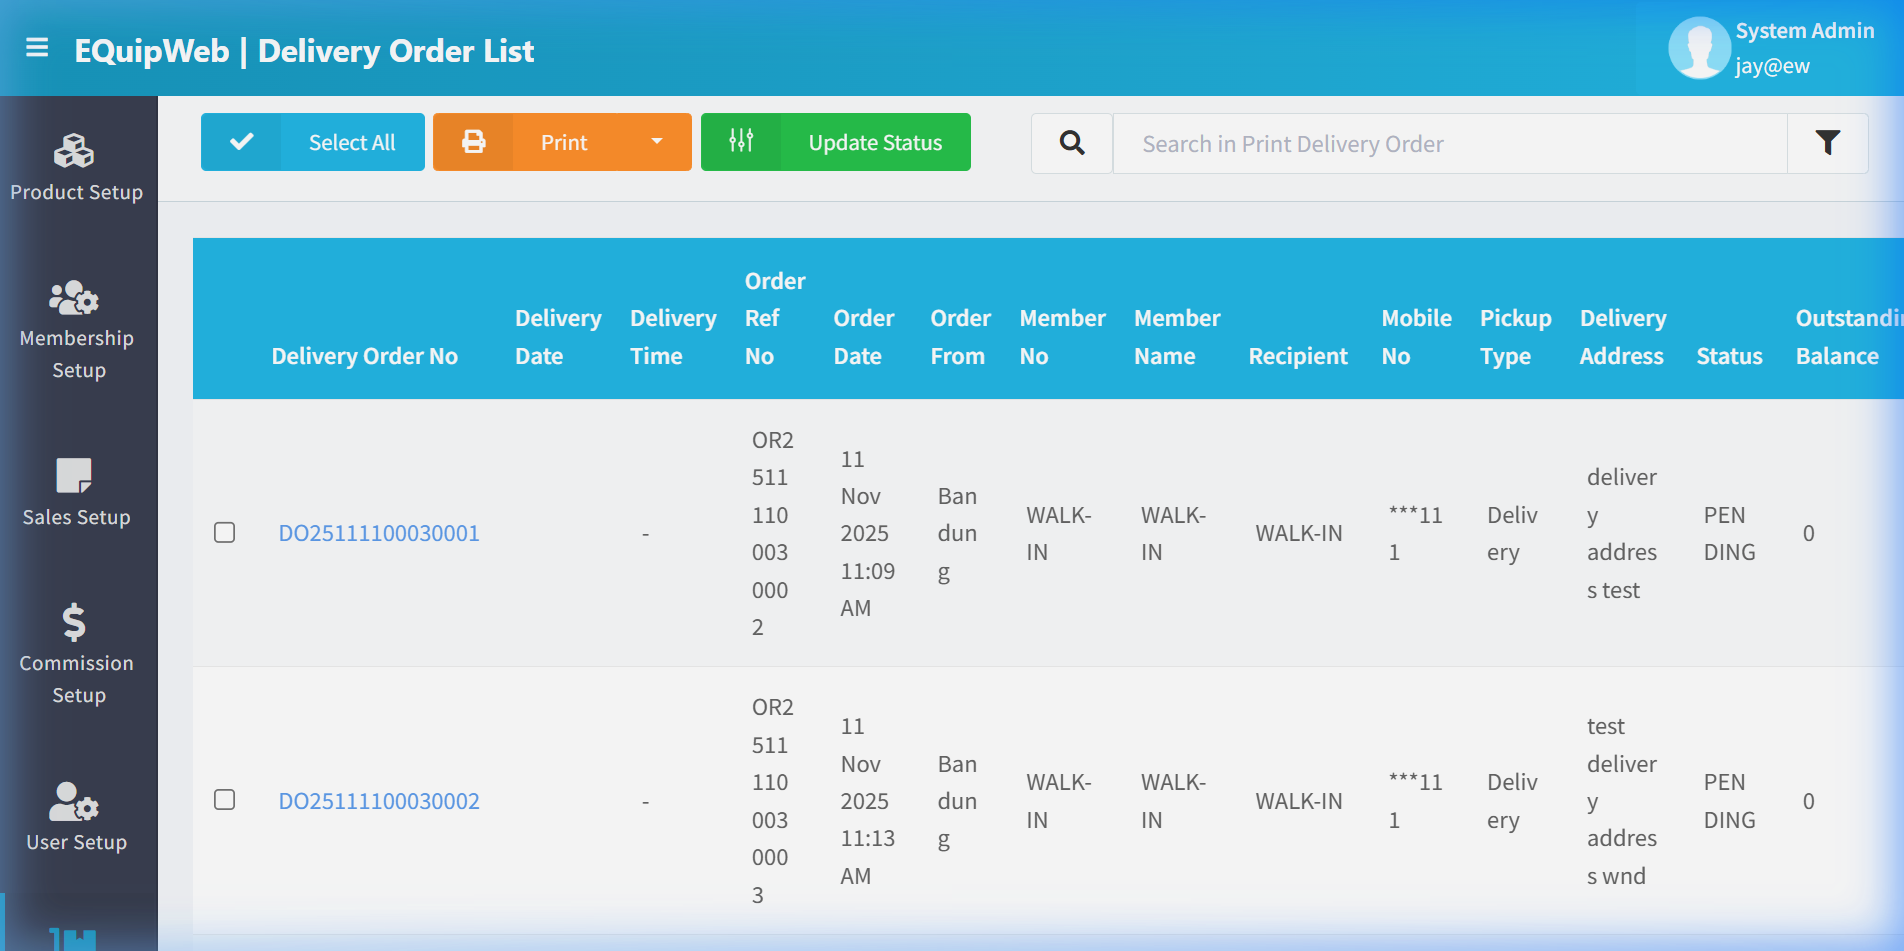
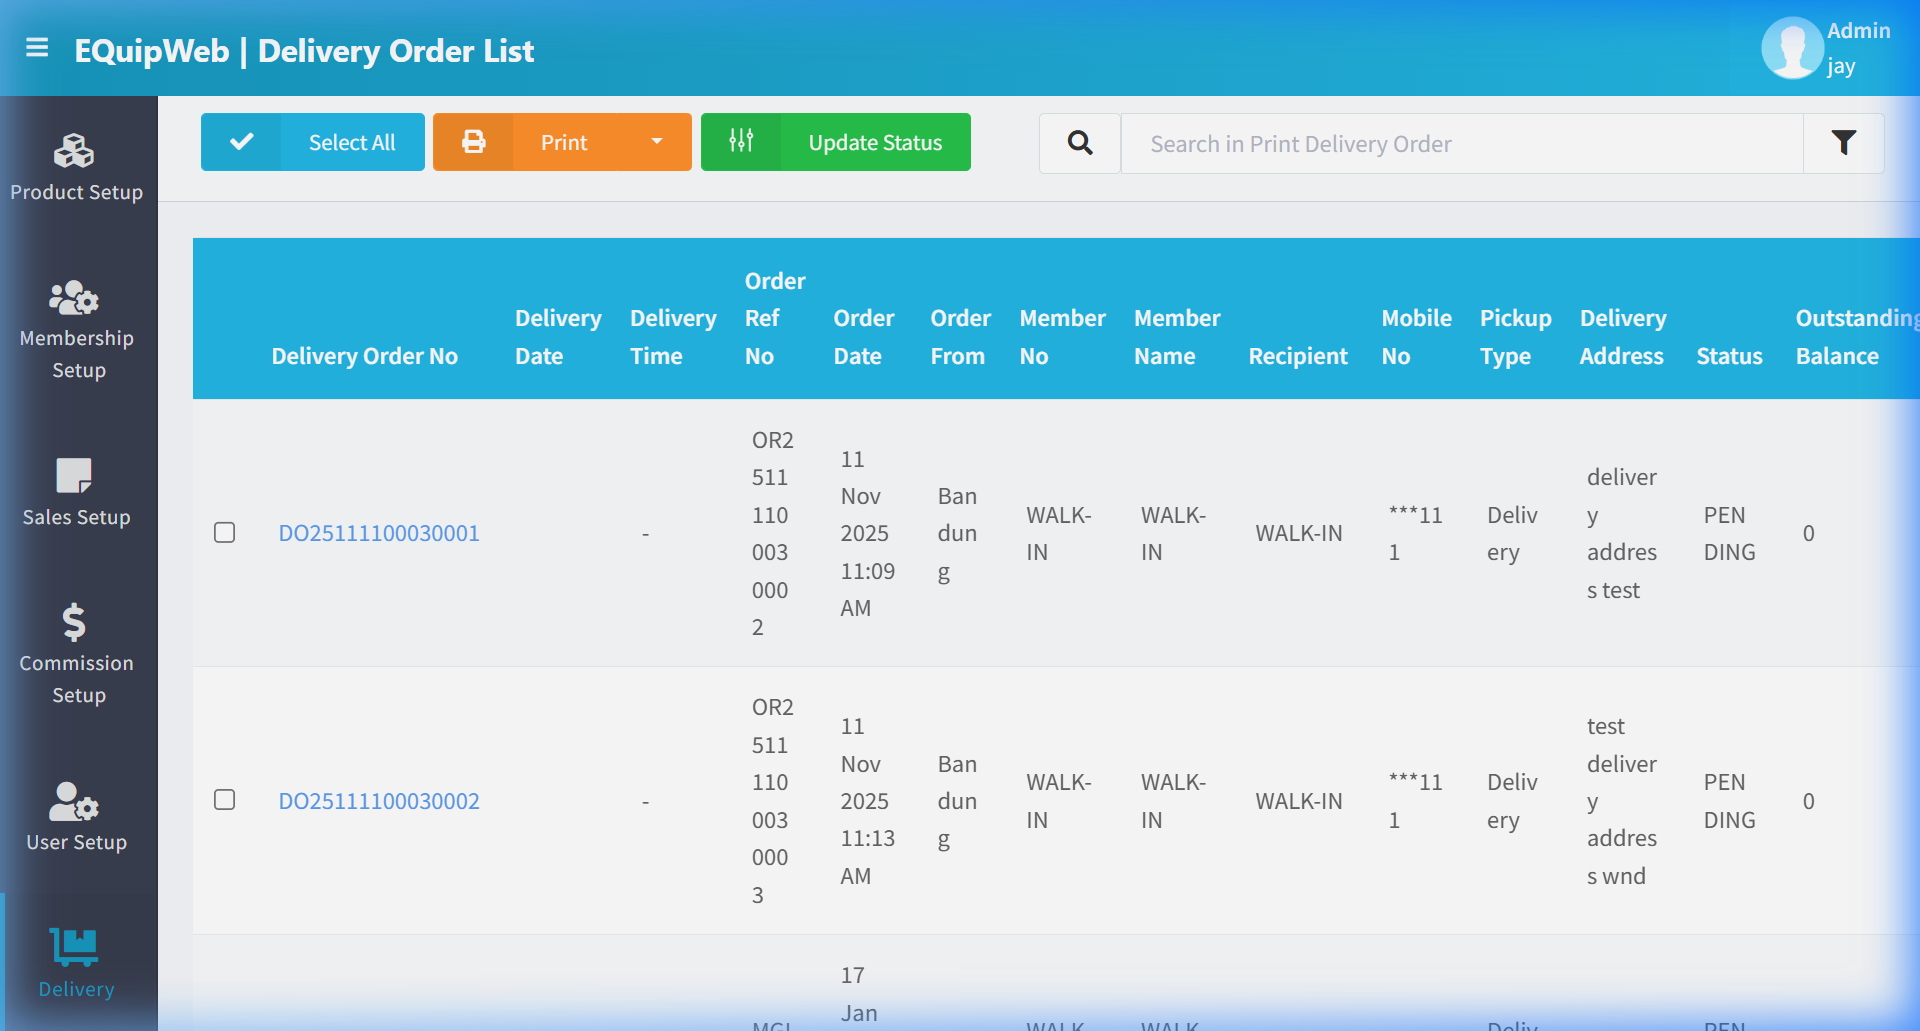
The Delivery Order List shows all your delivery orders in one place. Track order statuses, view delivery details, and manage your deliveries from here.
When to use this: When you need to create, track, or manage delivery orders for customer purchases.
Prerequisites
- Products and Outlets must exist
- Membership data available for customer lookup
Delivery Order List
📝 General Description
This page displays all delivery orders in a data grid. Delivery orders are created when a customer requests delivery during a POS sale or online order. The page tracks the order lifecycle from pending → dispatched → delivered.
⚙️ UI Elements
| Element | Type | Function |
|---|---|---|
| + Add New | Green Button | Create a manual delivery order |
| Export | Orange Button | Export delivery data to Excel |
| Search Bar | Text Input | Filter by order number or customer name |
| 🔽 Filter | Funnel Icon | Filter by status (Pending, Dispatched, Delivered), date range |
Use Order to manage and configure this feature in your EQuipWeb system.
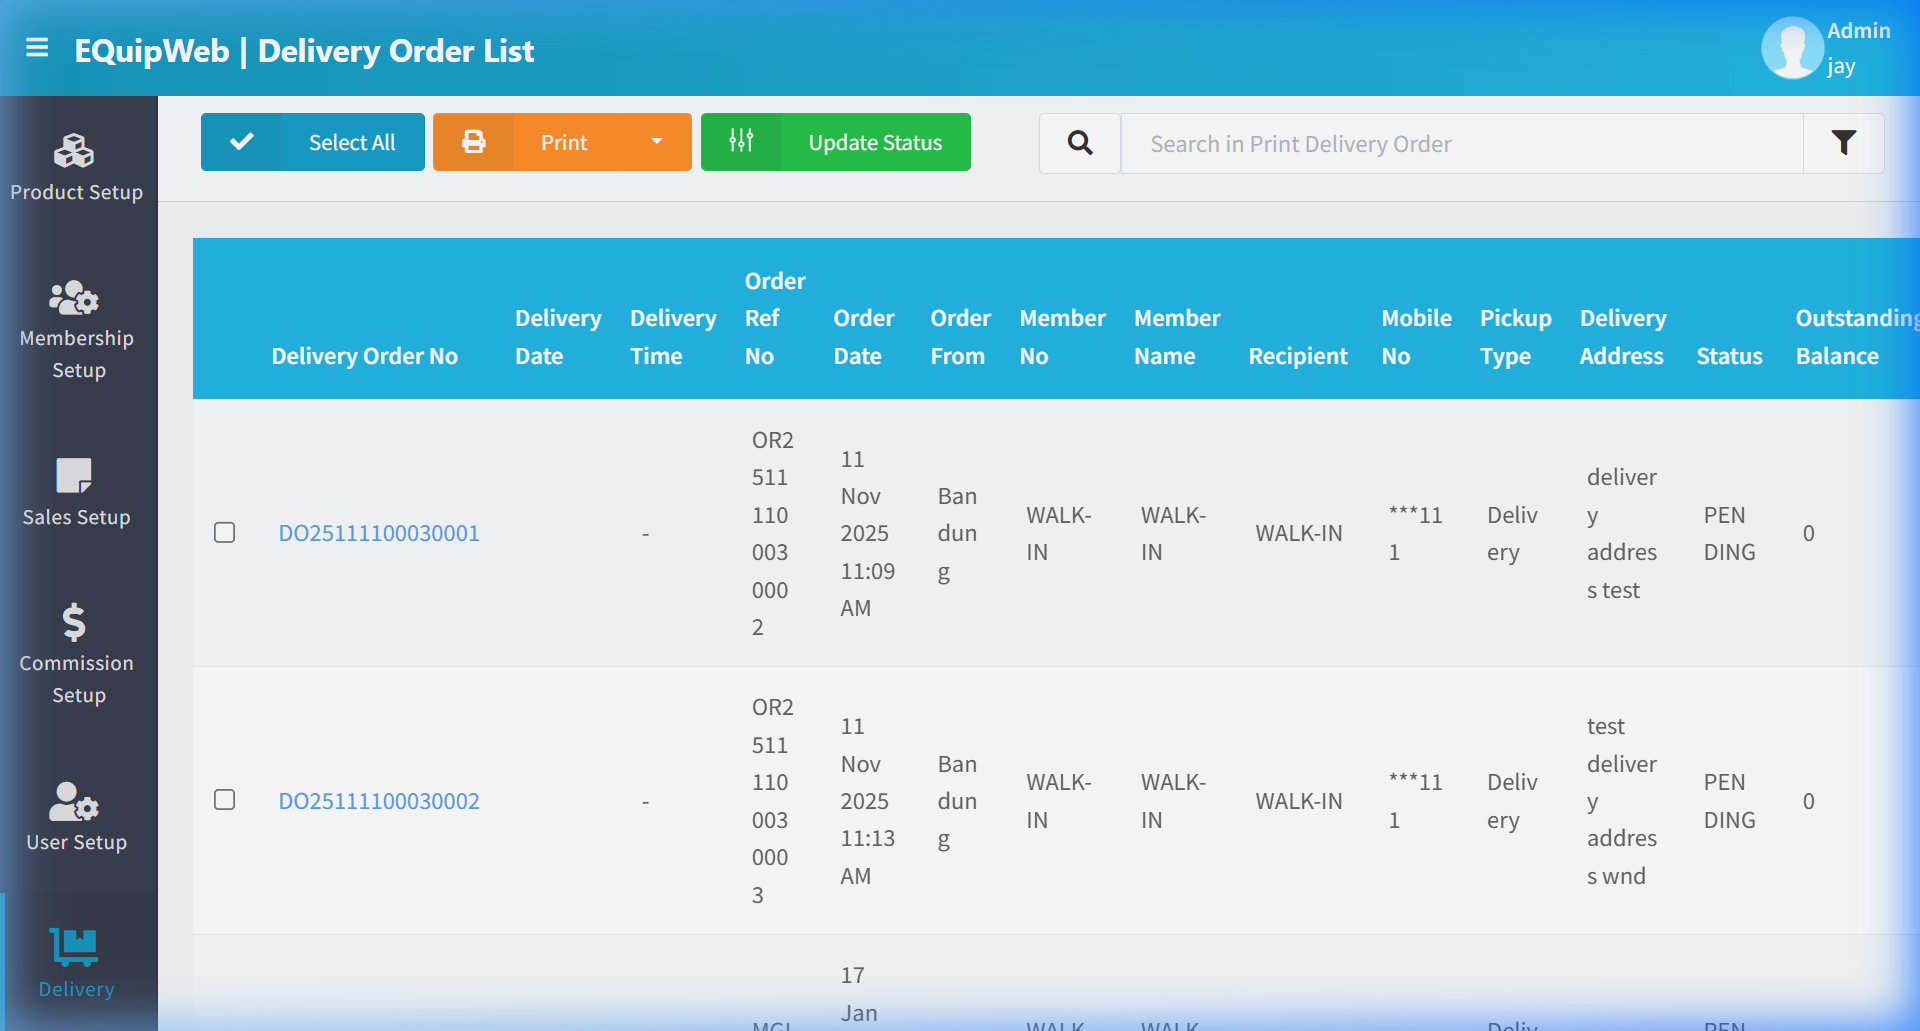
7.1.1 Data Grid Columns
| Column | Description |
|---|---|
| Delivery Order No | Unique delivery order number (clickable → opens detail/edit form) |
| Sales Order No | Linked sales transaction number |
| Customer Name | Delivery recipient name |
| Delivery Address | Full delivery address |
| Status | Order status: Pending, Dispatched, Delivered, Cancelled |
| Delivery Date | Scheduled or actual delivery date |
| Outlet | The outlet fulfilling the delivery |
| Created On | When the delivery order was created |
Use Order to manage and configure this feature in your EQuipWeb system.
7.1.2 How to Create a Delivery Order
Delivery orders are typically auto-created from POS sales or online orders. To create one manually:
- Navigate to Delivery → Delivery Order.
 2. Click + Add New.
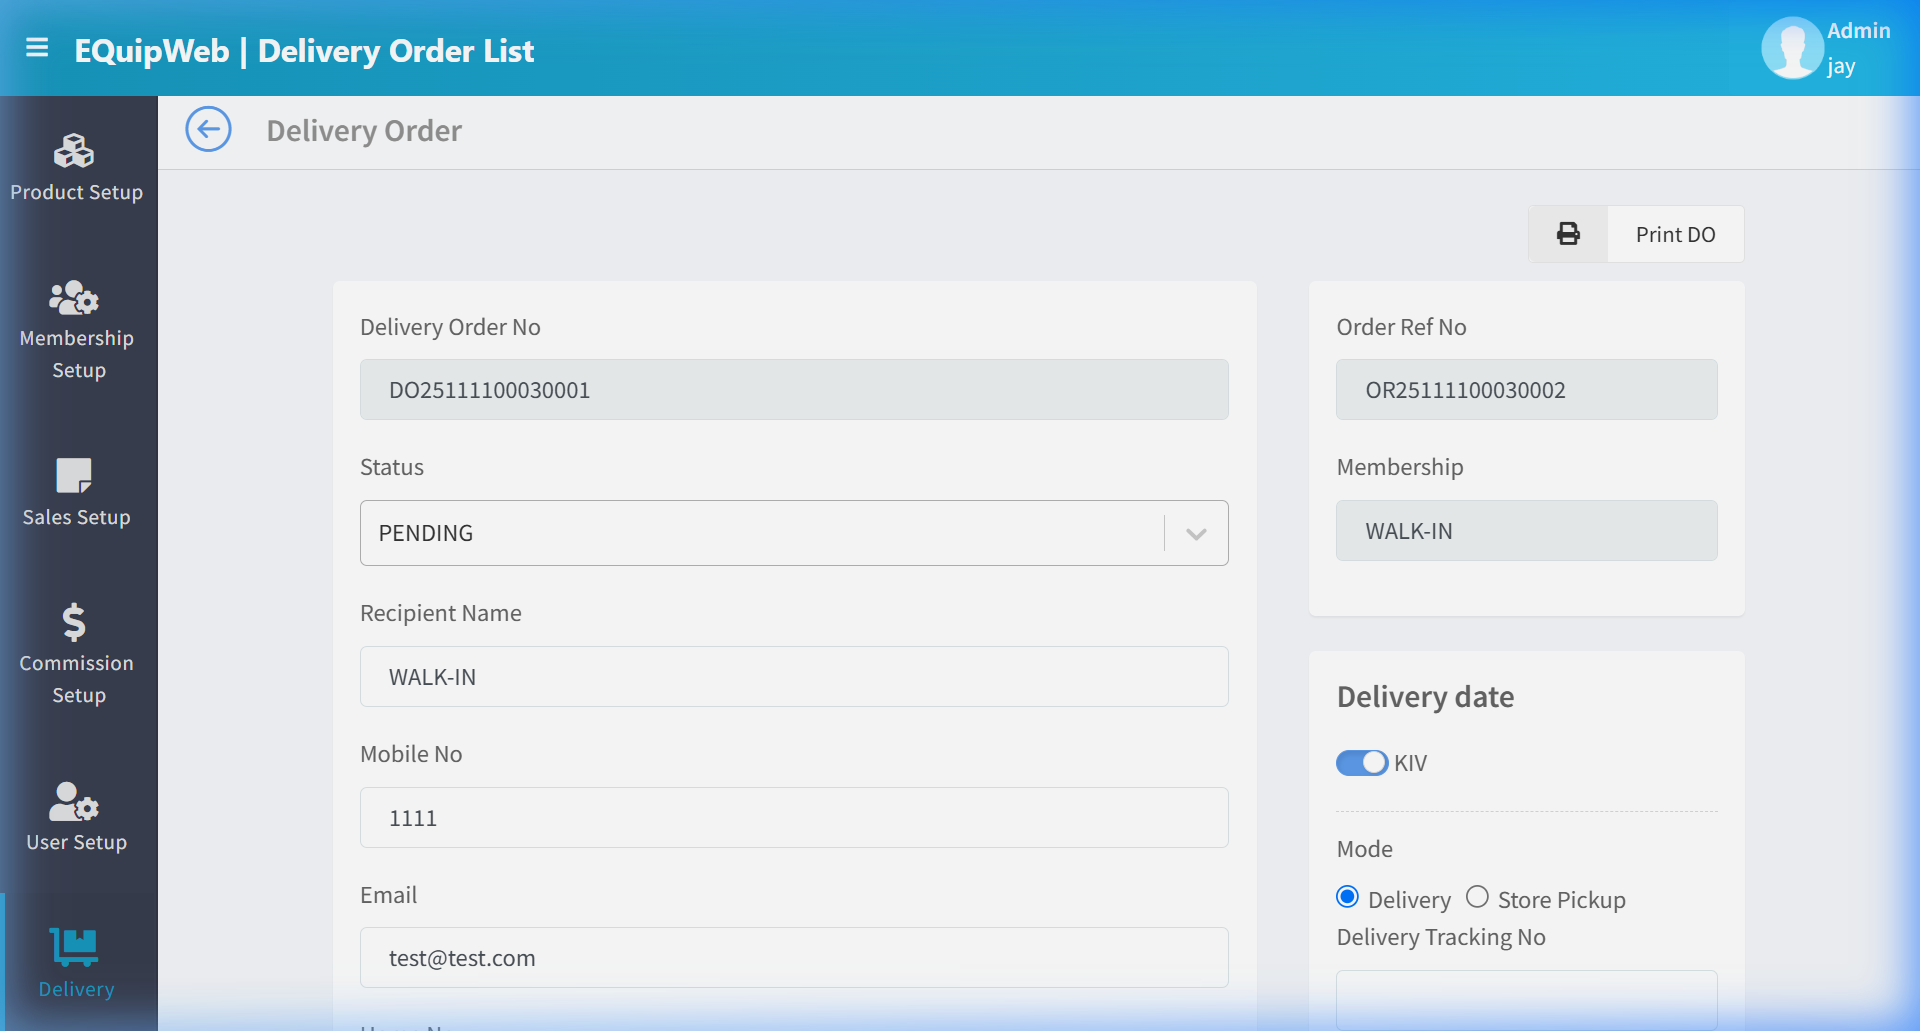
 3. Fill in:
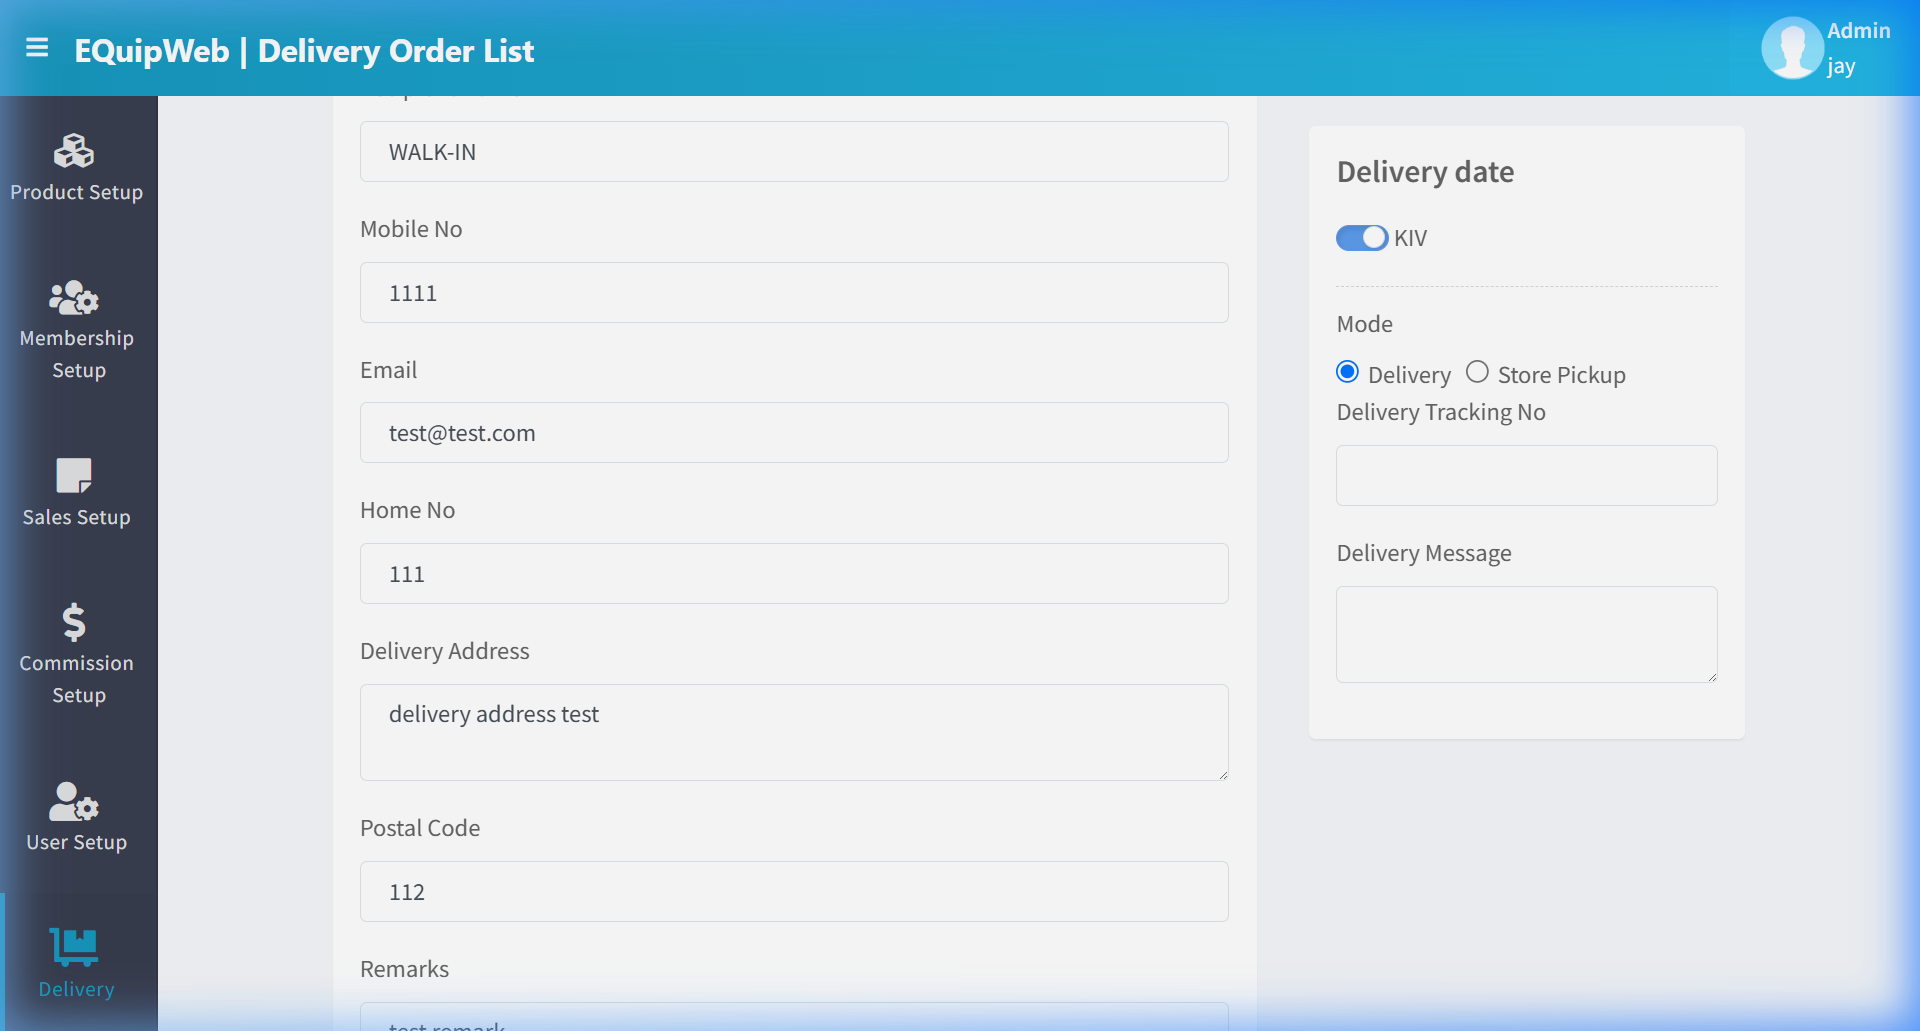
- Sales Order No: Link to an existing sales transaction.
- Customer Name: Recipient name.
- Delivery Address: Full delivery address.
- Delivery Date: Scheduled delivery date.
- Contact No: Recipient phone number.
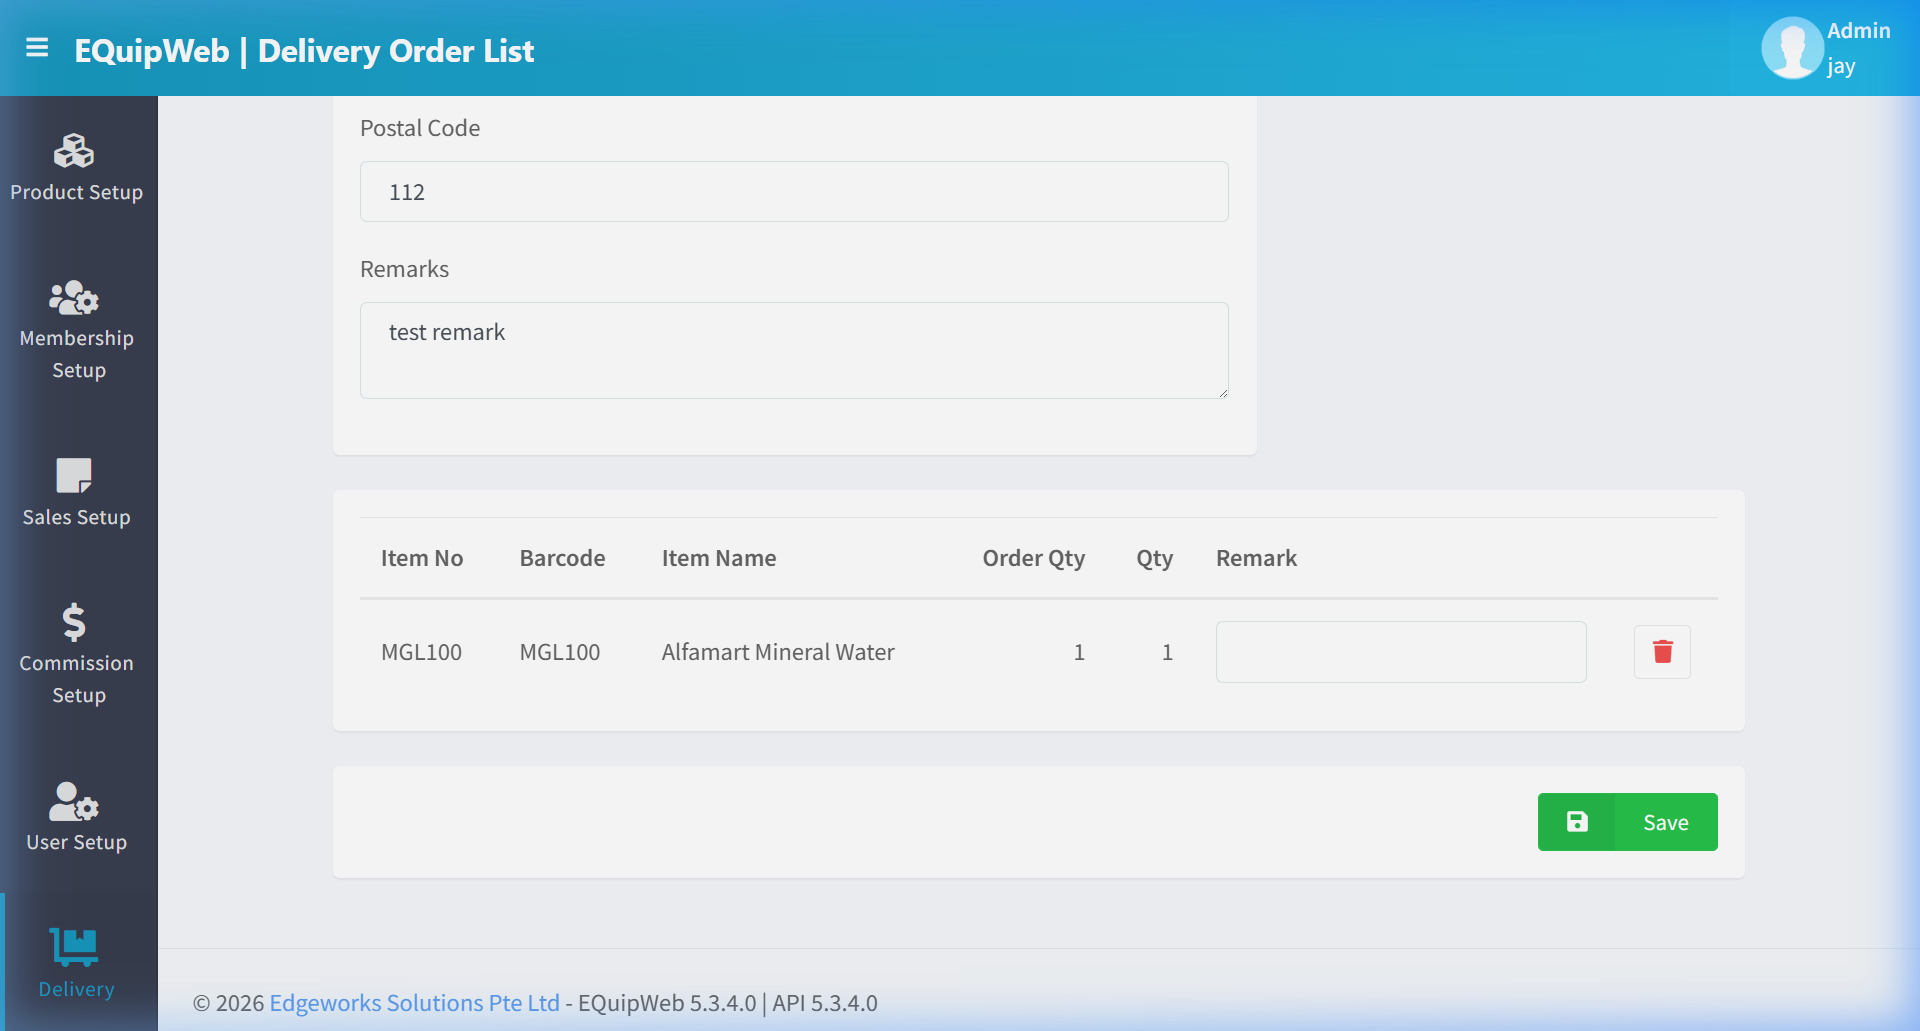
- Add delivery items from the linked sales order.
- Click Save.
Expected Result: The delivery order is saved and tracked.
Form Fields
| Field | Type | Required | Description |
|---|---|---|---|
| Delivery Order No | Auto-generated | ✅ Auto | Unique DO number |
| Sales Order No | Text / Dropdown | No | Linked POS transaction |
| Customer Name | Text | ✅ Yes | Recipient name |
| Contact No | Text | No | Recipient phone |
| Delivery Address | Textarea | ✅ Yes | Full delivery address |
| Postal Code | Text | No | Postal/ZIP code |
| Delivery Date | Date Picker | No | Scheduled delivery date |
| Delivery Time Slot | Dropdown | No | Preferred time window (e.g., 10AM–12PM) |
| Remark | Textarea | No | Special instructions (e.g., "Leave at door", "Call before delivery") |
| Status | Dropdown | ✅ Yes | Pending, Dispatched, Delivered, Cancelled |
| Driver / Courier | Text | No | Name of the delivery driver or courier service |
Use Order to manage and configure this feature in your EQuipWeb system.
7.1.3 How to Update Delivery Status
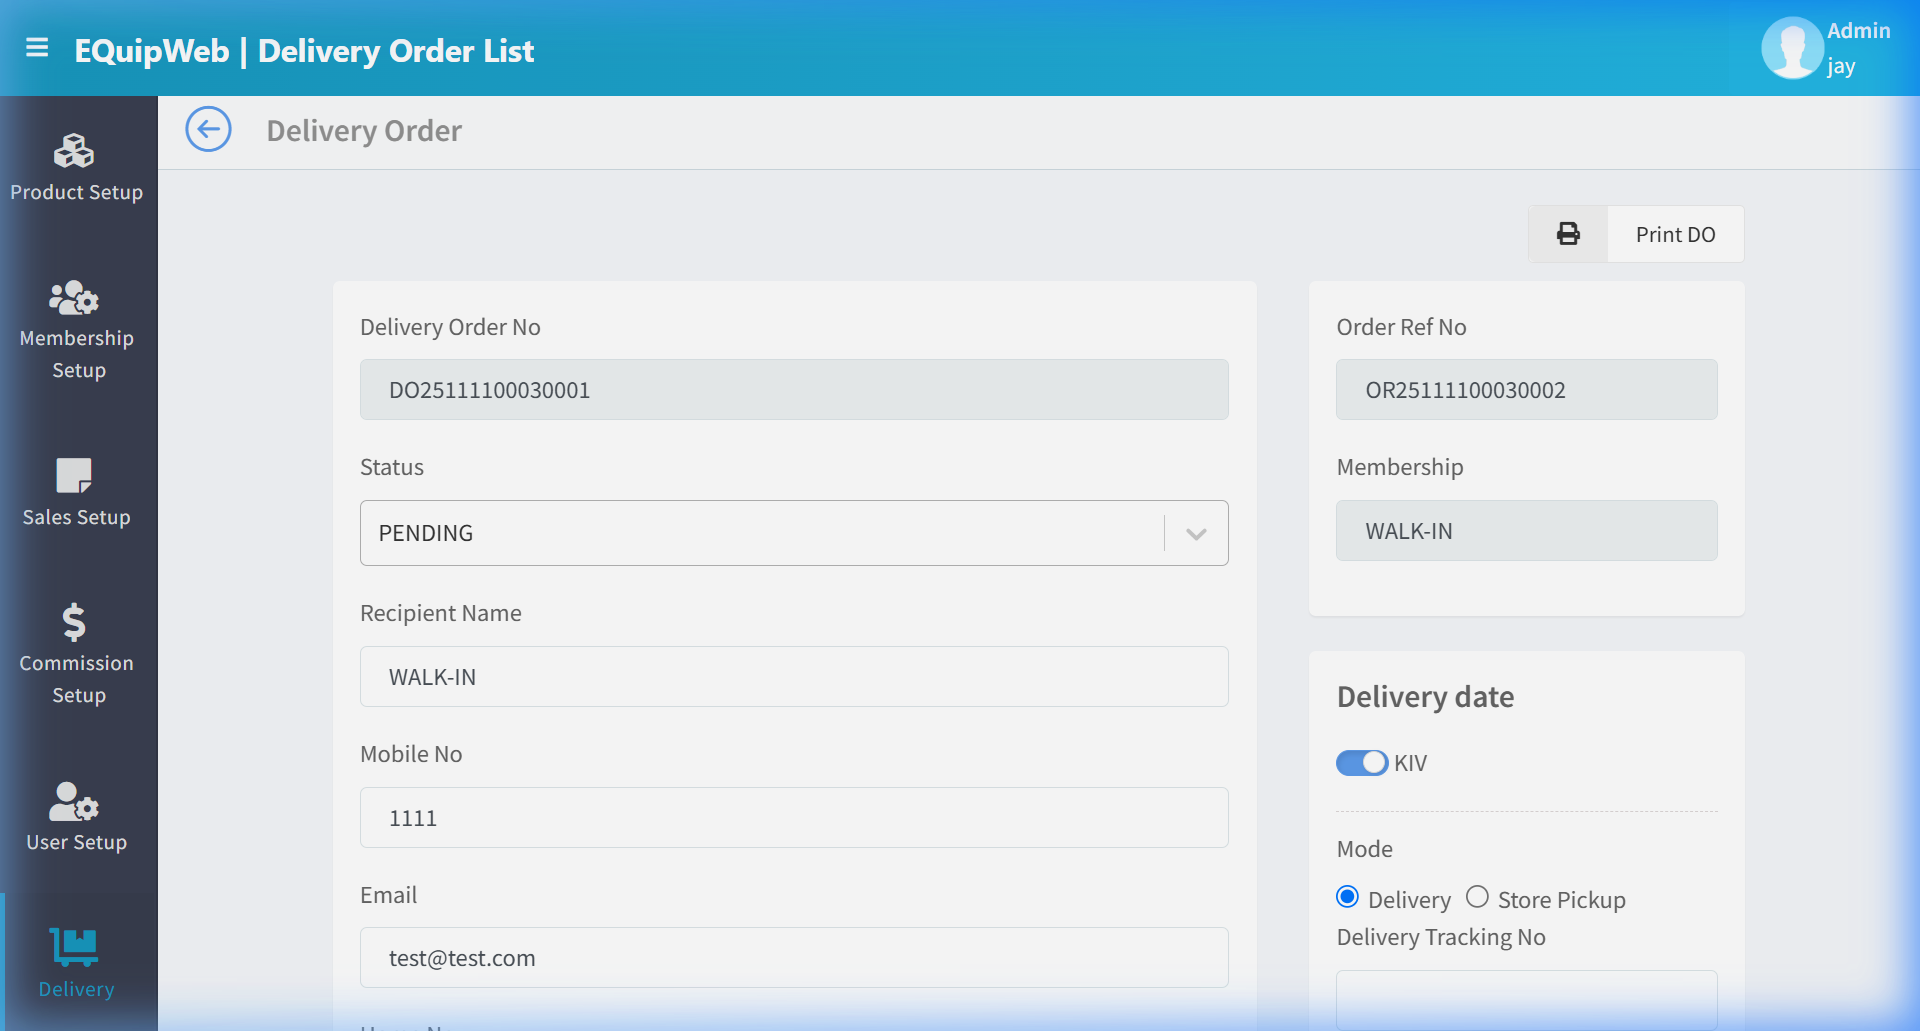
- Open the delivery order (click the DO number).
2. Change the Status field:
- Pending → Order is waiting to be dispatched.
- Dispatched → Order has been sent out for delivery.
- Delivered → Order has been successfully delivered.
- Cancelled → Order delivery was cancelled.
- Optionally update the Driver/Courier name and actual delivery date.
- Click Save.
Delivery Status Flow
Pending → Dispatched → Delivered
    ↓
Cancelled (at any stage)
Use Order to manage and configure this feature in your EQuipWeb system.
7.1.4 How to Cancel a Delivery Order
- Open the delivery order.
2. Change Status to Cancelled.
3. Enter a reason in the Remark field.
4. Click Save.
5. The linked sales transaction is not affected — only the delivery is cancelled.
Use Order to manage and configure this feature in your EQuipWeb system.
💡 Example
Scenario: A furniture store sells a sofa set with home delivery. The cashier processes the sale at POS and creates a delivery order.
Flow:
- Cashier completes the sale at POS → selects "Delivery" as the fulfillment method.
2. A delivery order is auto-created with status Pending.
3. The warehouse team views the delivery list → schedules delivery for Saturday.
4. On Saturday morning, they update status to Dispatched and enter the driver's name.
5. After successful delivery, the driver confirms → status updated to Delivered.
6. The delivery is complete and the record is maintained for future reference.
[!TIP] Use the Remark field for customer-specific delivery instructions. This information is visible to the delivery team and helps ensure smooth deliveries.
Use Order to manage and configure this feature in your EQuipWeb system.
Access & Permissions
| Role | View | Create | Edit | Delete |
|---|---|---|---|---|
| Admin | Yes | Yes | Yes | Yes |
| Supervisor | Yes | Yes | Yes | No |
| Cashier | No backend access | — | — | — |
[!NOTE] Exact permissions depend on the Privileges Setup configured for each role. Contact your administrator if you cannot access this page.
Use Order to manage and configure this feature in your EQuipWeb system.
How to View a Delivery Order
- Navigate to Delivery > Delivery Order List from the sidebar menu.
- The list shows all delivery orders with their status (Draft, Confirmed, Dispatched, Delivered).
- Click the order number link (blue text) to view the full delivery order details.
How to Update Delivery Order Status
- Open the delivery order by clicking its order number.
- Review the order items, quantities, and delivery address.
- Update the Status field to the next stage (e.g., Confirmed → Dispatched → Delivered).
- Click Save to update the status.
Expected Result: The delivery order status is updated and reflected in the list view.
[!NOTE] Completed delivery orders cannot be edited. If a correction is needed, create a return or adjustment order.
FAQ
Q: Can I edit a delivery order after it's been dispatched? A: No. Once dispatched, the order is locked. You would need to create a return or adjustment order.
Q: How do I track delivery status? A: Use the status column in the Delivery Order list. Statuses include Draft, Confirmed, Dispatched, and Delivered.
Use Order to manage and configure this feature in your EQuipWeb system.
Troubleshooting
| Issue | Possible Cause | Solution |
|---|---|---|
| Cannot save the record | Required fields are empty or invalid | Check all fields marked with * and fill in valid data |
| Record not appearing in POS | POS terminal has not synced yet | Wait for the next sync cycle or manually trigger sync from Terminal Status |
| Cannot delete the record | Record is being used by other modules | Check if the record is linked to active transactions, products, or other settings |
| Changes not taking effect | Browser cache showing old data | Refresh the page (Ctrl+F5) or clear browser cache |
| "Duplicate" error on save | A record with the same name/code already exists | Search the list (including deleted records) for duplicates |
| Page not loading | Session expired or network issue | Log out and log back in. Check your internet connection |
Use Order to manage and configure this feature in your EQuipWeb system.
Related Menus
- Product Setup > Product List — products for delivery
- Master Data > Outlet Setup — delivery source outlets
- Membership Setup > Membership List — delivery customer lookup
Use Order to manage and configure this feature in your EQuipWeb system.
Open Questions / Confirmation Needed
[!NOTE] The following items may vary depending on your system version and configuration:
- Exact permission settings depend on your Privileges Setup configuration
- Sync timing to POS terminals depends on network conditions and sync schedule
- Some features may require additional licensing or module activation
- Field behavior may differ between EQuip versions
If you encounter behavior not described in this manual, contact your system administrator or EQuip support team.
Business Rules
- Records that are linked to active transactions or other modules cannot be permanently deleted
- Changes made here will take effect on POS terminals after the next sync
- Deleted records can be restored from the list using the Show Deleted filter
- All changes are logged with the user who made them and the timestamp
Related Articles
Online Sales Order
? Backend — EQuipWebRetail ModeSales Setup Sales Setup — 4.8 Online Sales Order Use Order to manage and configure this feature in your EQuipWeb system. The Online Sales Order page shows all orders coming in from your connected delivery platforms ...POS Order Integration
? Backend — EQuipWebRetail ModeMaster Data Setup Chapter 8: Master Data Setup — 8.7 POS Order Integration Use POS Order Integration to connect your POS terminals with external ordering systems. This is where you set up how orders from third-party ...Main Portal
? Backend — EQuipWebRetail ModeChapter 1: Getting Started Backend Login — Main Portal Dashboard The Main Portal is the first page you see after logging into EQuipWeb. It provides a high-level overview of your business with key metrics, quick-access ...Navigation & Sidebar
? Backend — EQuipWebRetail ModeChapter 1: Getting Started Chapter 1: Getting Started — 1.4 Navigation & Sidebar The sidebar is the primary navigation tool in EQuipWeb. It appears on the left side of every page and provides access to all 11 modules ...Online Sales Channel
? Backend — EQuipWebRetail ModeSales Setup Sales Setup — 4.7 Online Sales Channel Use Online Sales Channel to connect your EQuip system with external delivery platforms — like GrabFood, Foodpanda, or Shopee. Orders placed on these platforms will ...