Promotion Setup
Chapter 2: Product Setup — 2.9 Promotion Setup
Use Promotion Setup to create special offers for your customers — Buy 1 Get 1, bundle deals, spend-based rewards, and more. Once a promotion is set up and activated, it applies automatically at the POS when the conditions are met. Promotions can be configured with specific pricing rules, date/time restrictions, applicable member groups, outlet assignments, and day-of-week schedules.
When to use this: When you want to create special offers like Buy 1 Get 1, bundle deals, or spend-based rewards.
Prerequisites
- Products must exist to link promotions
- Outlet Setup completed for outlet-specific promotions
Promotion List
📝 General Description
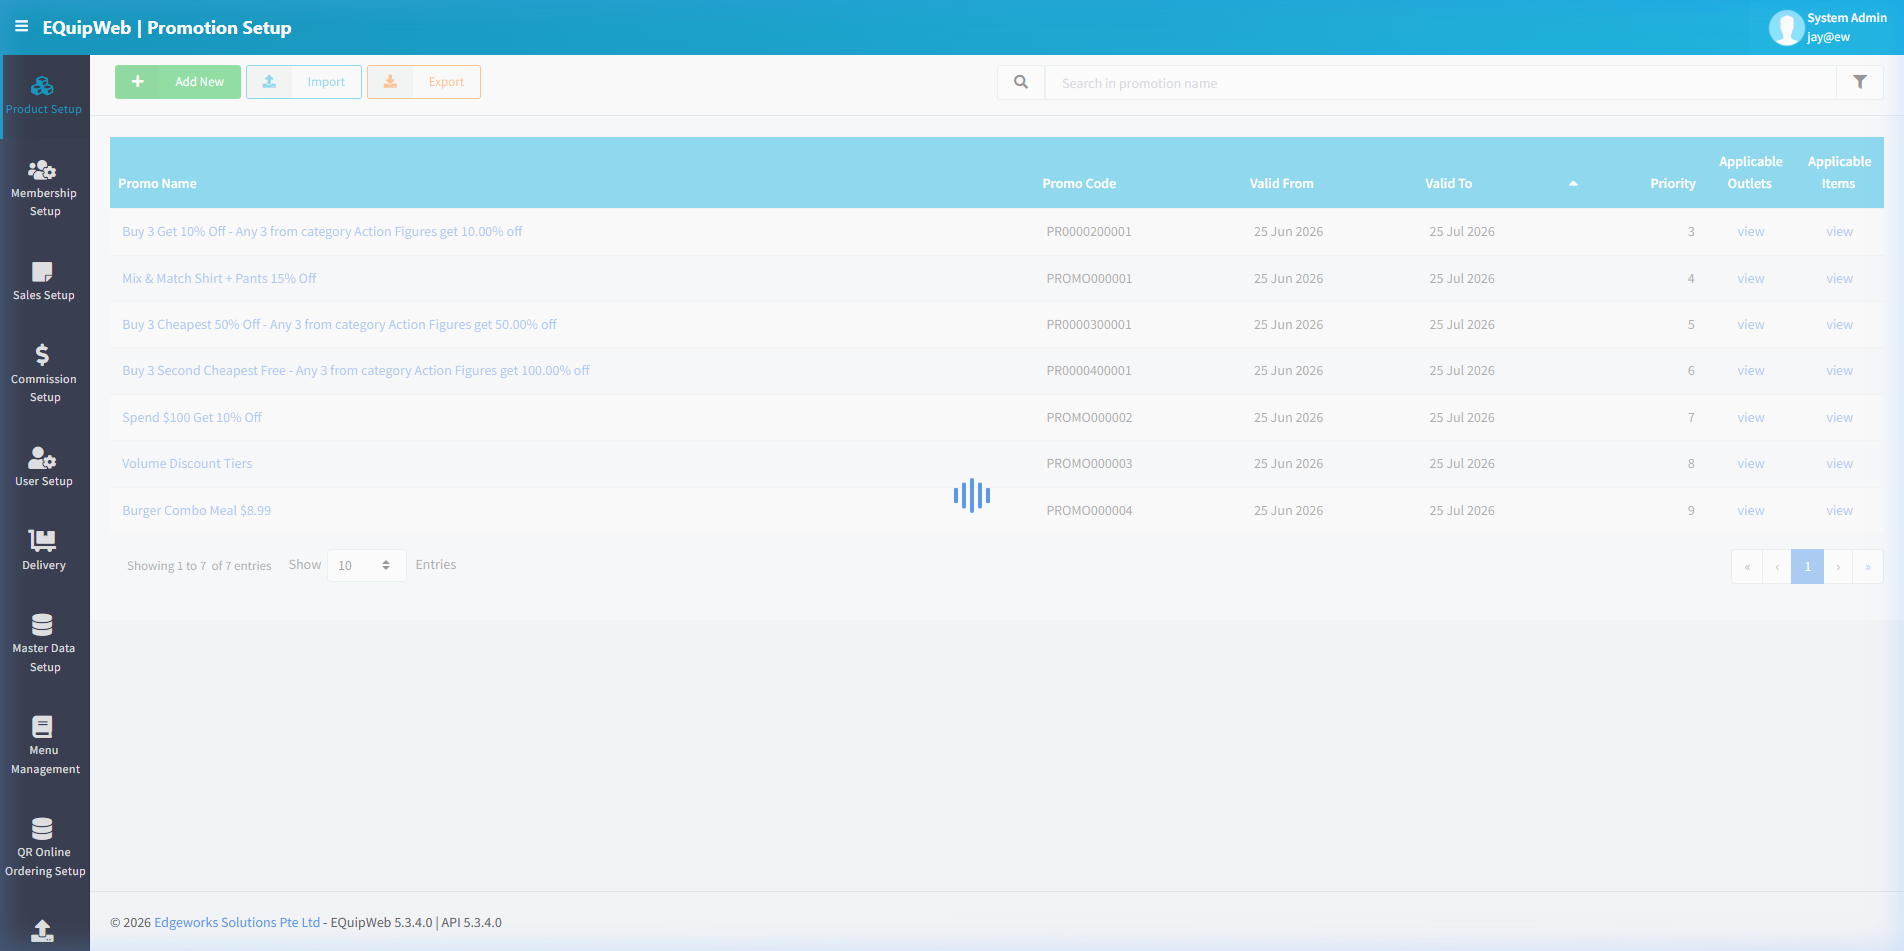
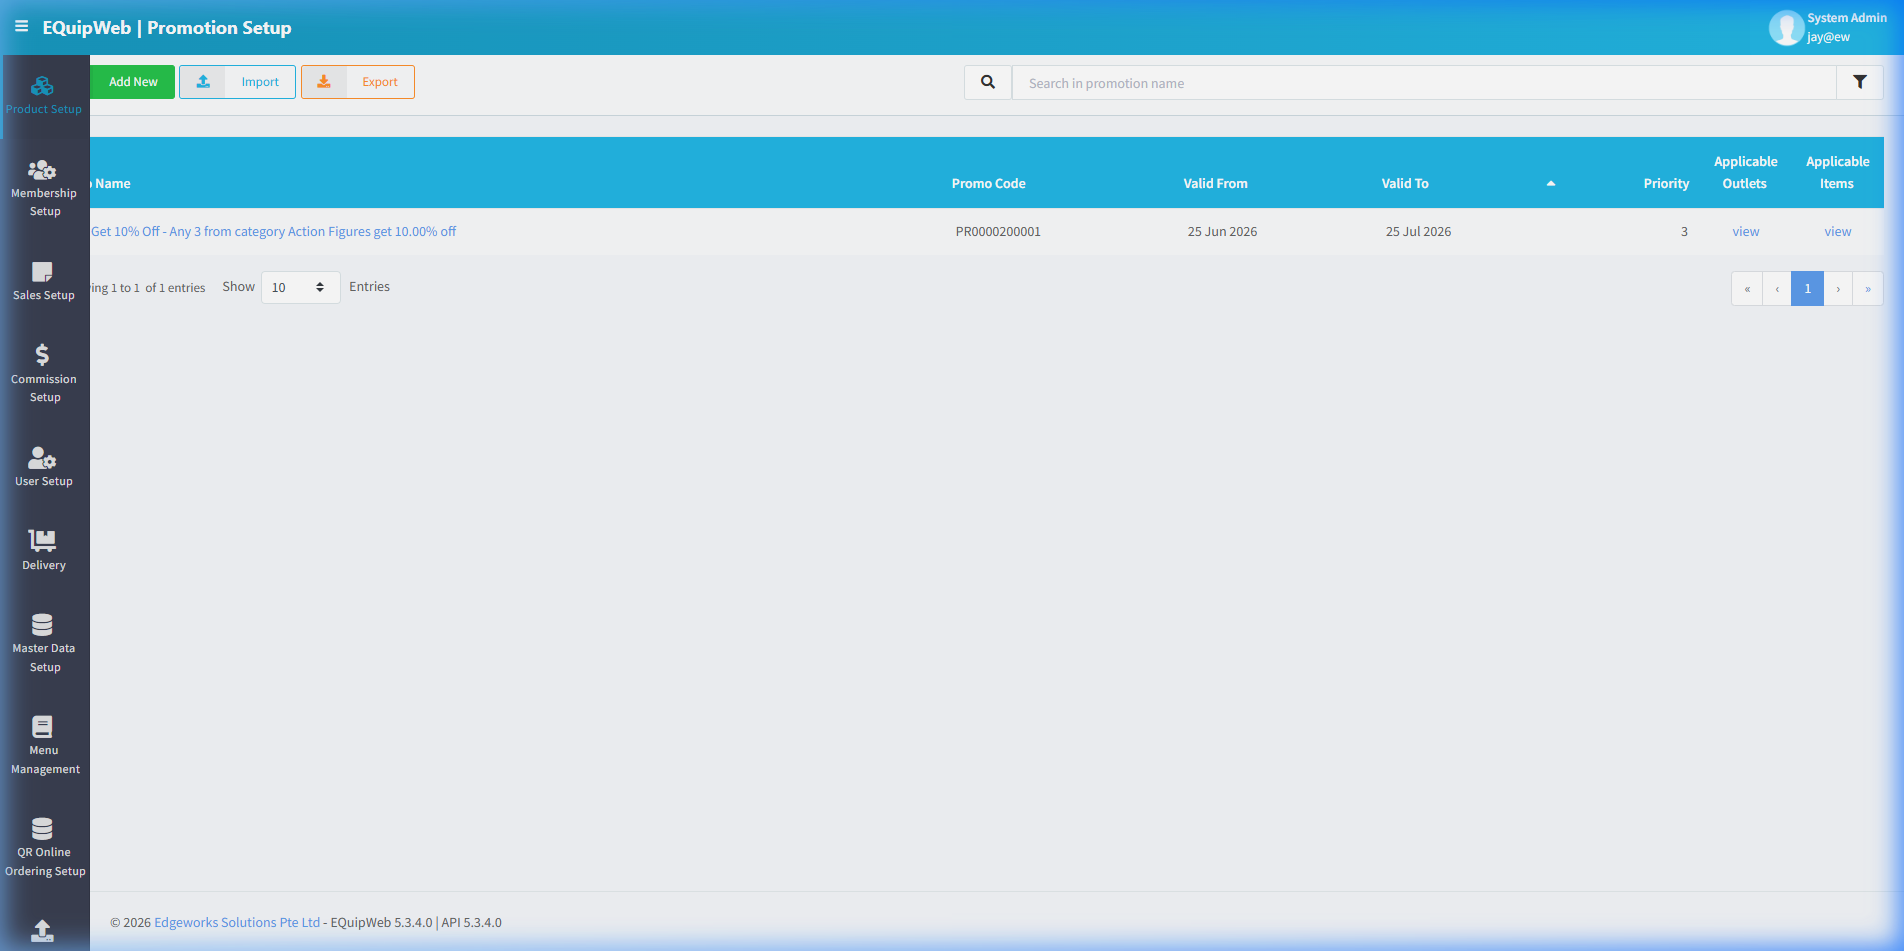
The Promotion list shows all configured promotions in a data grid. Each promotion has a name, promo code, validity dates, priority, and shows which outlets and items it applies to. Active promotions are automatically applied at POS when conditions are met.
⚙️ UI Elements
| Element | Type | Function |
|---|---|---|
| + Add New | Green Button | Create a new promotion |
| Import | Blue Button | Bulk import promotions from spreadsheet |
| Export | Orange Button | Download promotion list as spreadsheet |
| Search Bar | Text Input | Filter by promotion name |
| 🔽 Filter | Funnel Icon | Opens the Column Visibility Panel — toggle columns ON/OFF to customize the data grid view |
2.9.1 Column Visibility Filter Panel
Click the 🔽 funnel icon (top-right of the toolbar) to open the Column Visibility Panel. Each toggle switches a column ON (visible, blue) or OFF (hidden, grey).
Default Visible Columns (🔵 ON)
| Toggle | Column | Description |
|---|---|---|
| 🔵 Promo Name | Promo Name | Promotion name with rule description (clickable → edit form) |
| 🔵 Promo Code | Promo Code | System-generated or manual promotion code |
| 🔵 Valid From | Valid From | Promotion start date |
| 🔵 Valid To | Valid To | Promotion end date |
| 🔵 Priority | Priority | Priority number — higher = takes precedence when multiple promos apply |
| 🔵 Applicable Outlets | Applicable Outlets | "view" link → shows which outlets this promotion is active in |
| 🔵 Applicable Items | Applicable Items | "view" link → shows what products/categories this promotion targets |
Hidden Columns (⚪ OFF by default)
| Toggle | When ON (Visible) | When OFF (Hidden) |
|---|---|---|
| ⚪ Deleted | Shows Hidden/deleted status for archived promotions | Column hidden |
| ⚪ CreatedBy | Shows who created this promotion | Column hidden |
| ⚪ CreatedOn | Shows when this promotion was created | Column hidden |
| ⚪ ModifiedBy | Shows who last modified this promotion | Column hidden |
| ⚪ ModifiedOn | Shows when the last modification occurred | Column hidden |
2.9.2 Add / Edit Promotion Form
Left Column — Main Section
| Field | Type | Required | Description |
|---|---|---|---|
| Code | Text | Auto | System-generated or manual promotion code |
| Name | Text | ✅ Yes | Promotion display name (e.g., "CNY 2026 Sale", "Happy Hour 20% Off") |
Right Column — Settings
| Field | Type | Description |
|---|---|---|
| Priority | Number | Higher priority promotions override lower ones when both apply (default: 3) |
| Outlet(s) | Multi-select | Select outlets where this promotion is active (default: ALL) |
| Can be use by member only | Toggle | When ON, only loyalty members can use this promotion |
| Start On | Date Picker | When the promotion begins (e.g., "25 June 2026") |
| End On | Date Picker | When the promotion expires (e.g., "25 July 2026") |
| Applicable on specific hours | Toggle | When ON, enables time-based restrictions (start/end hours) |
| Days | Multi-select | Which days of the week the promotion is active (default: ALL) |
| Hide Promo Name In Sales Invoice | Toggle | When ON, the promotion name is not printed on receipts |
| Allow promo for non discountable item | Toggle | When ON, this promotion can apply even to items marked as "Non Discountable" |
How to Edit a promotion
- In the Promotion Setup page, find the promotion you want to change.
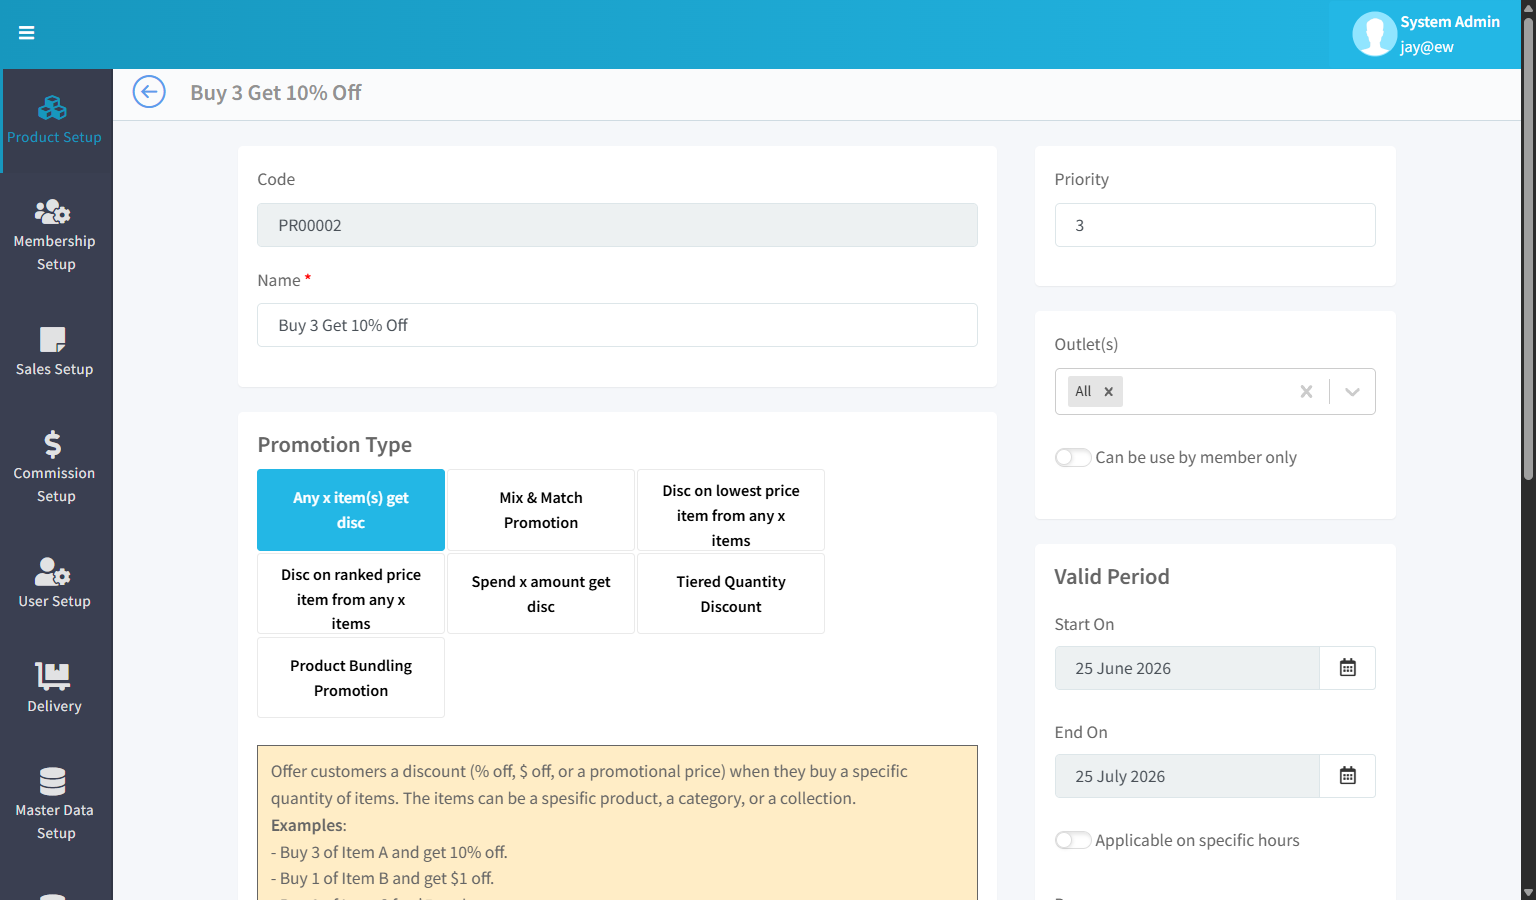
- Click the blue promotion name link. The edit form opens — it looks the same as the "Add New" form, but all fields are already filled in with the current values.
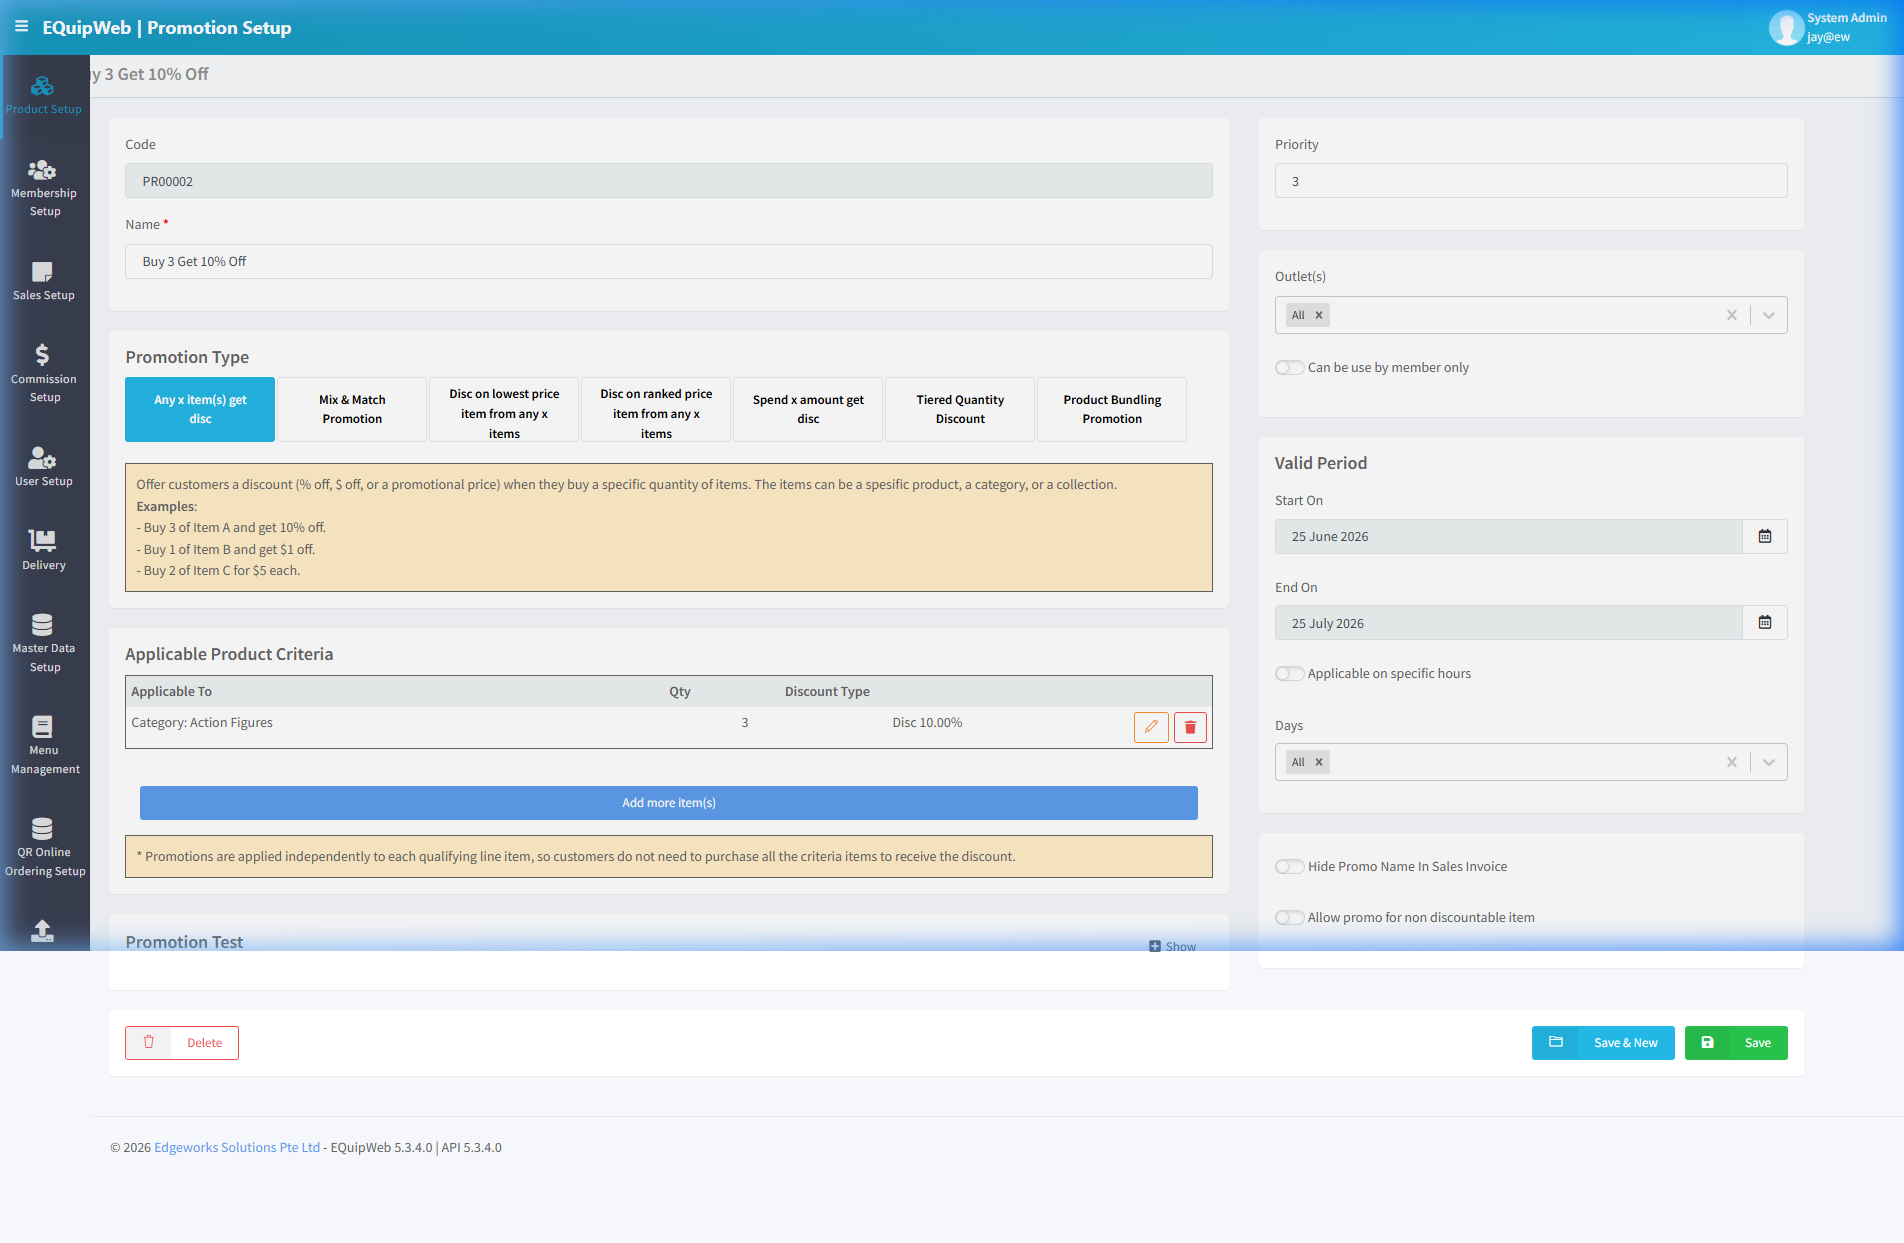
- Change the fields you need to update.
- Click Save to apply your changes.
Expected Result: The promotion is saved and active for qualifying transactions.
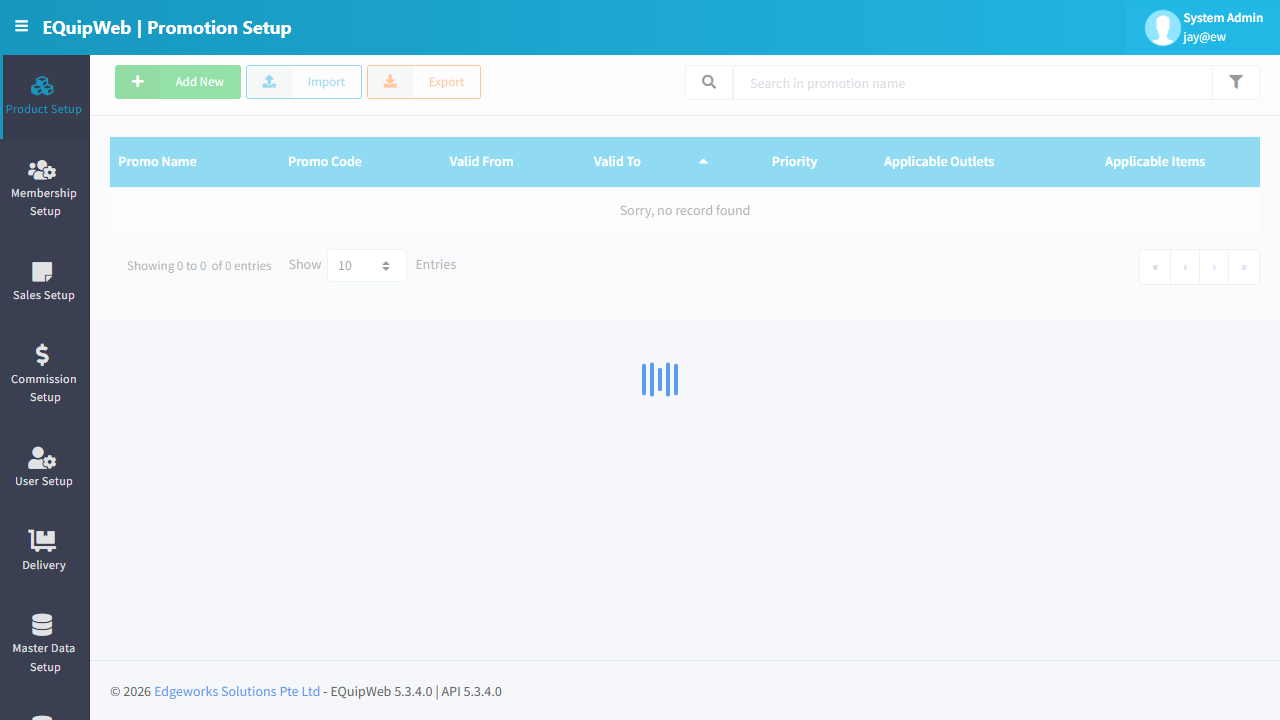
[!TIP] To make changes, just click the name of any promotion in the list — the same form opens with everything already filled in. Change what you need and click Save.
2.9.3 Promotion Types — Complete Guide with Real Examples
EQuip offers 7 promotion types, each designed for a different discount scenario. Select the type from the tab bar when creating a promotion. Each tab shows a yellow help box with a description and examples.
Type 1: Any x Item(s) Get Disc
Use case: Offer a flat discount when customers buy a specific quantity of items from a category, collection, or specific product.
What the yellow help box says:
Offer customers a discount (% off, $ off, or a promotional price) when they buy a specific quantity of items. The items can be a specific product, a category, or a collection.
Examples:
- Buy 3 of Item A and get 10% off.
- Buy 1 of Item B and get $1 off.
- Buy 2 of Item C for $5 each.
Real example created: "Buy 3 Get 10% Off"
- Applicable To: Category → Action Figures
- Qty: 3
- Discount: 10%
- Result: When a customer buys 3 or more Action Figures, each item gets 10% off.
Criteria fields: Applicable To, Category/Collection/Item, Qty, Discount (Disc % / $ Off / Fixed Price)
Type 2: Mix & Match Promotion
Use case: Offer a discount when customers buy items from different categories or products together.
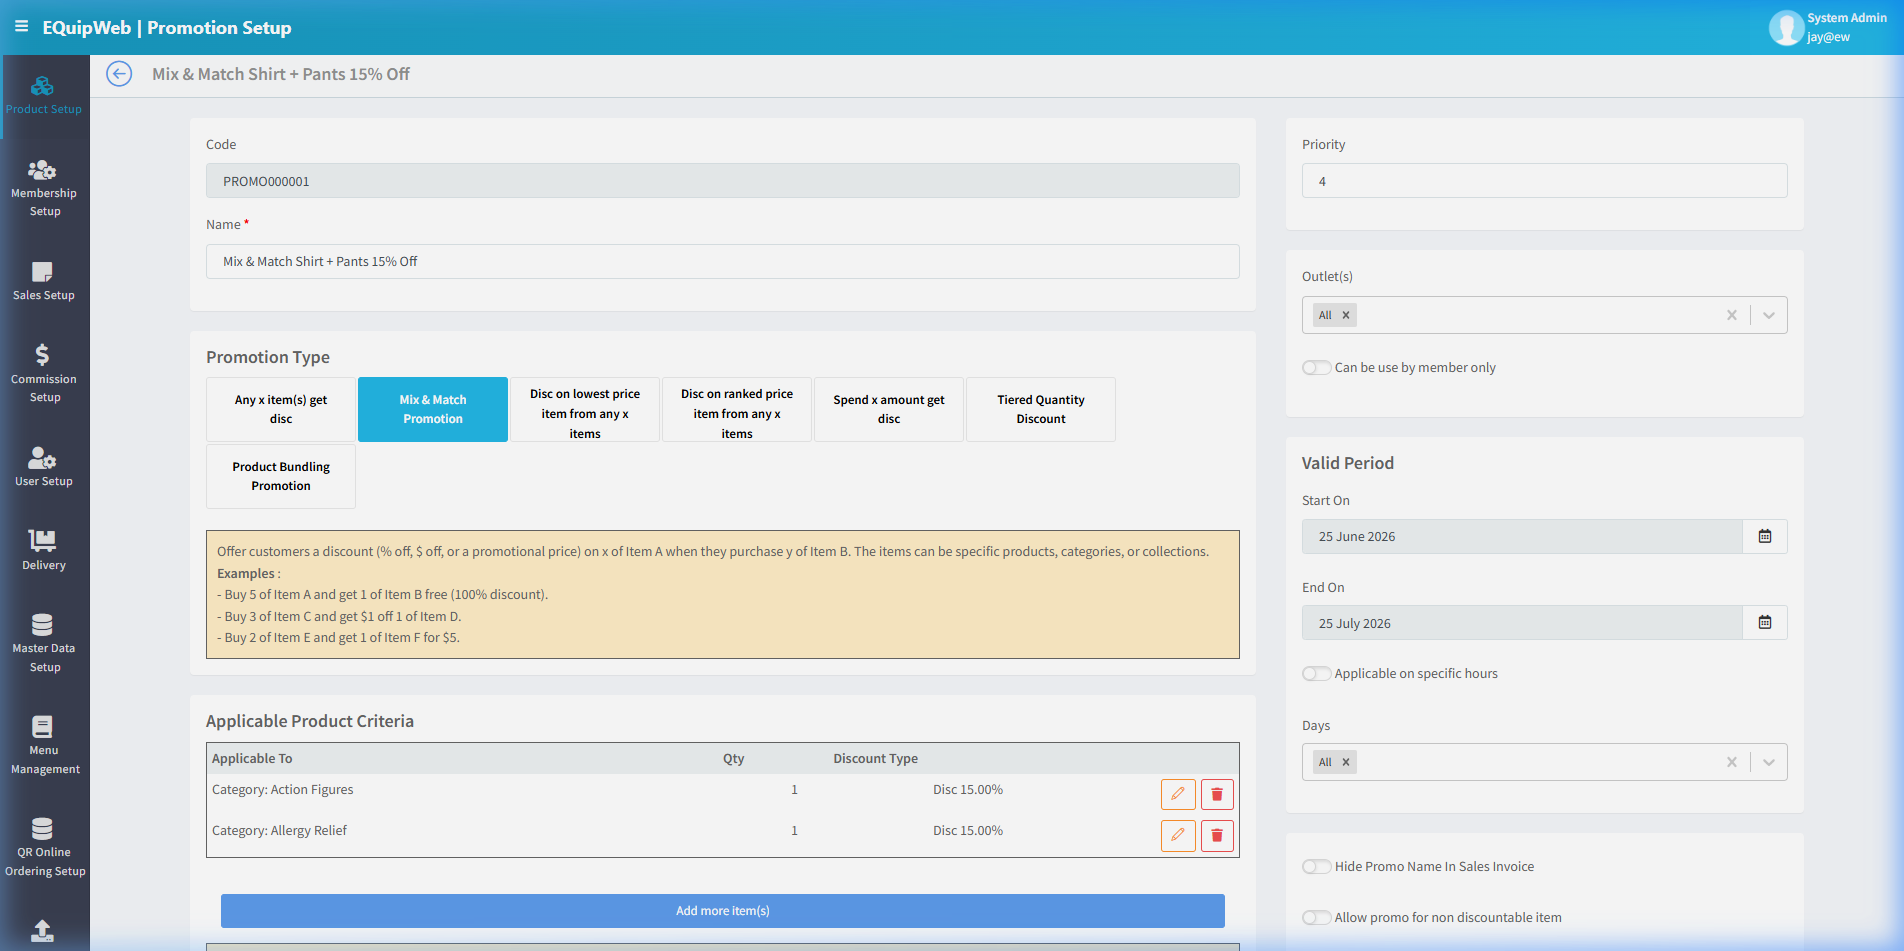
What the yellow help box says:
Offer customers a discount (% off, $ off, or a promotional price) on x of Item A when they purchase y of Item B. The items can be specific products, categories, or collections.
Examples:
- Buy 5 of Item A and get 1 of Item B free (100% discount).
- Buy 3 of Item C and get $1 off 1 of Item D.
- Buy 2 of Item E and get 1 of Item F for $5.
Real example created: "Mix & Match Shirt + Pants 15% Off"
- Criteria Row 1: Category → Action Figures, Qty: 1, Disc: 15%
- Criteria Row 2: Category → Allergy Relief, Qty: 1, Disc: 15%
- Result: Customer must buy at least 1 from each category to trigger the 15% discount on both.
Key difference from Type 1: Requires items from multiple criteria rows (AND logic), while Type 1 applies to items from a single criteria (OR logic).
Type 3: Disc on Lowest Price Item from Any x Items
Use case: Automatically discount the cheapest item when a customer buys a certain quantity.
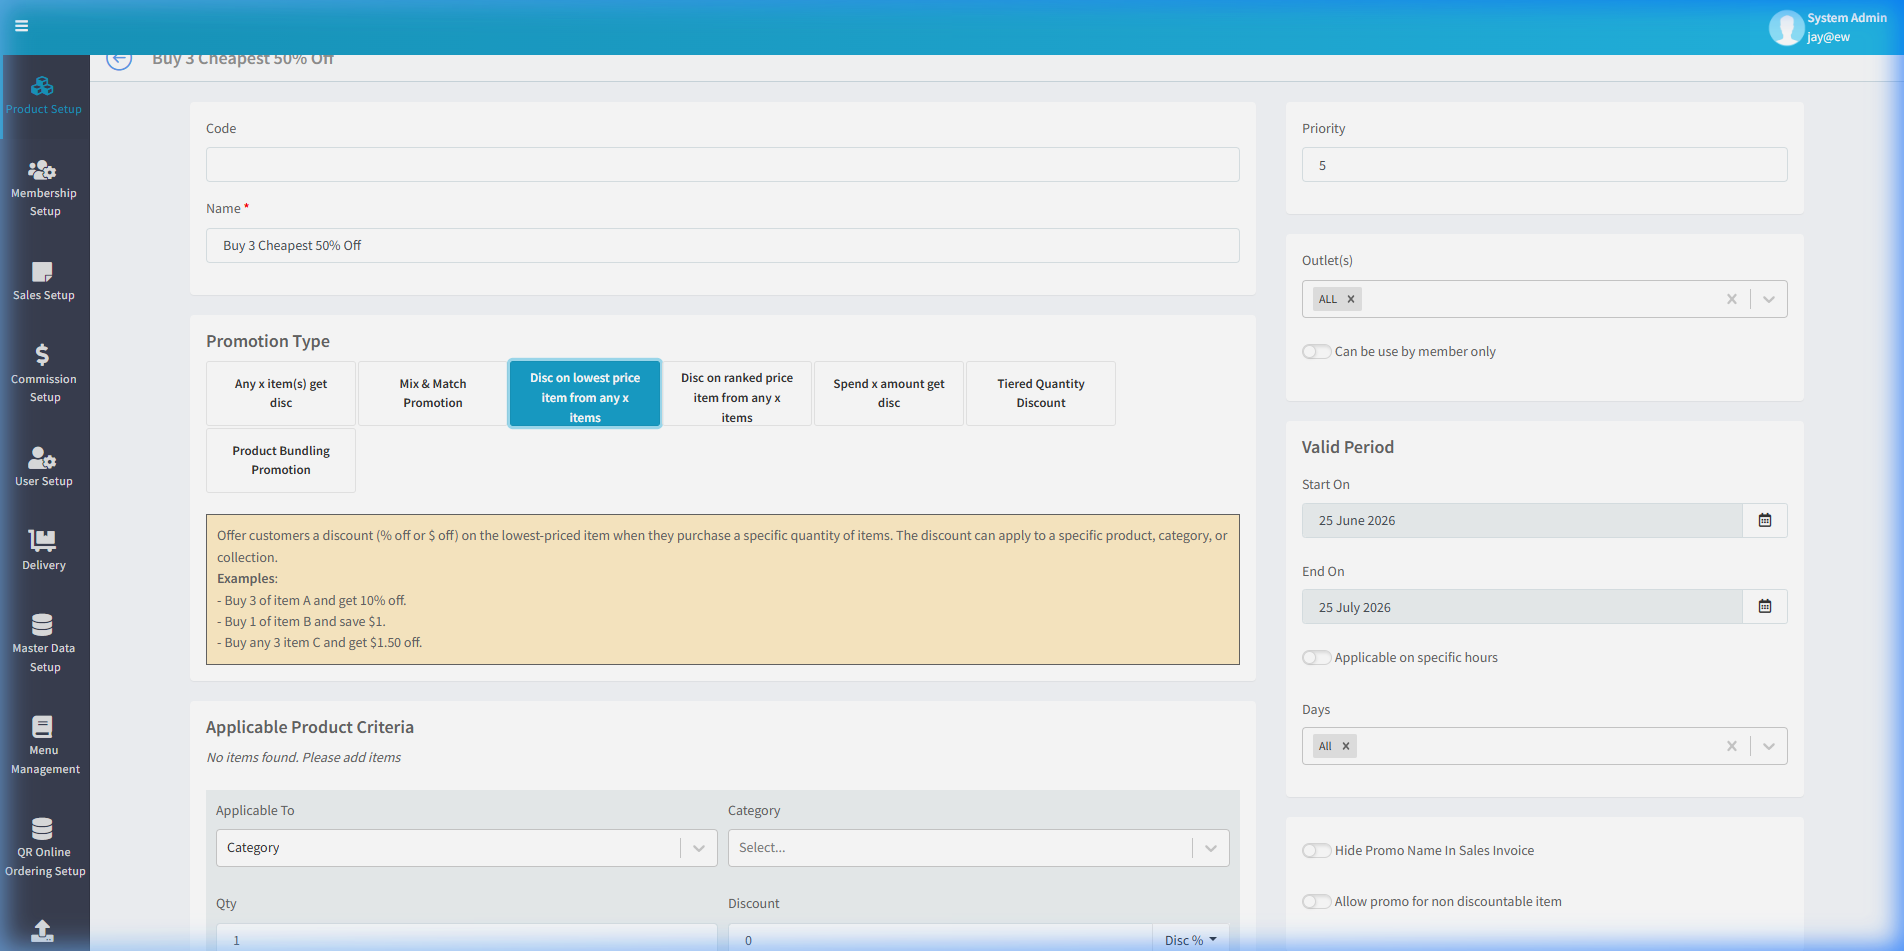
What the yellow help box says:
Offer customers a discount (% off or $ off) on the lowest-priced item when they purchase a specific quantity of items. The discount can apply to a specific product, category, or collection.
Examples:
- Buy 3 of Item A and get 10% off.
- Buy 1 of Item B and save $1.
- Buy any 3 Item C and get $1.50 off.
Real example created: "Buy 3 Cheapest 50% Off"
- Applicable To: Category → Action Figures
- Qty: 3
- Discount: 50%
- Result: Customer buys 3 items → the cheapest one gets 50% off automatically.
Best for: "Buy 3, cheapest is half price" or "Buy 2, cheapest is free" promotions.
Type 4: Disc on Ranked Price Item from Any x Items
Use case: Discount a specific ranked-position item (e.g., 2nd cheapest, 3rd most expensive) in a group purchase.
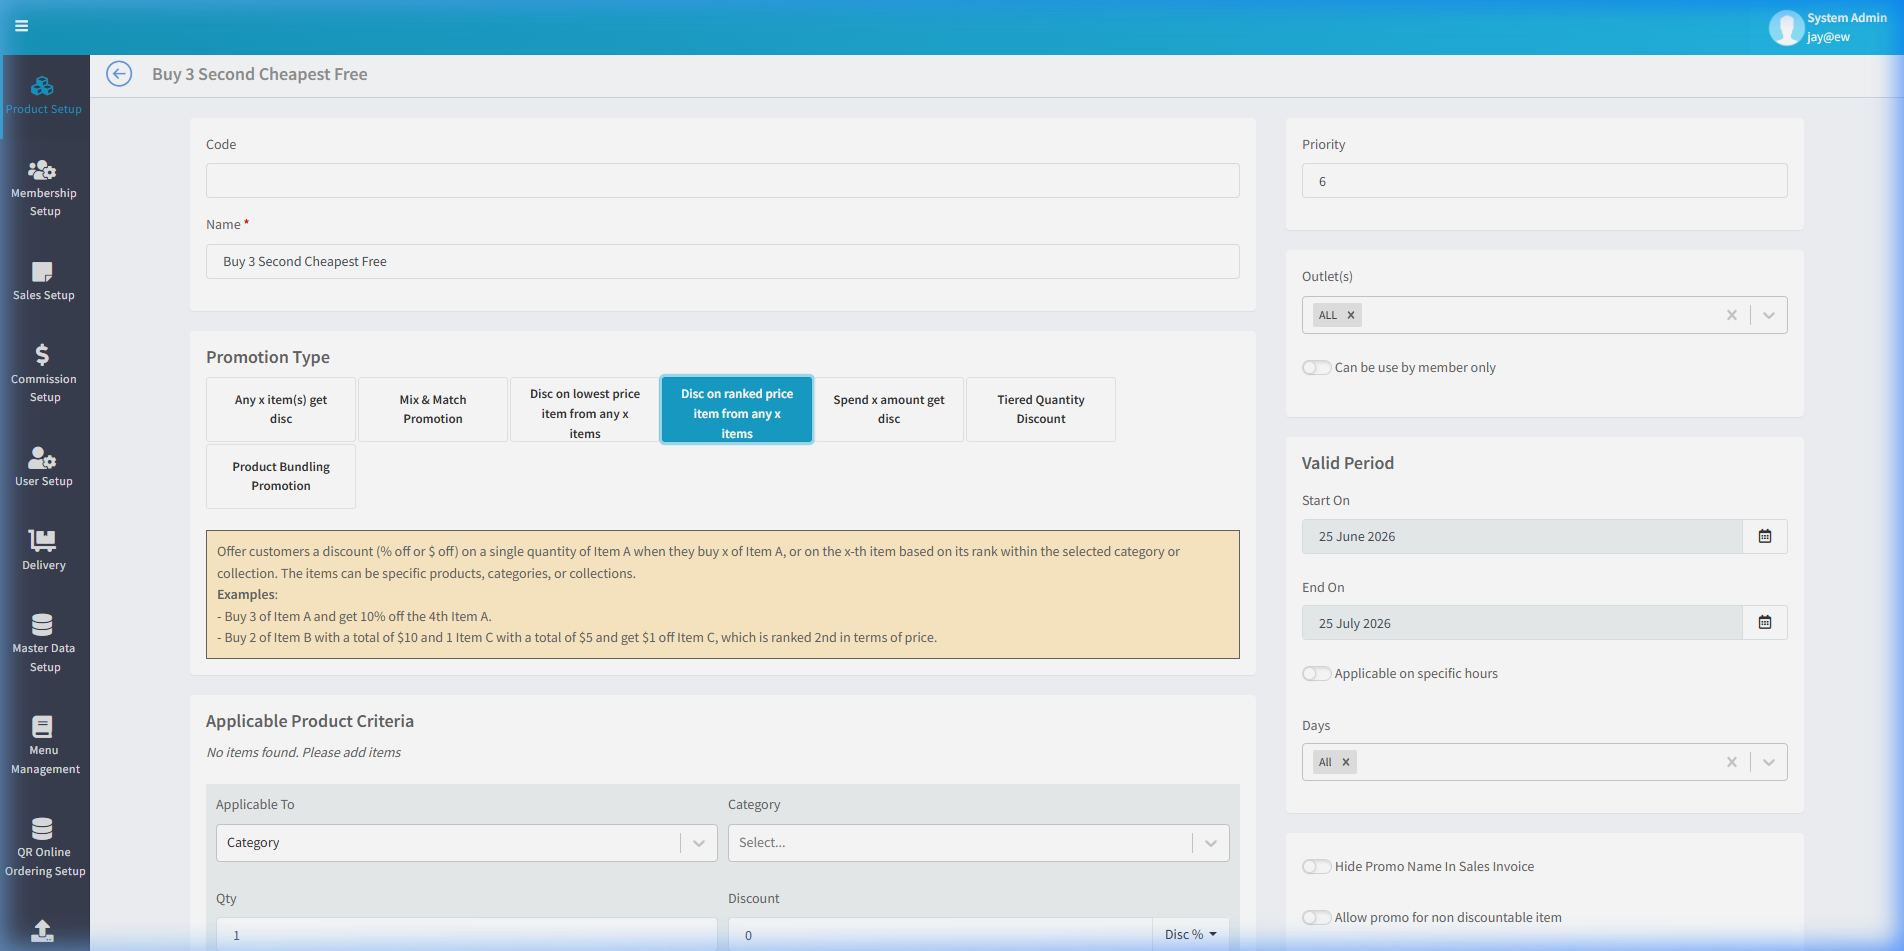
What the yellow help box says:
Offer customers a discount (% off or $ off) on a single quantity of Item A when they buy x of Item A, or on the x-th item based on its rank within the selected category or collection. The items can be specific products, categories, or collections.
Examples:
- Buy 3 of Item A and get 10% off the 4th Item A.
- Buy 2 of Item B with a total of $10 and 1 Item C with a total of $5 and get $1 off Item C, which is ranked 2nd in terms of price.
Real example created: "Buy 3 Second Cheapest Free"
- Applicable To: Category → Action Figures
- Qty: 3
- Discount: 100% (free)
- Result: Customer buys 3 items → the 2nd cheapest is free.
Key difference from Type 3: Type 3 always targets the cheapest; Type 4 lets you choose which rank gets the discount.
Type 5: Spend x Amount Get Disc
Use case: Offer a discount when the customer's spend on specific items reaches a minimum amount.
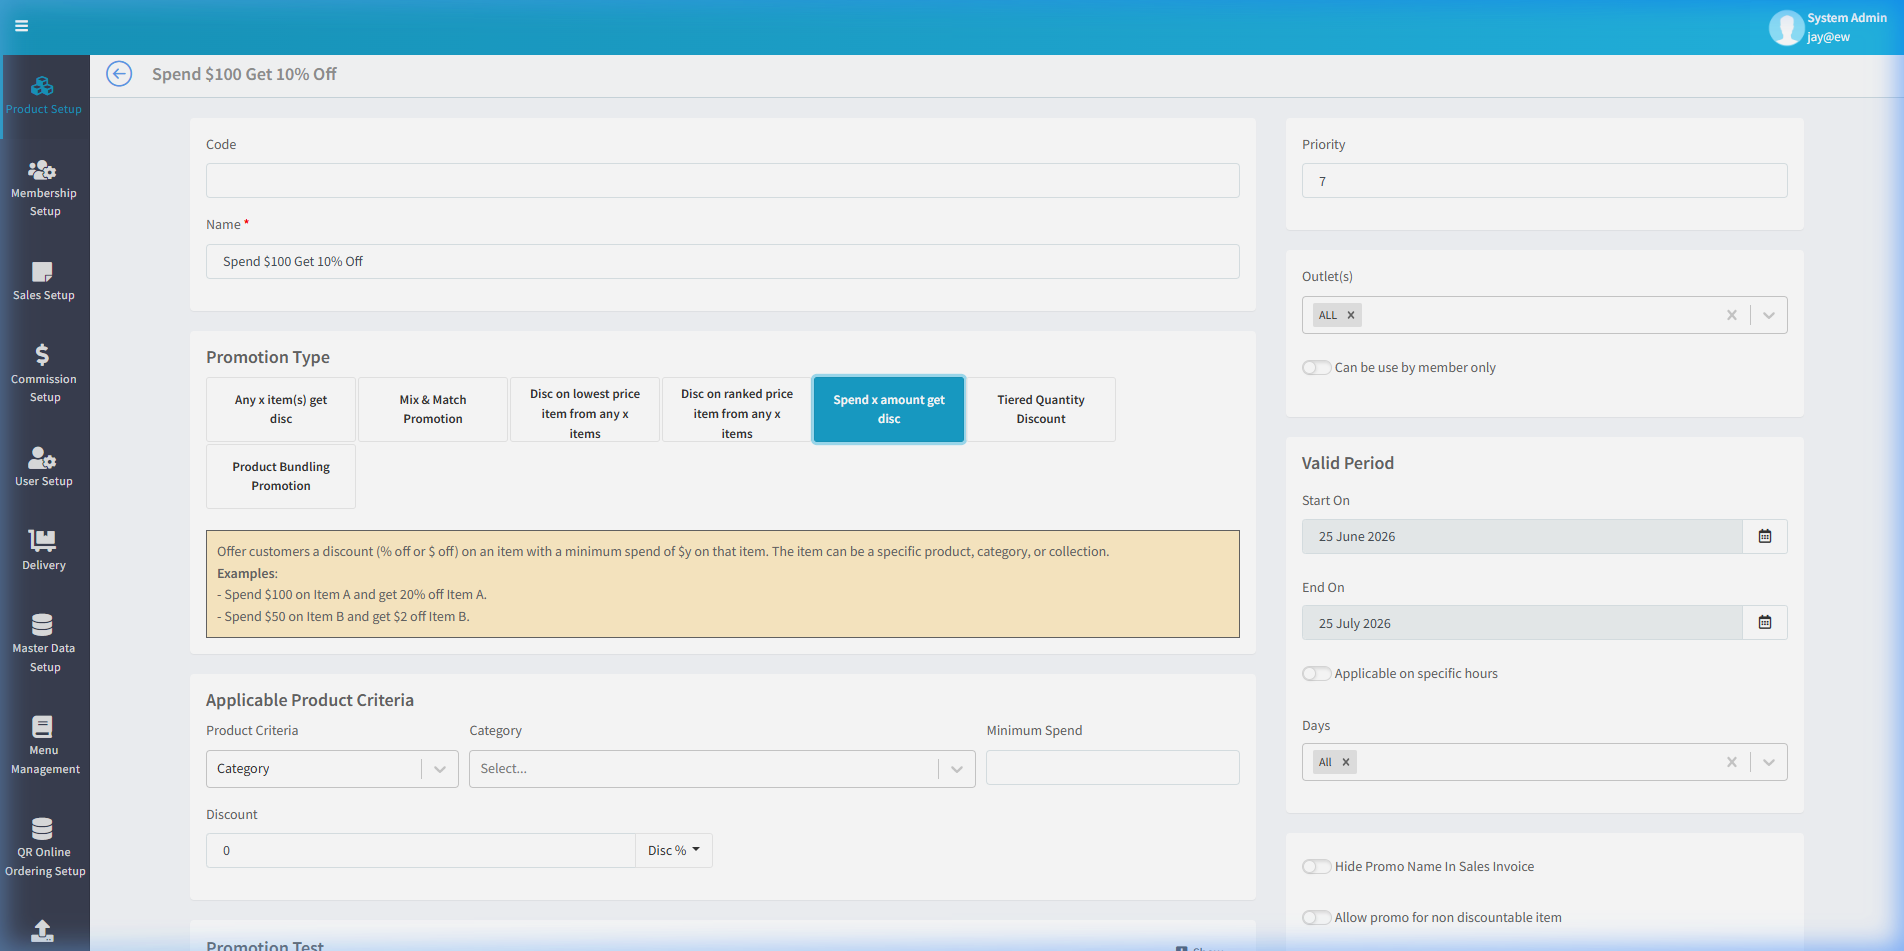
What the yellow help box says:
Offer customers a discount (% off or $ off) on an item with a minimum spend of $y on that item. The item can be a specific product, category, or collection.
Examples:
- Spend $100 on Item A and get 20% off Item A.
- Spend $50 on Item B and get $2 off Item B.
Real example created: "Spend $100 Get 10% Off"
- Product Criteria: Category
- Minimum Spend: 100
- Discount: 10%
- Result: When a customer's subtotal for the category reaches $100, they get 10% off.
Unique fields: This type has a "Minimum Spend" field instead of a "Qty" field. The discount triggers based on spending amount, not item count.
Type 6: Tiered Quantity Discount
Use case: Set volume-based pricing tiers — the more you buy, the bigger the discount.
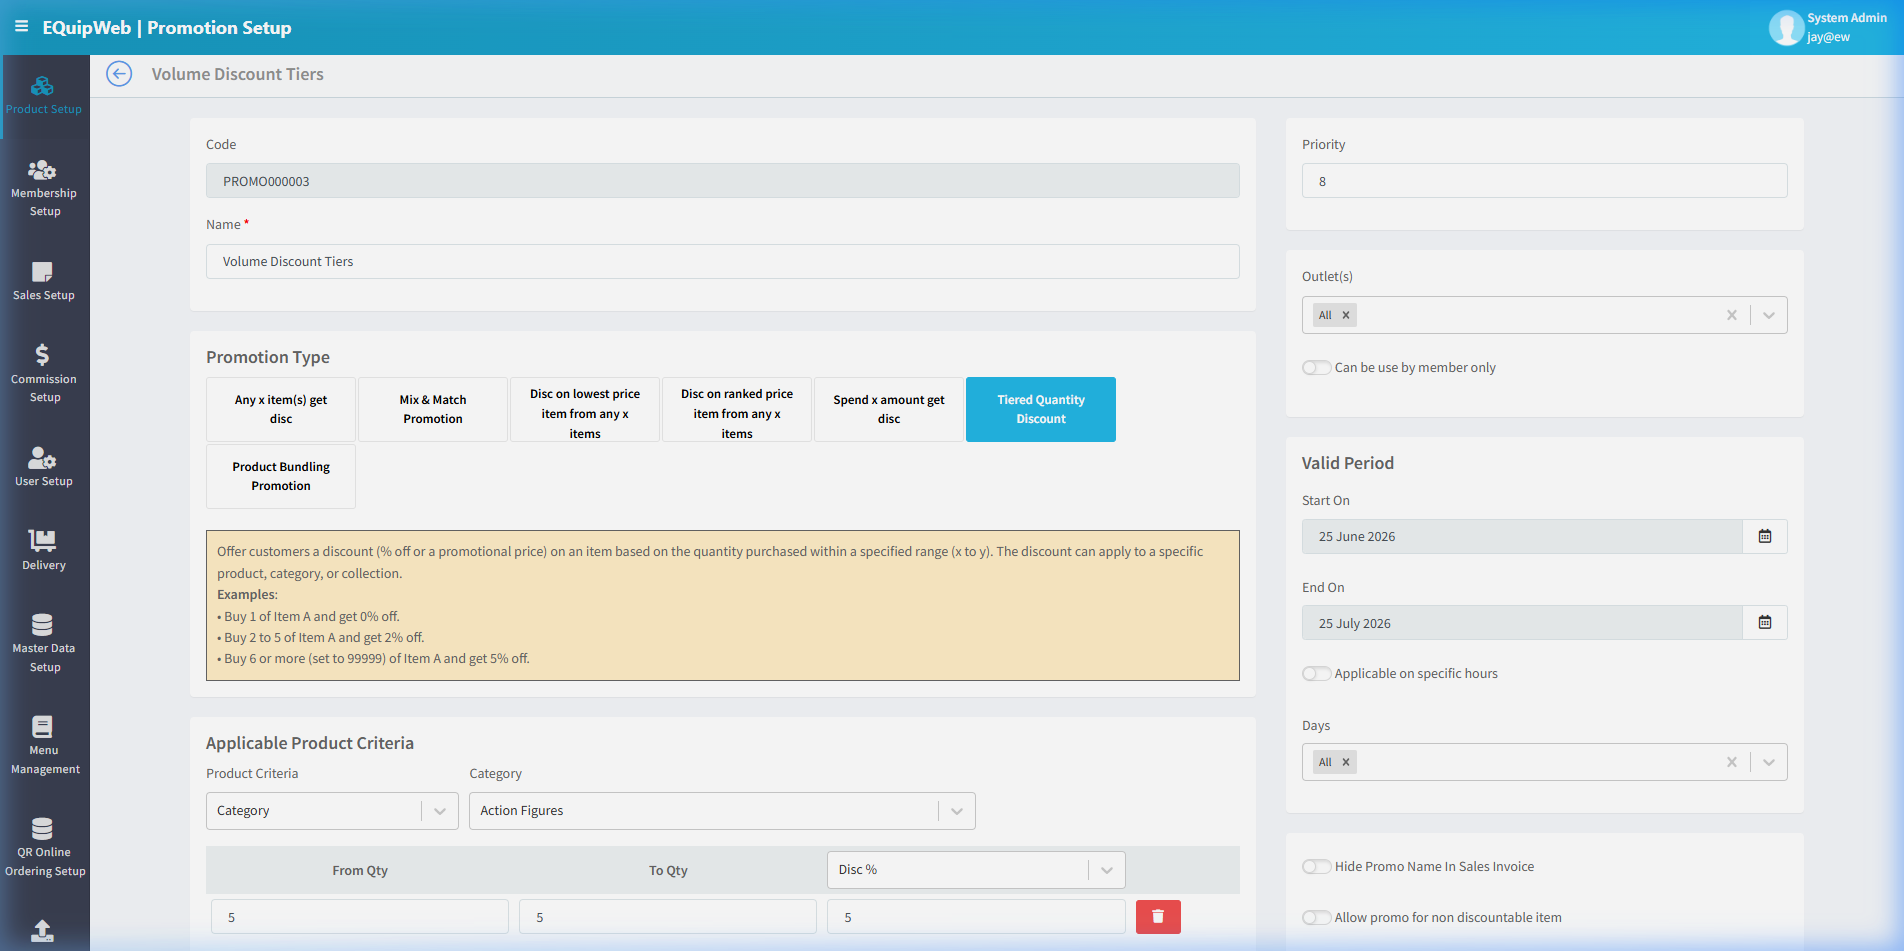
What the yellow help box says:
Offer customers a discount (% off or a promotional price) on an item based on the quantity purchased within a specified range (x to y). The discount can apply to a specific product, category, or collection.
Examples:
- Buy 1 of Item A and get 0% off.
- Buy 2 to 5 of Item A and get 2% off.
- Buy 6 or more (set to 99999) of Item A and get 5% off.
Real example created: "Volume Discount Tiers"
- Product Criteria: Category → Action Figures
- Tier: From Qty 5, To Qty 5, Disc 5%
- Result: When buying 5 items, get 5% off. You can add multiple tiers for progressive discounts.
Unique fields: This type has "From Qty" and "To Qty" columns instead of a single Qty field, allowing you to define quantity ranges. Add multiple rows for progressive tier discounts.
Type 7: Product Bundling Promotion
Use case: Bundle specific products together at a fixed promotional price.
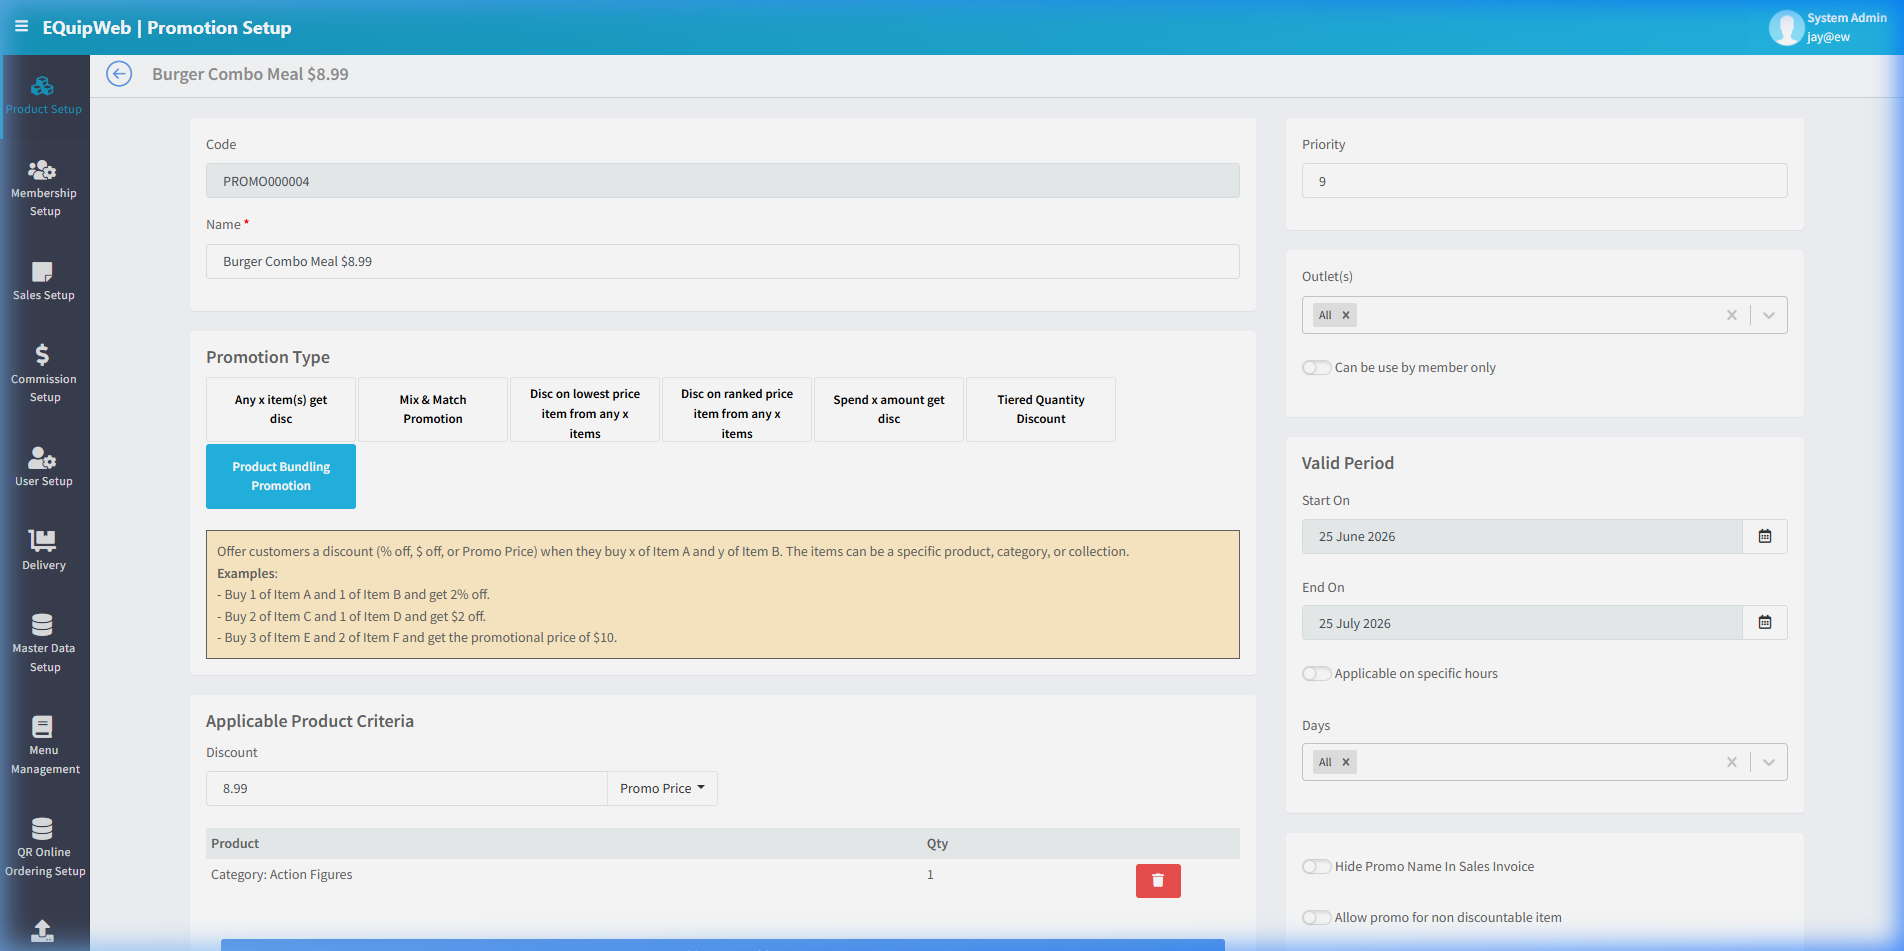
What the yellow help box says:
Offer customers a discount (% off, $ off, or Promo Price) when they buy x of Item A and y of Item B. The items can be a specific product, category, or collection.
Examples:
- Buy 1 of Item A and 1 of Item B and get 2% off.
- Buy 2 of Item C and 1 of Item D and get $2 off.
- Buy 3 of Item E and 2 of Item F and get the promotional price of $10.
Real example created: "Burger Combo Meal $8.99"
- Discount: 8.99 with type Promo Price
- Product: Category → Action Figures, Qty: 1
- Result: When the customer buys the bundled items, they pay $8.99 total instead of individual prices.
Unique fields: The Discount field sits above the product criteria (not per-row). The discount type can be set to "Promo Price" — a fixed bundle price regardless of individual item costs.
2.9.4 Applicable Product Criteria
This section defines which products get the promotion:
| Field | Type | Description |
|---|---|---|
| Applicable To | Dropdown | Category, Collection, Item, or All Items |
| Category / Collection / Item | Dropdown | Select the specific target (shown based on "Applicable To" selection) |
| Qty | Number | Quantity threshold for the promotion rule |
| Discount | Number + Type | Discount amount with type dropdown: Disc %, $ Off, Fixed Price, or Promo Price |
Actions
| Button | Function |
|---|---|
| + Add Item / Add more item(s) | Add another product criteria row (blue button, shown after first save) |
| ✏️ Edit | Edit an existing criteria row |
| 🗑️ Delete | Remove a criteria row |
[!IMPORTANT] The yellow note below the criteria says: "Promotions are applied independently to each qualifying line item, so customers do not need to purchase all the criteria items to receive the discount." This applies to Type 1 only. Mix & Match (Type 2) and Bundling (Type 7) require ALL criteria to be met.
2.9.5 Promotion Test (Edit Mode)
After saving, a Promotion Test section appears at the bottom with a Show button. This lets you simulate the promotion to verify it works correctly before going live.
2.9.6 Save Actions
| Button | Function |
|---|---|
| Save | Saves the promotion |
| Save & New | Saves then opens a new blank form |
| Delete / Restore | Soft-delete or restore the promotion (Edit mode only) |
💡 Quick Comparison: Which Type to Use?
| Scenario | Best Type |
|---|---|
| "Buy 3 get 10% off" | Type 1 — Any x Item(s) get disc |
| "Buy a shirt + pants, get 15% off both" | Type 2 — Mix & Match |
| "Buy 3, cheapest is half price" | Type 3 — Disc on lowest price |
| "Buy 3, 2nd cheapest is free" | Type 4 — Disc on ranked price |
| "Spend $100 get 10% off" | Type 5 — Spend x amount |
| "Buy 1-5: full price, 6+: 5% off" | Type 6 — Tiered Quantity |
| "Burger + Fries + Drink = $8.99" | Type 7 — Product Bundling |
[!IMPORTANT] When multiple promotions apply to the same product, the one with the highest Priority value wins. Set priority numbers carefully to avoid conflicts. For example: store-wide 10% = Priority 3, category-specific 20% = Priority 5, VIP member 25% = Priority 10.
Access & Permissions
| Role | View | Create | Edit | Delete |
|---|---|---|---|---|
| Admin | Yes | Yes | Yes | Yes |
| Supervisor | Yes | Yes | Yes | No |
| Cashier | No backend access | — | — | — |
[!NOTE] Exact permissions depend on the Privileges Setup configured for each role. Contact your administrator if you cannot access this page.
How to Delete a Promotion
- Navigate to Promotion Setup from the sidebar menu.
2. Click the name or code link (blue text) of the record you want to delete.
3. In the edit form, scroll down to the bottom.
4. Click the Delete button (red button).
5. A confirmation dialog appears — click Yes to confirm deletion.
Expected Result: The record is soft-deleted — it is hidden from the active list and POS terminals but can be restored later using the "Show Deleted" filter.
[!WARNING] Records linked to active transactions or other modules cannot be deleted. The system will display an error if deletion is not allowed.
How to Add a New Promotion
- Navigate to Promotion Setup from the sidebar menu.
-
Click the + Add New button (green button).
-
Fill in the required fields in the form.
-
Fill in any optional fields as needed.
-
Click Save to create the new promotion.
✅ Expected Result: The new promotion appears in the list and is available for use across the system.
FAQ
Q: Why is my product not showing on the POS? A: The POS needs to sync first. Check Terminal Status to see the last sync time. Also verify the product is not deleted and is assigned to the correct outlet.
Q: Can I delete a product that has sales history? A: You can soft-delete it (it will be hidden from active lists and POS), but it cannot be permanently removed because it is linked to transaction records.
Q: How do I update prices for multiple products at once? A: Use the Data Importer > Product Importer to bulk update. Export the current list, modify prices in the spreadsheet, then re-import.
Troubleshooting
| Issue | Possible Cause | Solution |
|---|---|---|
| Cannot save the record | Required fields are empty or invalid | Check all fields marked with * and fill in valid data |
| Record not appearing in POS | POS terminal has not synced yet | Wait for the next sync cycle or manually trigger sync from Terminal Status |
| Cannot delete the record | Record is being used by other modules | Check if the record is linked to active transactions, products, or other settings |
| Changes not taking effect | Browser cache showing old data | Refresh the page (Ctrl+F5) or clear browser cache |
| "Duplicate" error on save | A record with the same name/code already exists | Search the list (including deleted records) for duplicates |
| Page not loading | Session expired or network issue | Log out and log back in. Check your internet connection |
Related Menus
- Category Setup — product categorization
- Department Setup — reporting hierarchy
- Sales Setup > GST Setup — tax rates for products
- Data Importer > Product Importer — bulk product upload
- Sales Setup > Payment Mode — payment methods at POS
Open Questions / Confirmation Needed
[!NOTE] The following items may vary depending on your system version and configuration:
- Exact permission settings depend on your Privileges Setup configuration
- Sync timing to POS terminals depends on network conditions and sync schedule
- Some features may require additional licensing or module activation
- Field behavior may differ between EQuip versions
If you encounter behavior not described in this manual, contact your system administrator or EQuip support team.
Related Articles
Promotion Importer
? Backend — EQuipWebRetail ModeData Importer & Exporter Chapter 10: Data Importer — 10.4 Promotion Importer Use Importer to manage and configure this feature in your EQuipWeb system. Use the Promotion Importer to create or update many promotions at ...Campaign Setup
? Backend — EQuipWebRetail ModeMembership Setup Chapter 3: Membership Setup — 3.6 Campaign Setup Use Campaign Setup to create time-limited promotions for your loyalty members — like "Double Points Weekend" or "Birthday Month 20% Off". Campaigns run ...Collection Setup
? Backend — EQuipWebRetail ModeProduct Setup Chapter 2: Product Setup — 2.7 Collection Setup Use Collection Setup to group products into reusable sets. Unlike categories (which are for organizing), collections are for linking products together — for ...Referral Setup
? Backend — EQuipWebRetail ModeMembership Setup Chapter 3: Membership Setup — 3.4 Referral Setup Use Referral Setup to reward your existing members when they bring in new customers. Set up the reward — like bonus points or a discount — and the ...Membership Setup
? Backend — EQuipWebRetail ModeMembership Setup Chapter 3: Membership Setup — 3.1 Membership List The Membership List is where you manage all your loyalty members. You can look up a customer, check their points balance, update their details, or see ...