GST Setup
Sales Setup — 4.5 GST Setup
Use GST Setup to configure your tax rates. Whether it's GST in Singapore, VAT in other countries, or service charge — set the rate once here, and it will be applied automatically to your products at the POS. Each record defines a tax percentage and its commence date — when that rate officially takes effect. Products and surcharges reference these tax rates for automatic tax calculation at POS.
When to use this: When you need to create or manage tax rates for different product categories (e.g., standard rate, zero-rated, exempt).
Prerequisites
- No prerequisites — GST rates are foundational setup
GST Rate List
📝 General Description
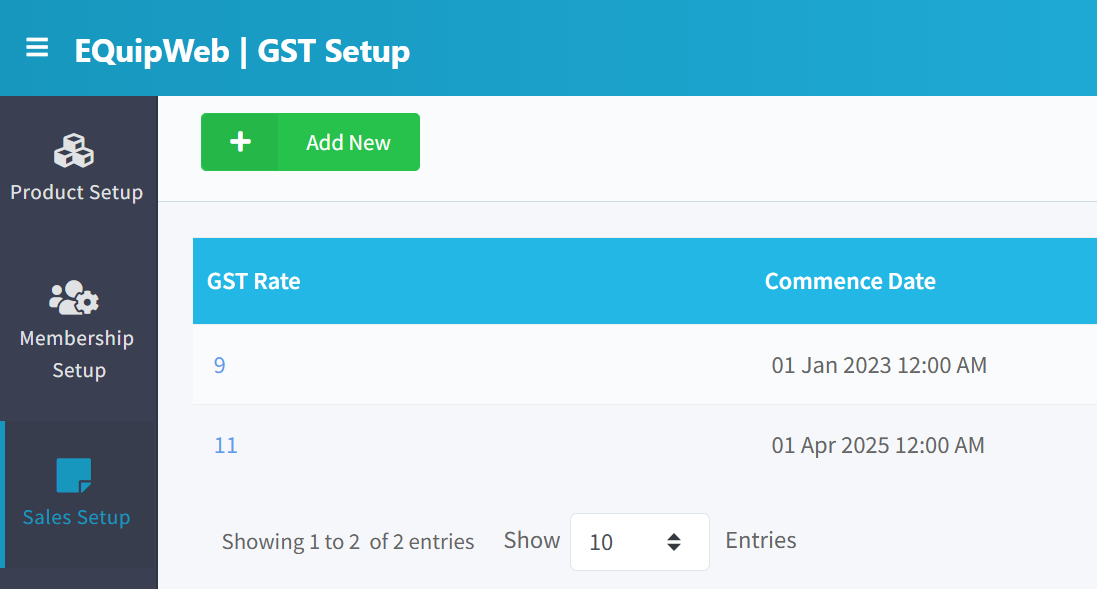
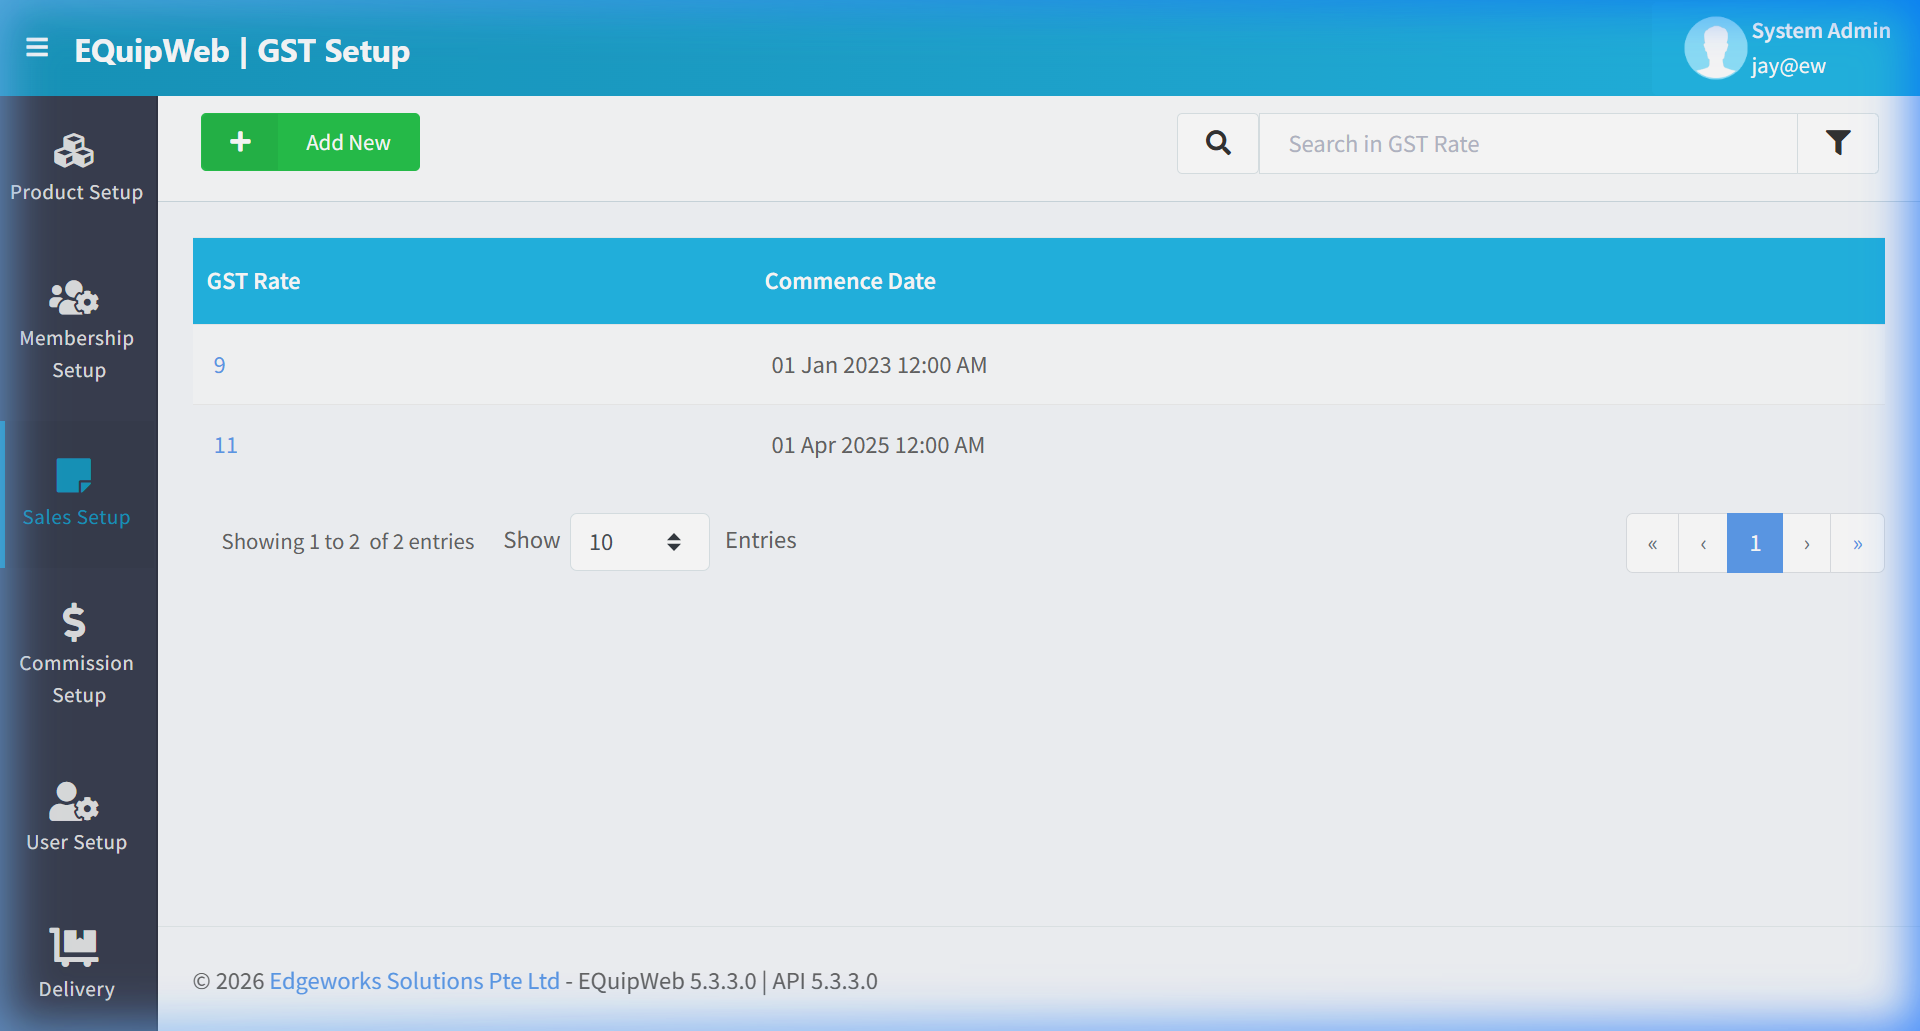
The list shows all configured tax rates with their effective dates. In the screenshot above, you can see two GST rates: 9% (effective 01 Jan 2023) and 11% (effective 01 Apr 2025). The system automatically uses the rate with the most recent commence date for new transactions.
⚙️ Configuration Guide & UI Elements
- 🔴 1. Add New
- Element Type: Button (Green)
- Function: Opens the form to add a new GST rate.
- 🔴 2. Search Bar
- Element Type: Input Field (
Search in GST Rate) - Function: Filters the list by rate percentage.
- Element Type: Input Field (
- 🔴 3. Filter Icon (🔽)
- Element Type: Funnel button
- Function: Opens the advanced filter panel with "Show Deleted" checkbox.
📊 Column Descriptions
| Column | Description | Example |
|---|---|---|
| GST Rate | Tax percentage (clickable — opens edit form) | 9, 11 |
| Commence Date | Date when this rate takes effect | 01 Jan 2023 12:00 AM |
Add / Edit GST Rate
Click + Add New or click a GST Rate link to open the form:
| Field | Type | Required | Description |
|---|---|---|---|
| GST Rate | Number (%) | Yes | The tax rate percentage. Example: 9 for 9% GST. |
| Commence Date | Date Picker | Yes | The date when this rate officially begins. |
💡 Example
Scenario: Singapore's GST increased from 8% to 9% on 1 Jan 2024.
- Before the change: GST Rate =
8, Commence Date =01 Jan 2023. - After the increase: Add a new record — GST Rate =
9, Commence Date =01 Jan 2024. - The system will automatically use 8% for transactions before 1 Jan 2024 and 9% for transactions on or after that date.
🔗 How GST Connects to Products
Each product in Product Setup has a GSTRule field that determines tax behavior:
| GSTRule | What Happens at POS |
|---|---|
| INC-GST | The selling price already includes GST. The system back-calculates the tax component. Example: Price $10.90 with 9% GST → Base price $10.00, Tax $0.90. |
| EXC-GST | GST is added on top of the selling price. Example: Price $10.00 + 9% GST = Customer pays $10.90. |
| NON-GST | No tax applied. The product is exempt. Example: Essential goods, medical items. |
[!IMPORTANT] When you change the GST rate here, it affects all products with INC-GST or EXC-GST rules. Always create a new rate record with the correct commence date rather than editing the existing one — this preserves the historical rate for past transaction reporting.
How to Add a GST Rate
- Navigate to Sales Setup > GST Setup and click + Add New.
- Enter the GST percentage and select the commence date.
- Click Save to apply.
Expected Result: The new GST rate is saved and will automatically apply to products from the commence date.
Actions
| Action | When Available | Description |
|---|---|---|
| Save | Always | Saves the GST rate |
| Save and New | Always | Saves then opens a blank form |
| Delete | Edit mode (not deleted) | Removes the rate |
| Restore | Edit mode (deleted) | Restores a safely deleted rate |
Access & Permissions
| Role | View | Create | Edit | Delete |
|---|---|---|---|---|
| Admin | Yes | Yes | Yes | Yes |
| Supervisor | Yes | Yes | Yes | No |
| Cashier | No backend access | — | — | — |
[!NOTE] Exact permissions depend on the Privileges Setup configured for each role. Contact your administrator if you cannot access this page.
How to Delete a GST
- Navigate to GST Setup from the sidebar menu.
2. Click the name or code link (blue text) of the record you want to delete.
3. In the edit form, scroll down to the bottom.
4. Click the Delete button (red button).
5. A confirmation dialog appears — click Yes to confirm deletion.
Expected Result: The record is soft-deleted — it is hidden from the active list and POS terminals but can be restored later using the "Show Deleted" filter.
[!WARNING] Records linked to active transactions or other modules cannot be deleted. The system will display an error if deletion is not allowed.
How to Edit a GST
- Navigate to GST Setup from the sidebar menu.
-
Click on the name or code link (blue text) of the record you want to edit.
-
The edit form opens with all current values pre-filled. Modify the fields as needed.
- Click Save to apply your changes.
✅ Expected Result: The gst is updated and changes take effect immediately.
FAQ
Q: Why is this payment mode not appearing on the POS? A: Check that the payment mode is marked as Active and assigned to the correct outlet. The POS also needs to sync.
Q: Can I edit a completed sales transaction? A: No. Completed transactions cannot be edited. You can void the transaction and create a new one if correction is needed.
Q: How do I set up a new tax rate without affecting past transactions? A: Create a new GST rate with a future Commence Date. The system will automatically apply the old rate to past transactions and the new rate from the effective date.
Troubleshooting
| Issue | Possible Cause | Solution |
|---|---|---|
| Cannot save the record | Required fields are empty or invalid | Check all fields marked with * and fill in valid data |
| Record not appearing in POS | POS terminal has not synced yet | Wait for the next sync cycle or manually trigger sync from Terminal Status |
| Cannot delete the record | Record is being used by other modules | Check if the record is linked to active transactions, products, or other settings |
| Changes not taking effect | Browser cache showing old data | Refresh the page (Ctrl+F5) or clear browser cache |
| "Duplicate" error on save | A record with the same name/code already exists | Search the list (including deleted records) for duplicates |
| Page not loading | Session expired or network issue | Log out and log back in. Check your internet connection |
Related Menus
- Product Setup > Product List — products linked to pricing
- Master Data > Outlet Setup — outlet-specific payment modes
- Master Data > POS Setup — POS terminal configuration
- Setting > Feature Setup — enable/disable sales features
Open Questions / Confirmation Needed
[!NOTE] The following items may vary depending on your system version and configuration:
- Exact permission settings depend on your Privileges Setup configuration
- Sync timing to POS terminals depends on network conditions and sync schedule
- Some features may require additional licensing or module activation
- Field behavior may differ between EQuip versions
If you encounter behavior not described in this manual, contact your system administrator or EQuip support team.
Related Articles
Company Setup
? Backend — EQuipWebRetail ModeMaster Data Setup Chapter 8: Master Data Setup — 8.9 Company Setup Use Company Setup (under Master Data) to enter your company's official business details — company name, registration number, address, and contact ...Surcharge Setup
? Backend — EQuipWebRetail ModeSales Setup Sales Setup — 4.11 Surcharge Setup Use Surcharge Setup to add extra charges that apply automatically — like a 10% service charge or a public holiday surcharge. Once set up, the surcharge is added to every ...Currency Setup
? Backend — EQuipWebRetail ModeSales Setup Chapter 4: Sales Setup — 4.8 Currency Setup Use Currency Setup to add the currencies your business accepts. If you only accept one currency (e.g., SGD), it's already set up for you. Multi-currency ...Category Setup
? Backend — EQuipWebRetail ModeProduct Setup Chapter 2: Product Setup — 2.3 Category Setup Use Category Setup to organize your products into groups — like "Beverages", "Snacks", or "Electronics". When your products are neatly categorized, your staff ...Outlet Setup
? Backend — EQuipWebRetail ModeMaster Data Setup Chapter 8: Master Data Setup — 8.3 Outlet Setup Use Outlet Setup to add and manage your store locations. Each outlet has its own address, contact details, operating hours, and receipt settings. When ...