Outlet Pricing Setup
Chapter 2: Product Setup — 2.11 Outlet Pricing
Use Outlet Pricing to set different prices for the same product at different outlets. For example, a drink might cost .00 at your city store but .50 at the suburban one. Set it here, and each POS will automatically show the correct price.
When to use this: When different outlets need different prices for the same product.
Prerequisites
- Outlets must exist (Master Data > Outlet Setup)
- Products must exist with base pricing
Outlet Pricing Setup
📝 General Description
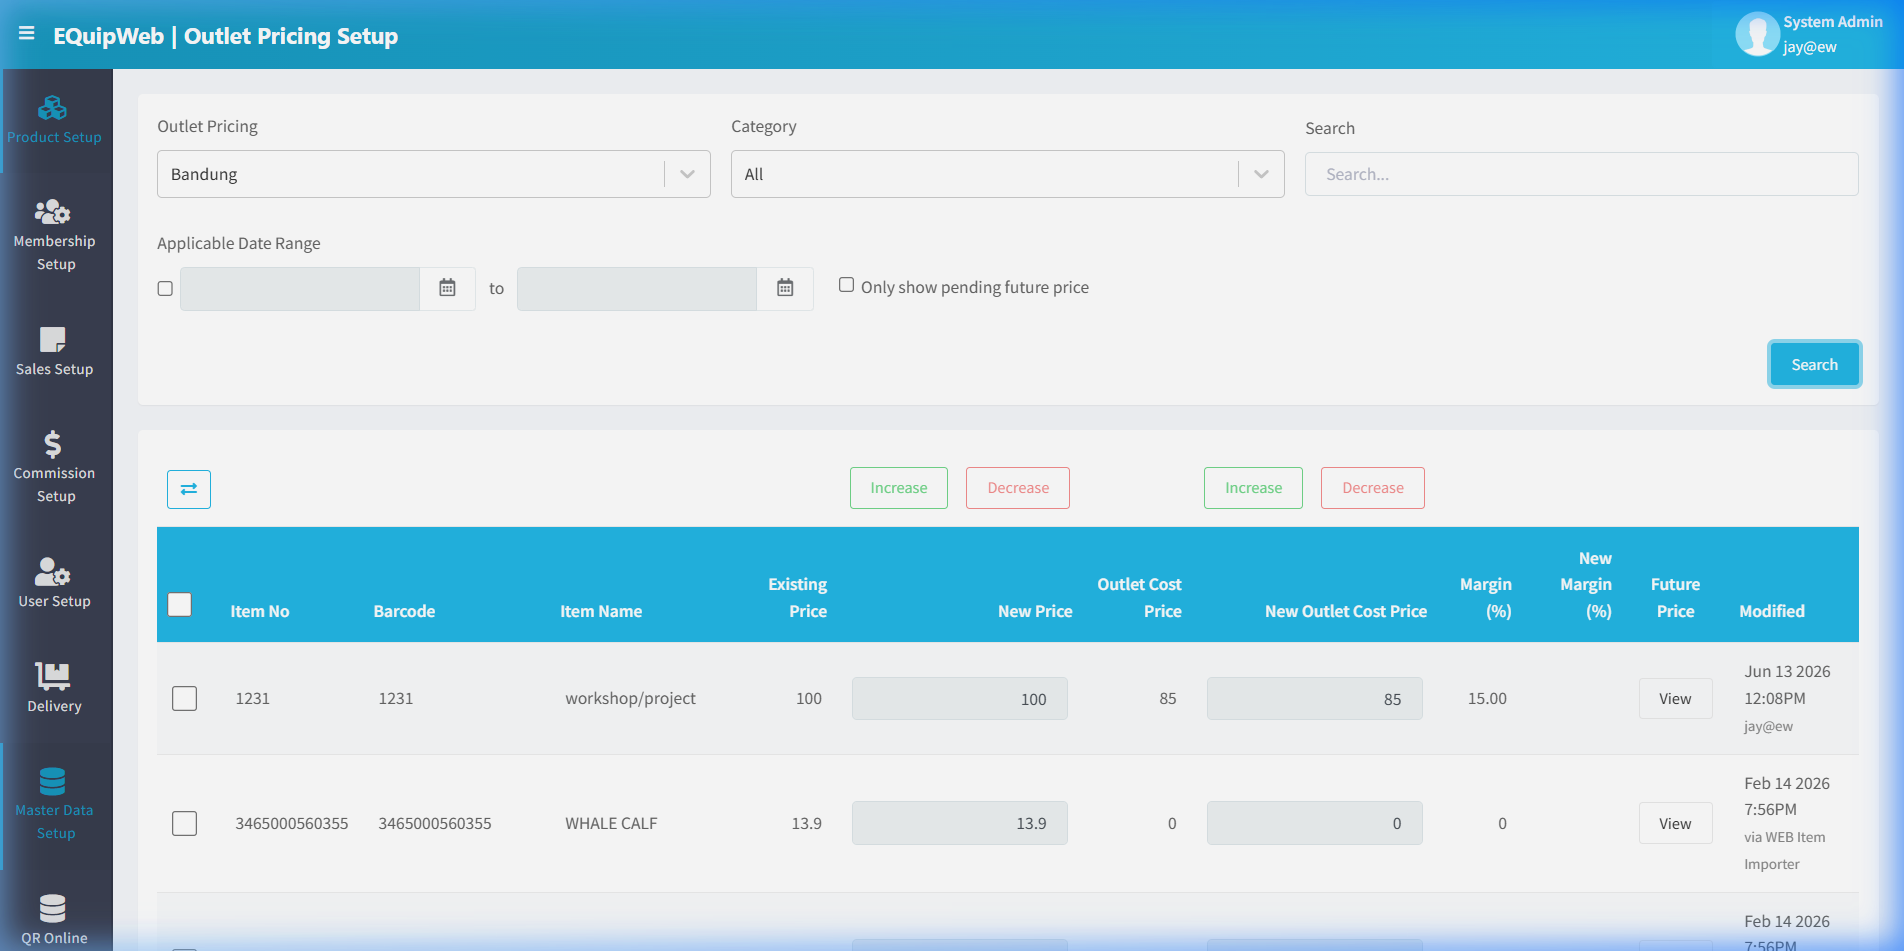
The Outlet Pricing Setup page allows you to manage different product prices per outlet location. Use the filter panel at the top to select an outlet and category, then view and adjust prices in the data grid below.
⚙️ How It Works
- By default, every product has one retail price (set in Product Setup).
 2. With Outlet Pricing, you can override this price for specific outlets.
3. When a product is sold at an outlet with a custom price, the outlet price is used instead of the default price.
4. Outlets without a custom price use the default product price.
2. With Outlet Pricing, you can override this price for specific outlets.
3. When a product is sold at an outlet with a custom price, the outlet price is used instead of the default price.
4. Outlets without a custom price use the default product price.
Filter Panel
| Filter | Type | Description |
|---|---|---|
| Outlet Pricing | Dropdown | Select the outlet to view/edit pricing for (e.g., "Bandung") |
| Category | Dropdown | Filter products by category (default: "All") |
| Search | Text Input | Search by product name or code |
| Applicable Date Range | Date Pickers | Optional date range for scheduled future price changes |
| Only show pending future price | Checkbox | Show only items with upcoming scheduled price changes |
| Search | Teal Button | Execute the search with current filters |
Price Adjustment Buttons
The toolbar between the filter panel and data grid contains bulk adjustment buttons:
| Button | Style | Function |
|---|---|---|
| ↕️ (Transfer icon) | Blue outline | Transfer/sync prices between outlets |
| Increase | Green outline | Increase the Existing Price by a fixed amount or percentage for selected items |
| Decrease | Red outline | Decrease the Existing Price by a fixed amount or percentage for selected items |
| Increase | Green text | Increase the Outlet Cost Price by a fixed amount or percentage |
| Decrease | Red text | Decrease the Outlet Cost Price by a fixed amount or percentage |
Data Grid Columns
| Column | Description |
|---|---|
| ☐ | Checkbox for selecting items for bulk operations |
| Item No | Product code |
| Barcode | Product barcode |
| Item Name | Product display name |
| Existing Price | Current retail price (from Product Setup — master price) |
| New Price | Enter the new outlet-specific selling price here |
| Outlet Cost Price | Current cost price at this outlet |
| New Outlet Cost Price | Enter the updated cost price for this outlet |
| Margin (%) | Auto-calculated profit margin percentage |
[!NOTE] Changes made here only affect the selected outlet. The master product price (in Product Setup) remains unchanged. To update prices across all outlets simultaneously, change the price in Product Setup instead.
💡 Example
Example 1: CBD vs. Suburban Pricing
A bubble tea chain has different prices for CBD (downtown) and suburban outlets:
| Product | Default Price | CBD Outlet | Suburban Outlet |
|---|---|---|---|
| Pearl Milk Tea | $5.50 | $6.50 (outlet price) | $5.50 (default) |
| Matcha Latte | $6.00 | $7.00 (outlet price) | $6.00 (default) |
Example 2: Airport vs. Mall Pricing
An F&B chain charges premium prices at the airport:
| Product | Default (Mall) | Airport Outlet |
|---|---|---|
| Americano | $4.50 | $6.00 |
| Croissant | $3.90 | $5.50 |
[!TIP] Use the Applicable Date Range filter and "Only show pending future price" checkbox to manage scheduled price changes. This is useful for planning seasonal pricing adjustments or GST rate changes in advance.
Access & Permissions
| Role | View | Create | Edit | Delete |
|---|---|---|---|---|
| Admin | Yes | Yes | Yes | Yes |
| Supervisor | Yes | Yes | Yes | No |
| Cashier | No backend access | — | — | — |
[!NOTE] Exact permissions depend on the Privileges Setup configured for each role. Contact your administrator if you cannot access this page.
Expected Result: Changes are saved successfully and reflected across the system after the next POS sync.
How to Set Outlet-Specific Pricing
- Navigate to Product Setup > Outlet Pricing Setup from the sidebar menu.
- Select the Outlet from the dropdown at the top of the page.
- The list shows all products with their base price and outlet-specific price (if any).
- Click the product name to edit its outlet price.
- Enter the outlet-specific price in the price field.
- Click Save to apply the outlet pricing.
How to Edit Outlet Pricing
- Navigate to Outlet Pricing Setup and select the outlet.
- Find the product with existing outlet pricing.
- Click the product name to open the pricing form.
- Modify the price as needed.
- Click Save to update.
How to Remove Outlet Pricing (Reset to Base Price)
- Navigate to Outlet Pricing Setup and select the outlet.
- Find the product whose outlet price you want to remove.
- Click the product name to open the pricing form.
- Clear the outlet-specific price field (leave it empty or set to 0).
- Click Save — the product will revert to using the base price.
Expected Result: The product now uses the base price at this outlet instead of an outlet-specific price.
FAQ
Q: Why is my product not showing on the POS? A: The POS needs to sync first. Check Terminal Status to see the last sync time. Also verify the product is not deleted and is assigned to the correct outlet.
Q: Can I delete a product that has sales history? A: You can soft-delete it (it will be hidden from active lists and POS), but it cannot be permanently removed because it is linked to transaction records.
Q: How do I update prices for multiple products at once? A: Use the Data Importer > Product Importer to bulk update. Export the current list, modify prices in the spreadsheet, then re-import.
Troubleshooting
| Issue | Possible Cause | Solution |
|---|---|---|
| Cannot save the record | Required fields are empty or invalid | Check all fields marked with * and fill in valid data |
| Record not appearing in POS | POS terminal has not synced yet | Wait for the next sync cycle or manually trigger sync from Terminal Status |
| Cannot delete the record | Record is being used by other modules | Check if the record is linked to active transactions, products, or other settings |
| Changes not taking effect | Browser cache showing old data | Refresh the page (Ctrl+F5) or clear browser cache |
| "Duplicate" error on save | A record with the same name/code already exists | Search the list (including deleted records) for duplicates |
| Page not loading | Session expired or network issue | Log out and log back in. Check your internet connection |
Related Menus
- Category Setup — product categorization
- Department Setup — reporting hierarchy
- Sales Setup > GST Setup — tax rates for products
- Data Importer > Product Importer — bulk product upload
- Sales Setup > Payment Mode — payment methods at POS
Open Questions / Confirmation Needed
[!NOTE] The following items may vary depending on your system version and configuration:
- Exact permission settings depend on your Privileges Setup configuration
- Sync timing to POS terminals depends on network conditions and sync schedule
- Some features may require additional licensing or module activation
- Field behavior may differ between EQuip versions
If you encounter behavior not described in this manual, contact your system administrator or EQuip support team.
Field Reference
| Field | Required | Description |
|---|---|---|
| Name / Title | Yes | The display name for this record |
| Status / Active | — | Whether this record is active in the system |
| Created Date | Auto | System-generated creation timestamp |
| Modified Date | Auto | System-generated last modification timestamp |
[!NOTE] Additional fields specific to this page are documented in the sections above. The table above shows common fields present across most pages.
Related Articles
Outlet Setup
? Backend — EQuipWebRetail ModeMaster Data Setup Chapter 8: Master Data Setup — 8.3 Outlet Setup Use Outlet Setup to add and manage your store locations. Each outlet has its own address, contact details, operating hours, and receipt settings. When ...Outlet Group Setup
? Backend — EQuipWebRetail ModeMaster Data Setup Chapter 8: Master Data Setup — 8.5 Outlet Group Setup Use Outlet Group Setup to organize your outlets into logical groups — like "Central Region", "East Region", or "Franchise Stores". Grouping ...Role Setup
? Backend — EQuipWebRetail ModeUser Setup Chapter 6: User Setup — 6.2 Role Setup Use Role Setup to create job roles for your team — like "Cashier", "Supervisor", "Manager", or "Admin". Each role determines what a user can see and do in the system. ...Currency Setup
? Backend — EQuipWebRetail ModeSales Setup Chapter 4: Sales Setup — 4.8 Currency Setup Use Currency Setup to add the currencies your business accepts. If you only accept one currency (e.g., SGD), it's already set up for you. Multi-currency ...GST Setup
? Backend — EQuipWebRetail ModeSales Setup Sales Setup — 4.5 GST Setup Use GST Setup to configure your tax rates. Whether it's GST in Singapore, VAT in other countries, or service charge — set the rate once here, and it will be applied automatically ...