Profile & Account
Chapter 1: Getting Started — 1.3 Profile & Account
Use Account to manage and configure this feature in your EQuipWeb system.
The Profile section is accessed from the top-right corner of any EQuipWeb page. It provides quick access to your account settings, cross-module navigation, and logout.
When to use this: When you need to update your own account details, change your password, or view your login information.
Prerequisites
- User must have appropriate role permissions (see Access & Permissions above)
Profile Dropdown Menu
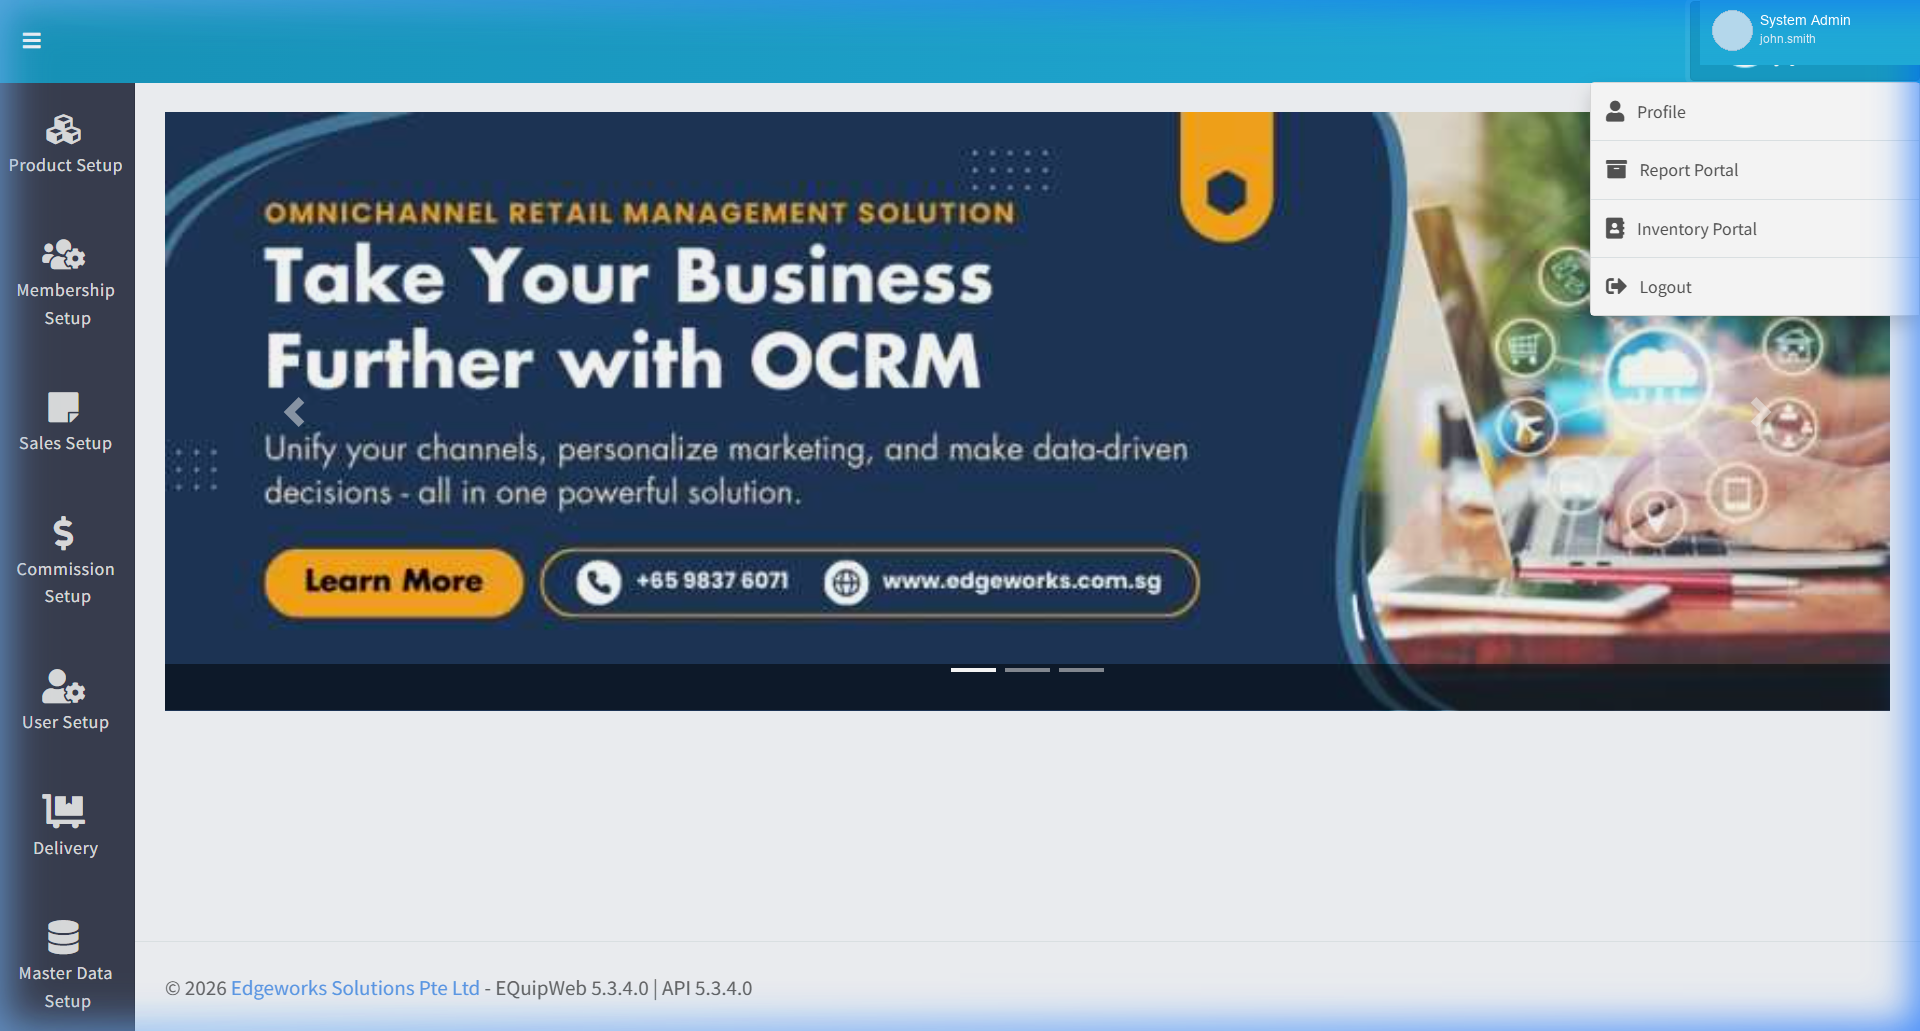
📝 General Description
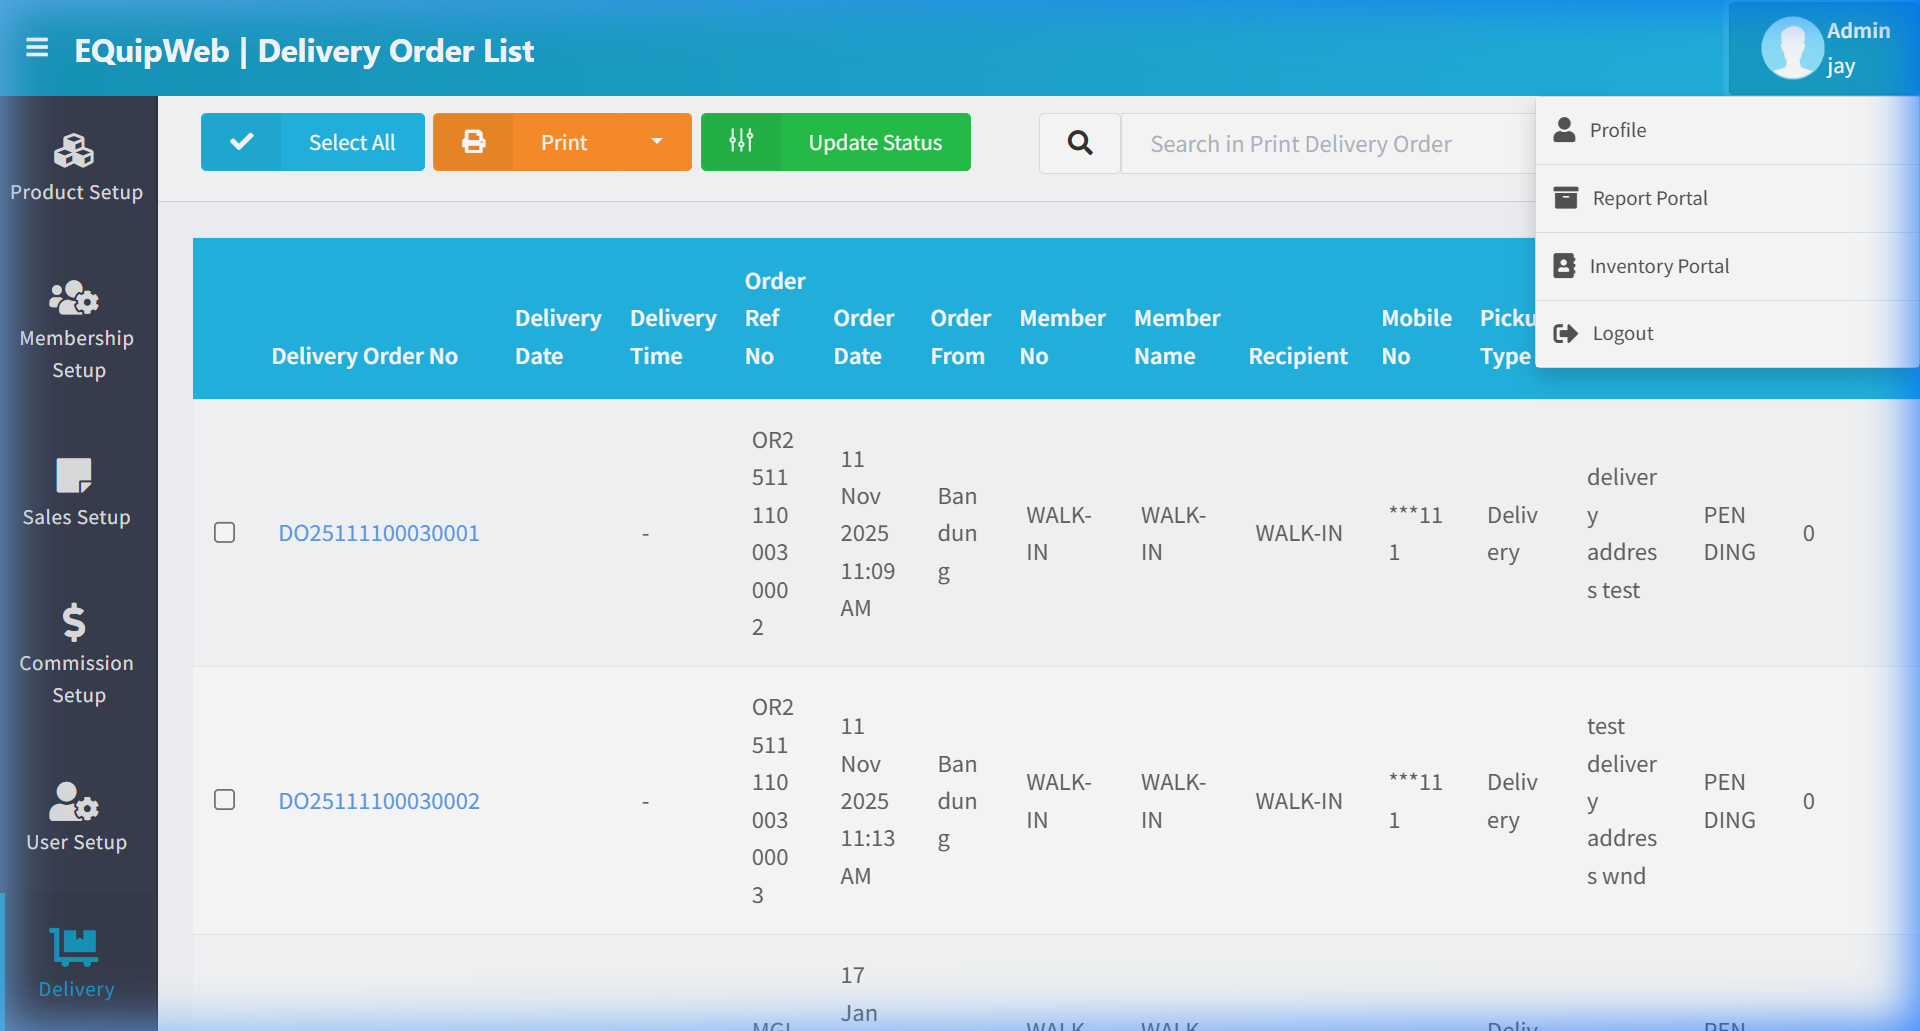
Click the user profile block in the top-right corner (showing your role name and username) to open a dropdown menu with four options.
⚙️ Dropdown Menu Items
| # | Menu Item | Icon | Description |
|---|---|---|---|
| 1 | Profile | 👤 | Opens your user profile page where you can view and update your account details. |
| 2 | Report Portal | 📊 | Navigates to the EQuip Report module. Opens in the same tab. |
| 3 | Inventory Portal | 📦 | Navigates to the EQuip Inventory module. Opens in the same tab. |
| 4 | Logout | 🔓 | Logs you out of EQuipWeb and returns to the login page. |
Use Account to manage and configure this feature in your EQuipWeb system.
1.3.1 View Profile
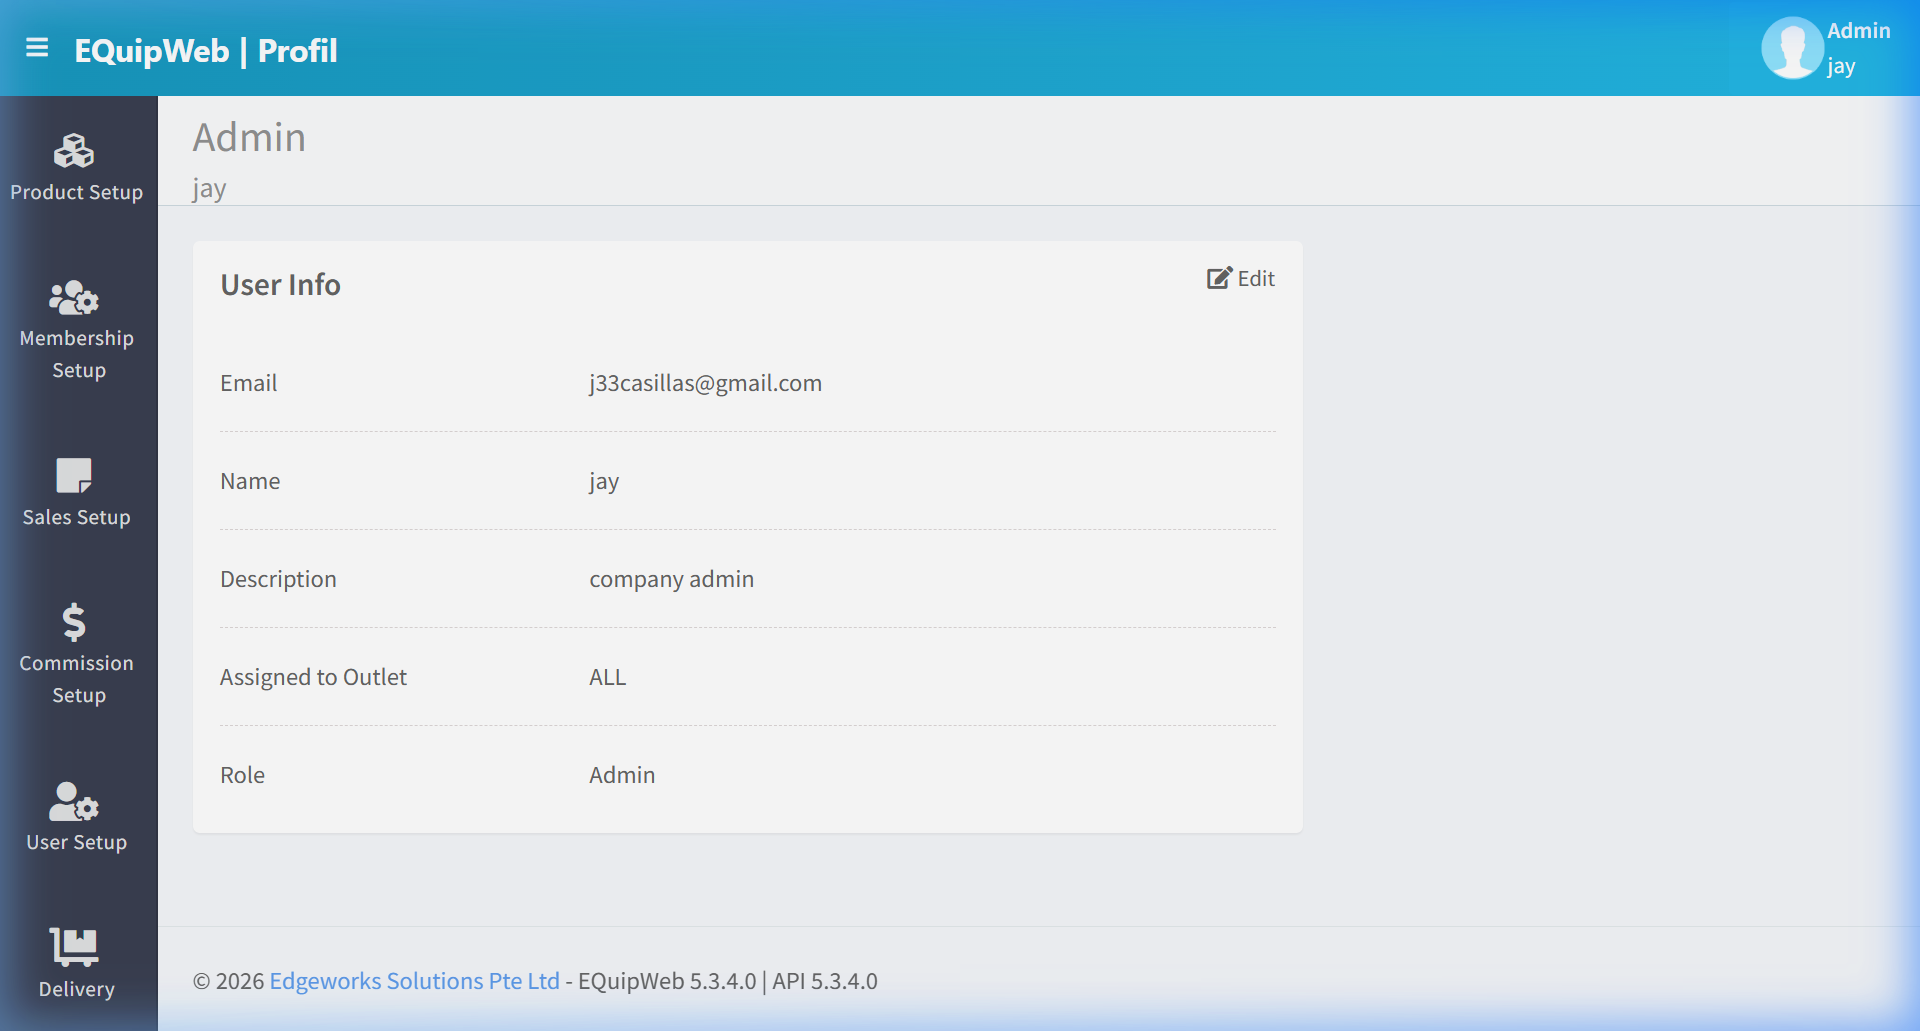
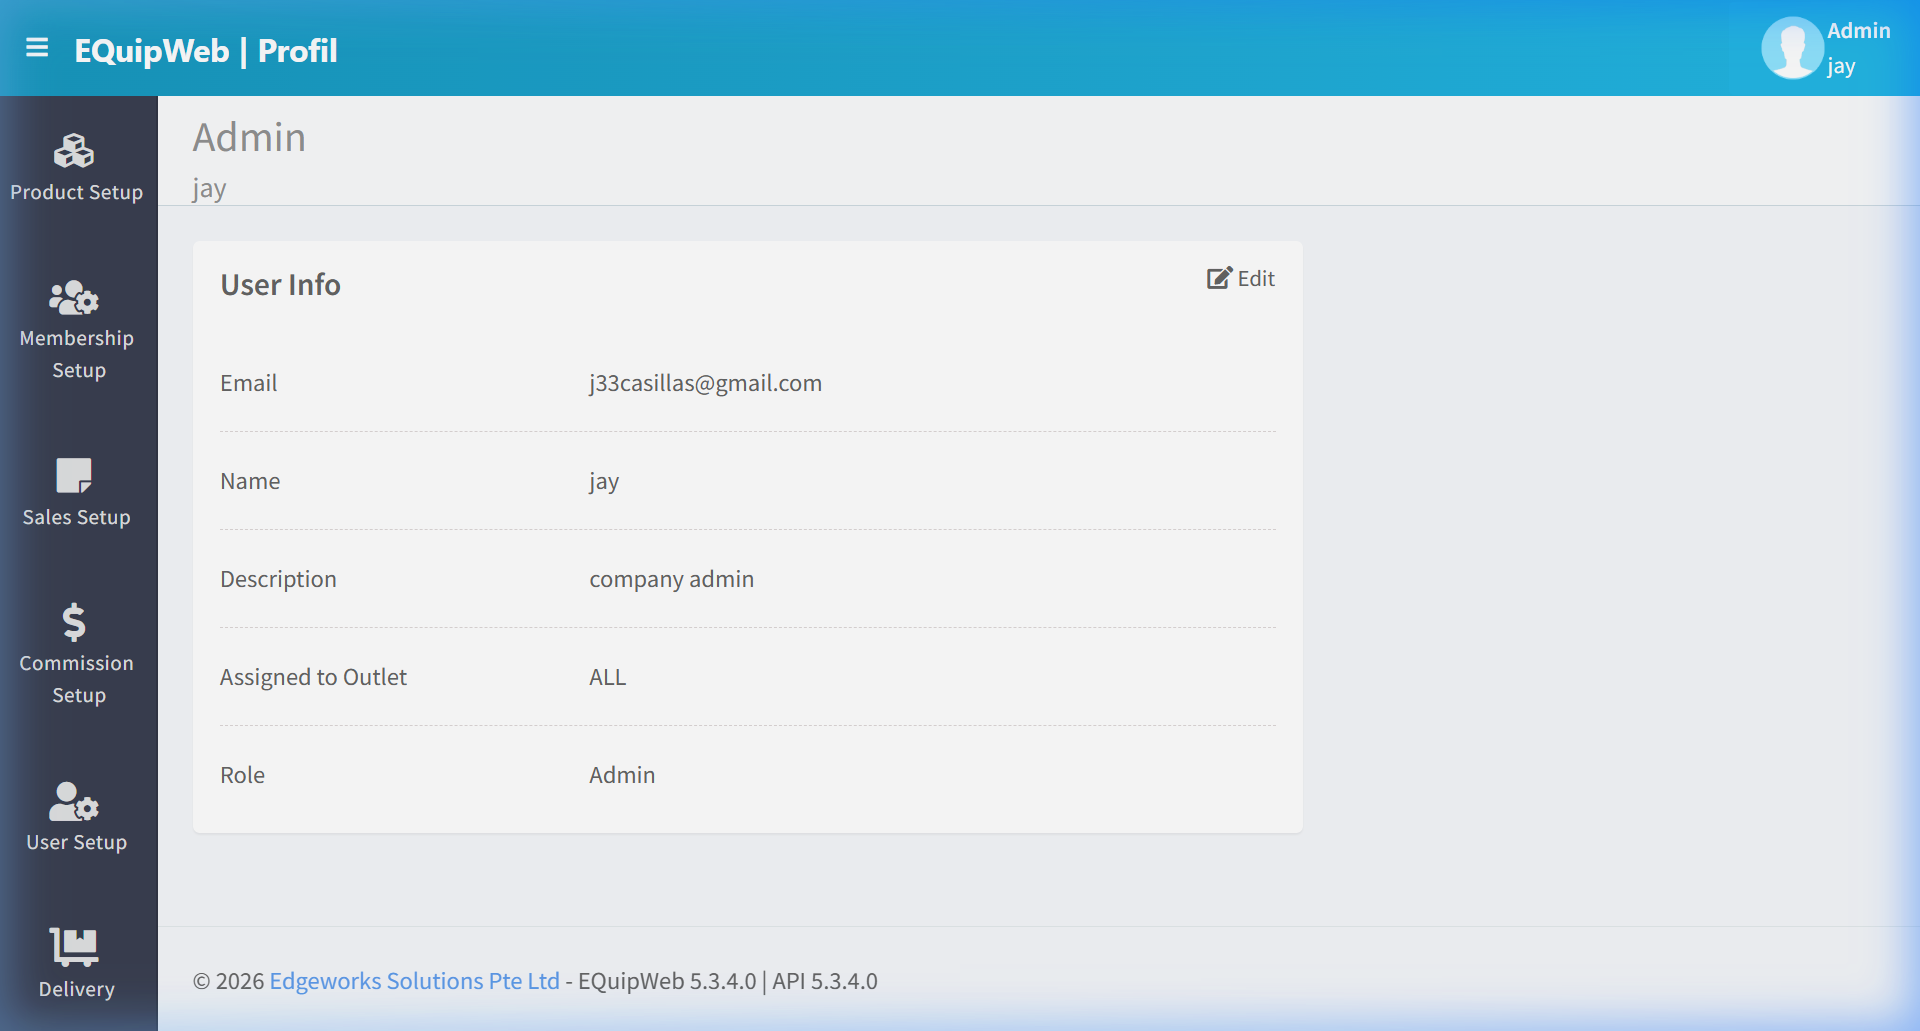
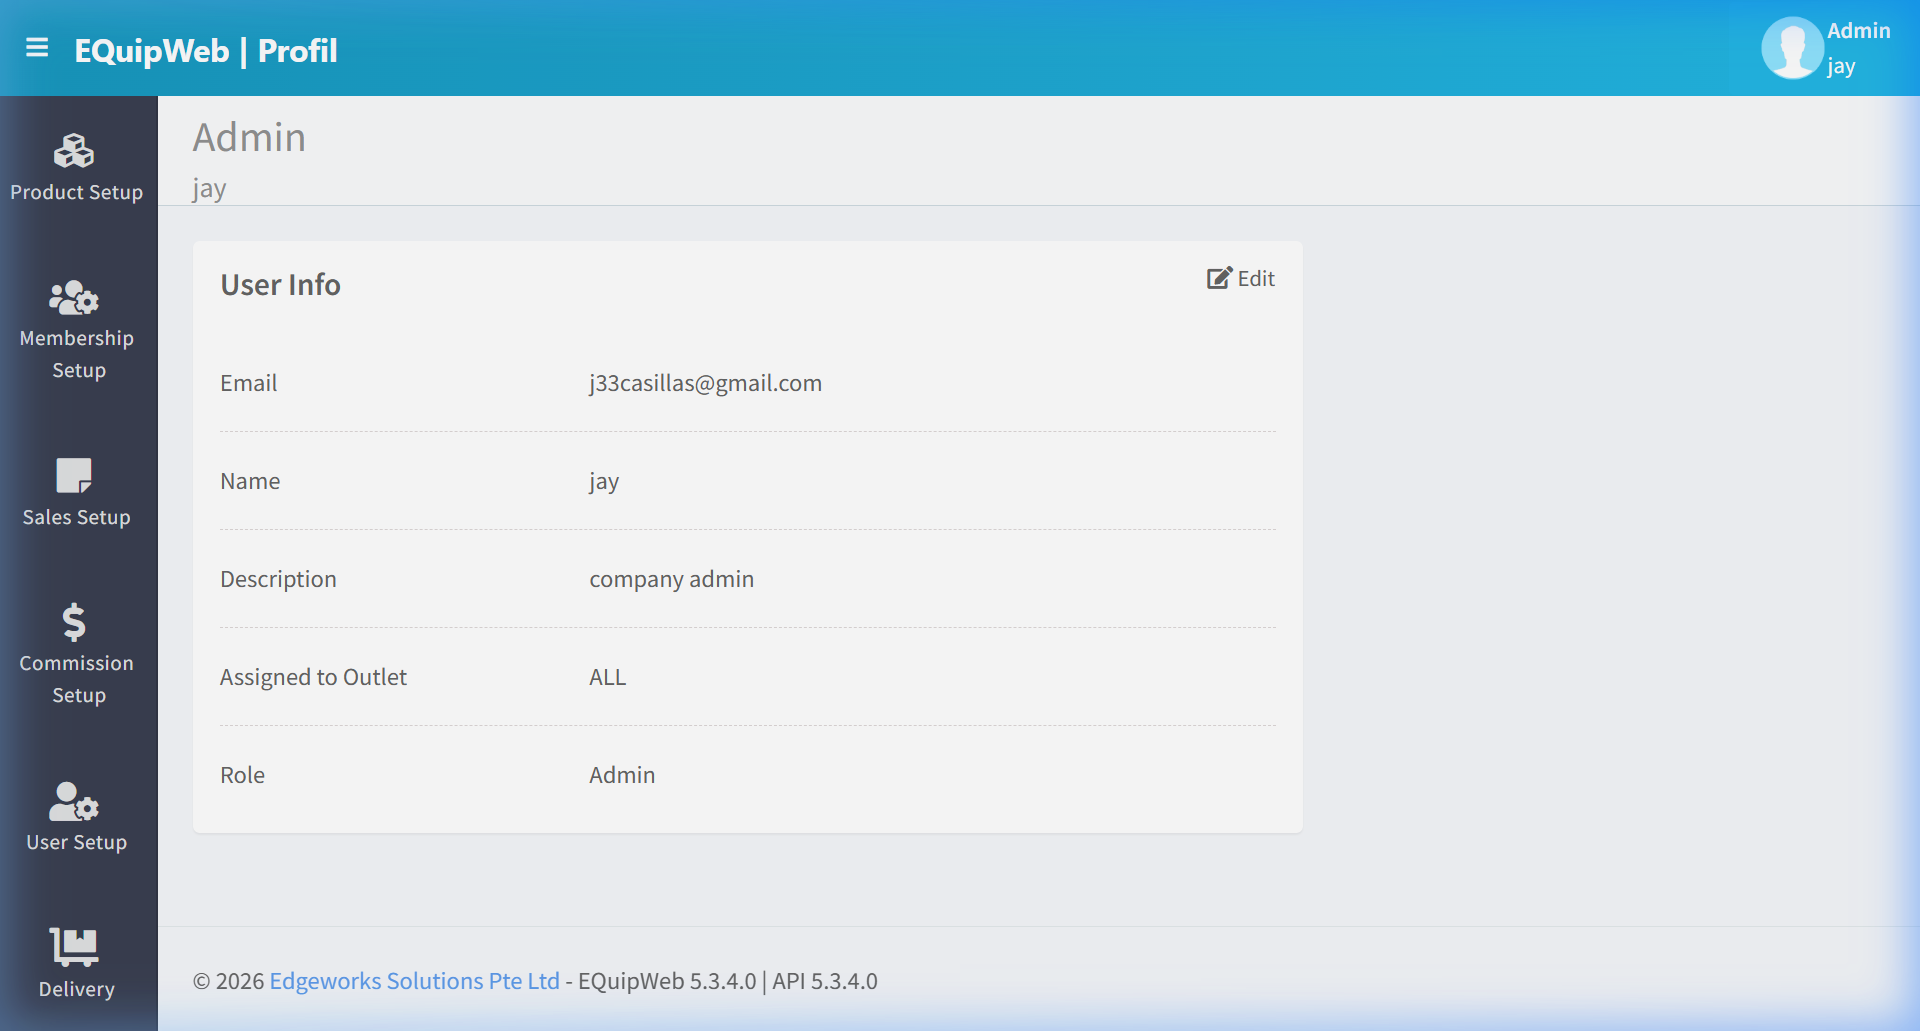
Click Profile from the dropdown to open the profile page.
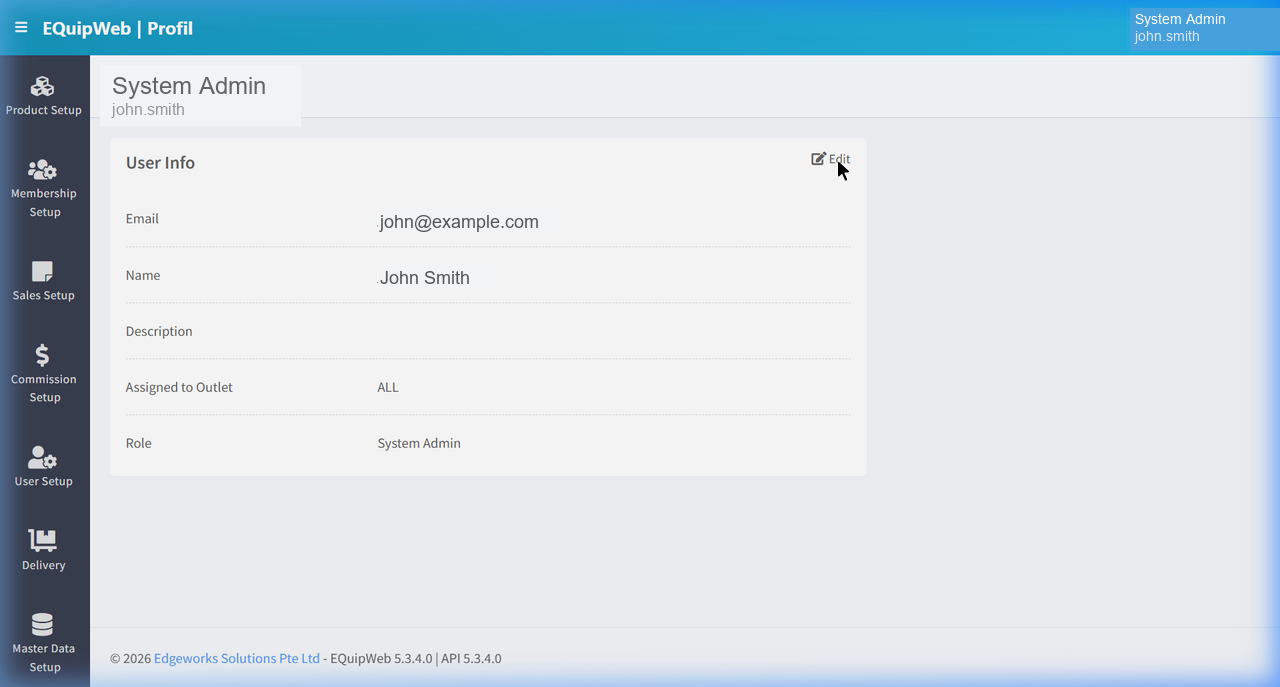
The page header displays your role name (e.g., "System Admin") and username below it. The "User Info" card shows your account details in read-only mode by default.
Profile Fields
| Field | Type | Editable | Description |
|---|---|---|---|
| Text | ❌ No | Your registered email address (set by admin via User Setup). | |
| Name | Text | ✅ Yes | Your display name shown across the system (e.g., in reports, audit logs). |
| Description | Textarea | ✅ Yes | Optional notes or description about the user account. |
| Assigned to Outlet | Text | ❌ No | Which outlet(s) you have access to. Set by admin. |
| Role | Text | ❌ No | Your assigned role (e.g., "System Admin", "Store Manager"). Set by admin. |
Use Account to manage and configure this feature in your EQuipWeb system.
1.3.2 Edit Profile
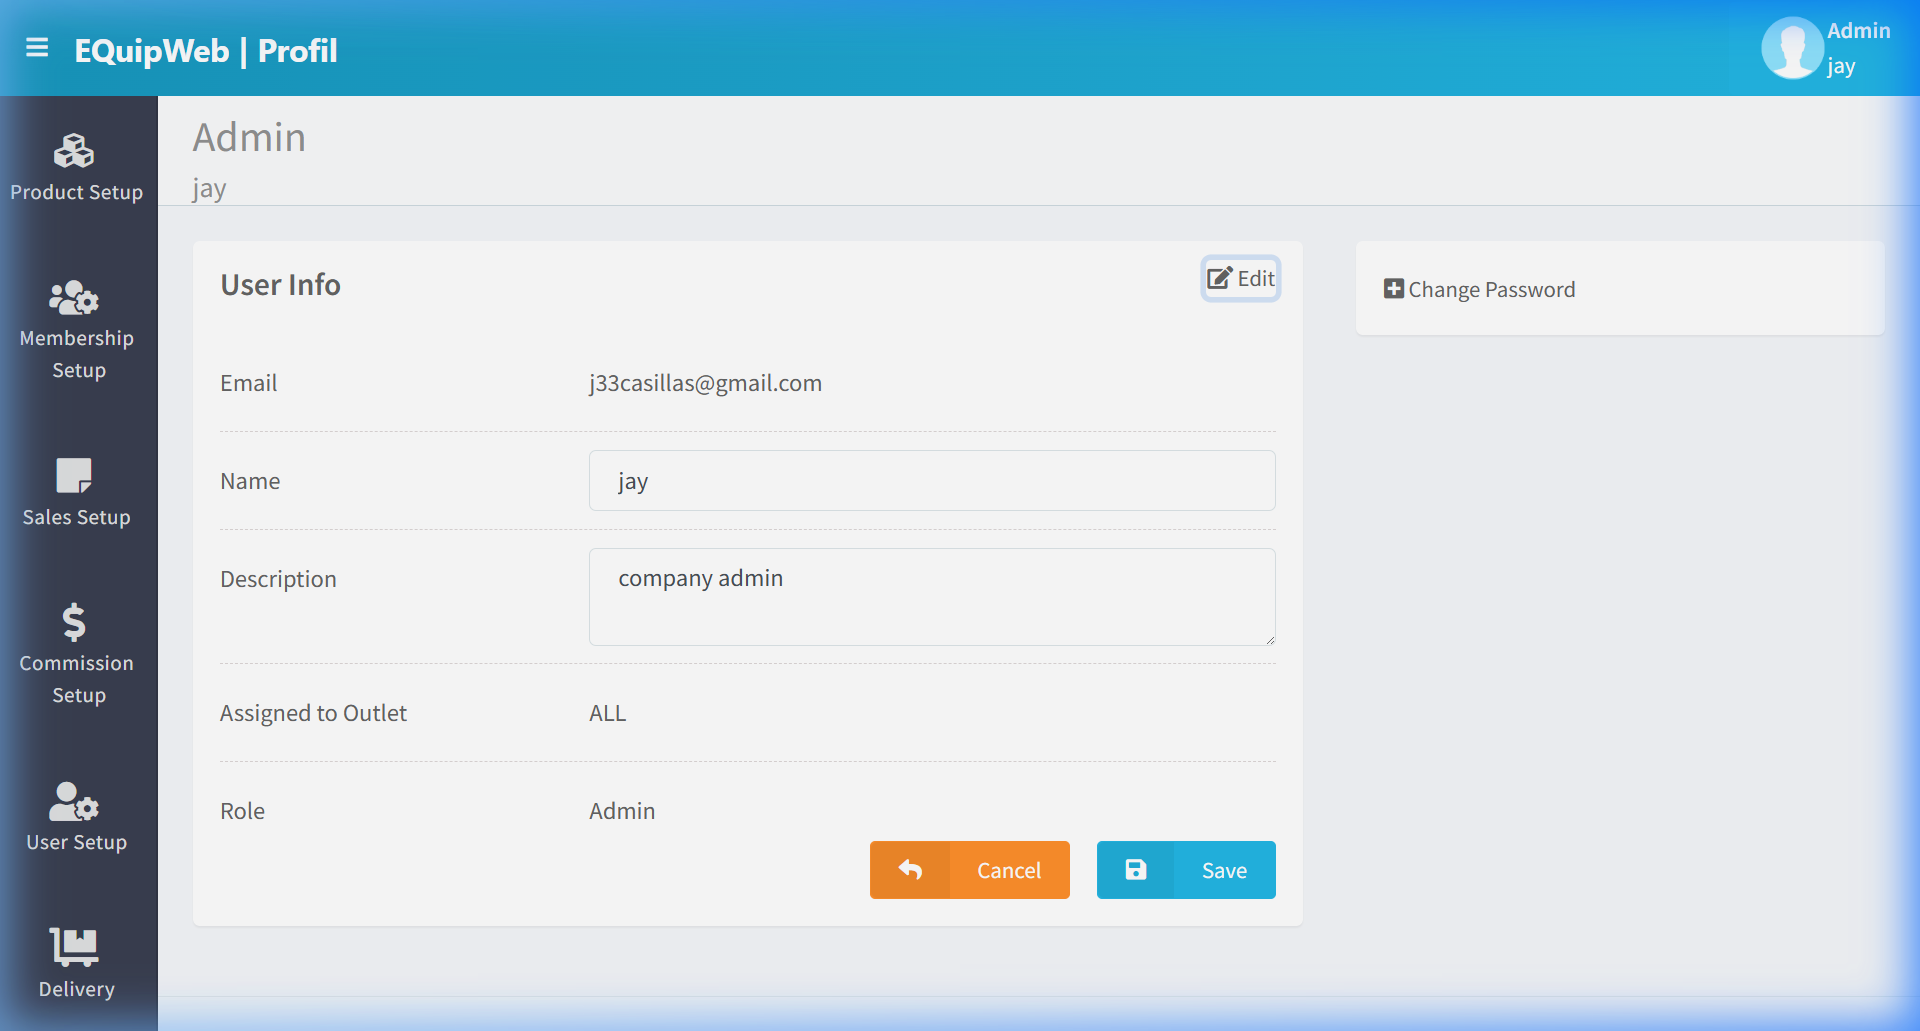
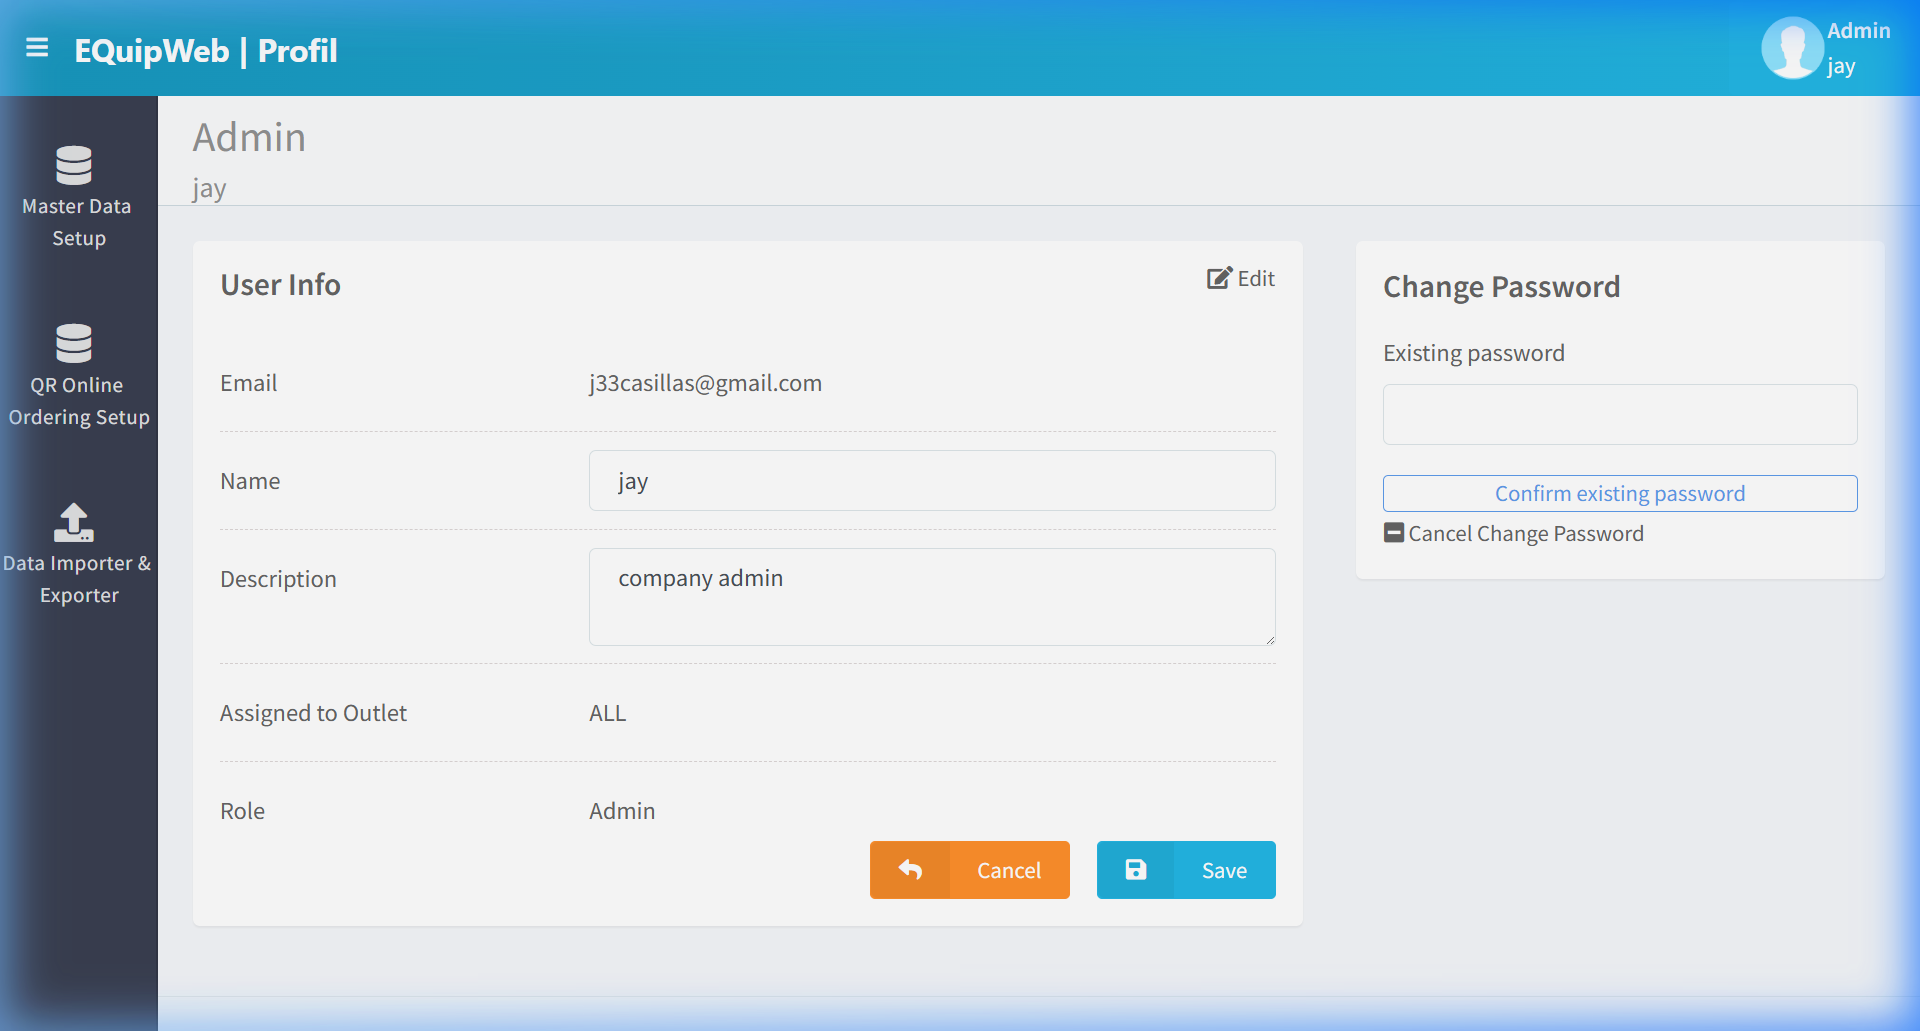
Click the ✏️ Edit button (top-right corner of the User Info card) to switch to edit mode. The editable fields (Name, Description) become input fields. A "Change Password" button also appears on the right side.
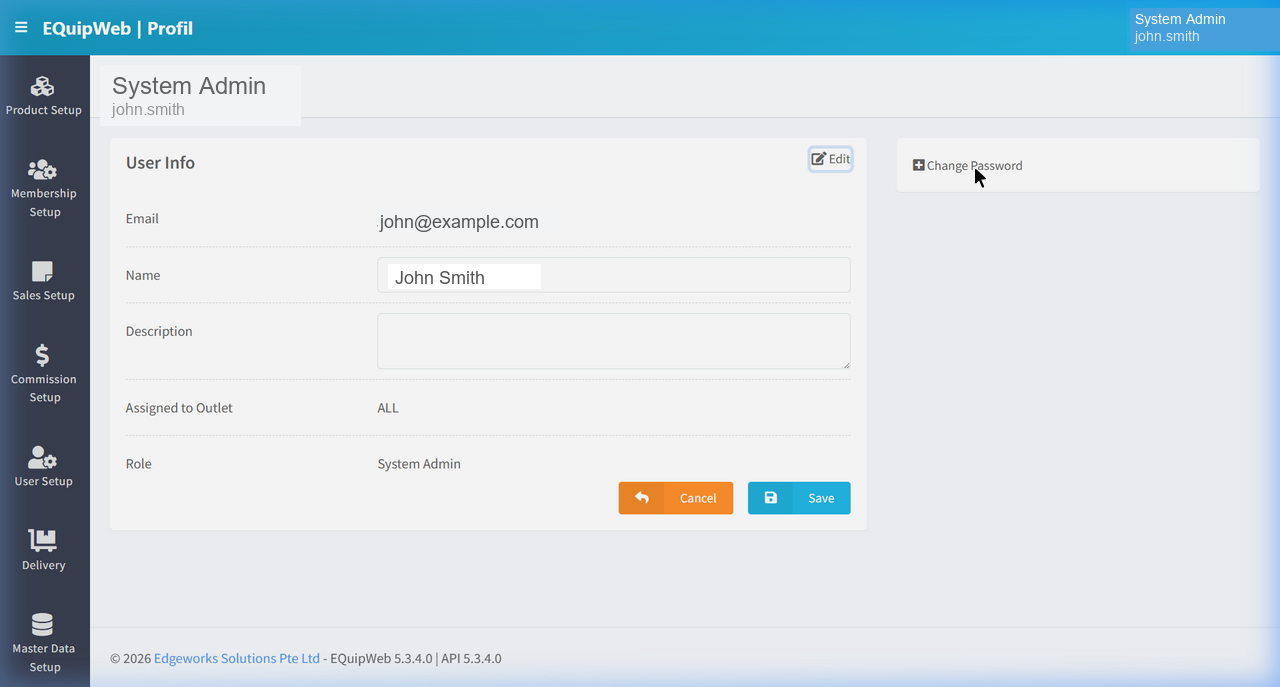
Editable vs Read-Only Fields
| Field | In Edit Mode |
|---|---|
| Read-only (still plain text — cannot be changed here). | |
| Name | Editable text input field. |
| Description | Editable textarea. |
| Assigned to Outlet | Read-only (set by admin). |
| Role | Read-only (set by admin). |
Action Buttons
| Button | Color | Action |
|---|---|---|
| Cancel | 🟠 Orange | Discards changes and returns to view mode. |
| Save | 🔵 Blue | Saves changes to your profile. |
Use Account to manage and configure this feature in your EQuipWeb system.
1.3.3 Change Password
The password change function is accessible from the Profile page in edit mode. Click the "+ Change Password" button on the right side panel.
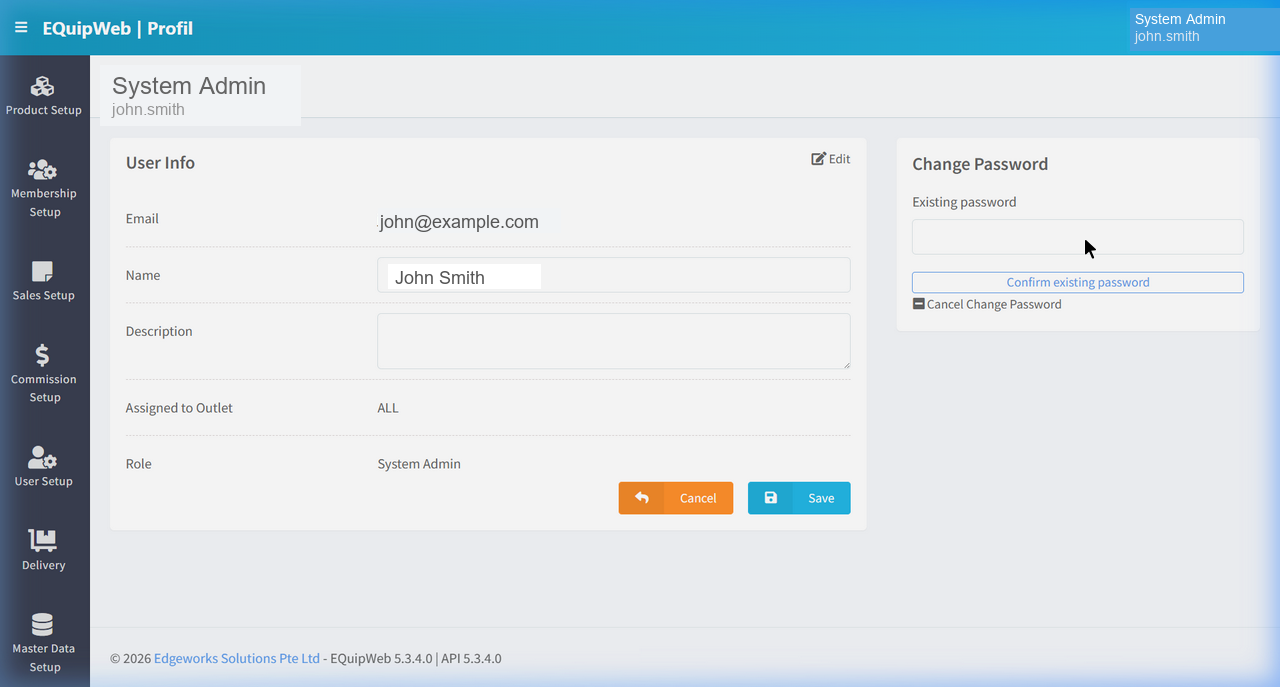
Step-by-Step
- Open Profile (from the dropdown menu).
 2. Click the ✏️ Edit button to enter edit mode.
 3. Click "+ Change Password" on the right side panel.
 4. Enter your Existing Password — this verifies you are the account owner.
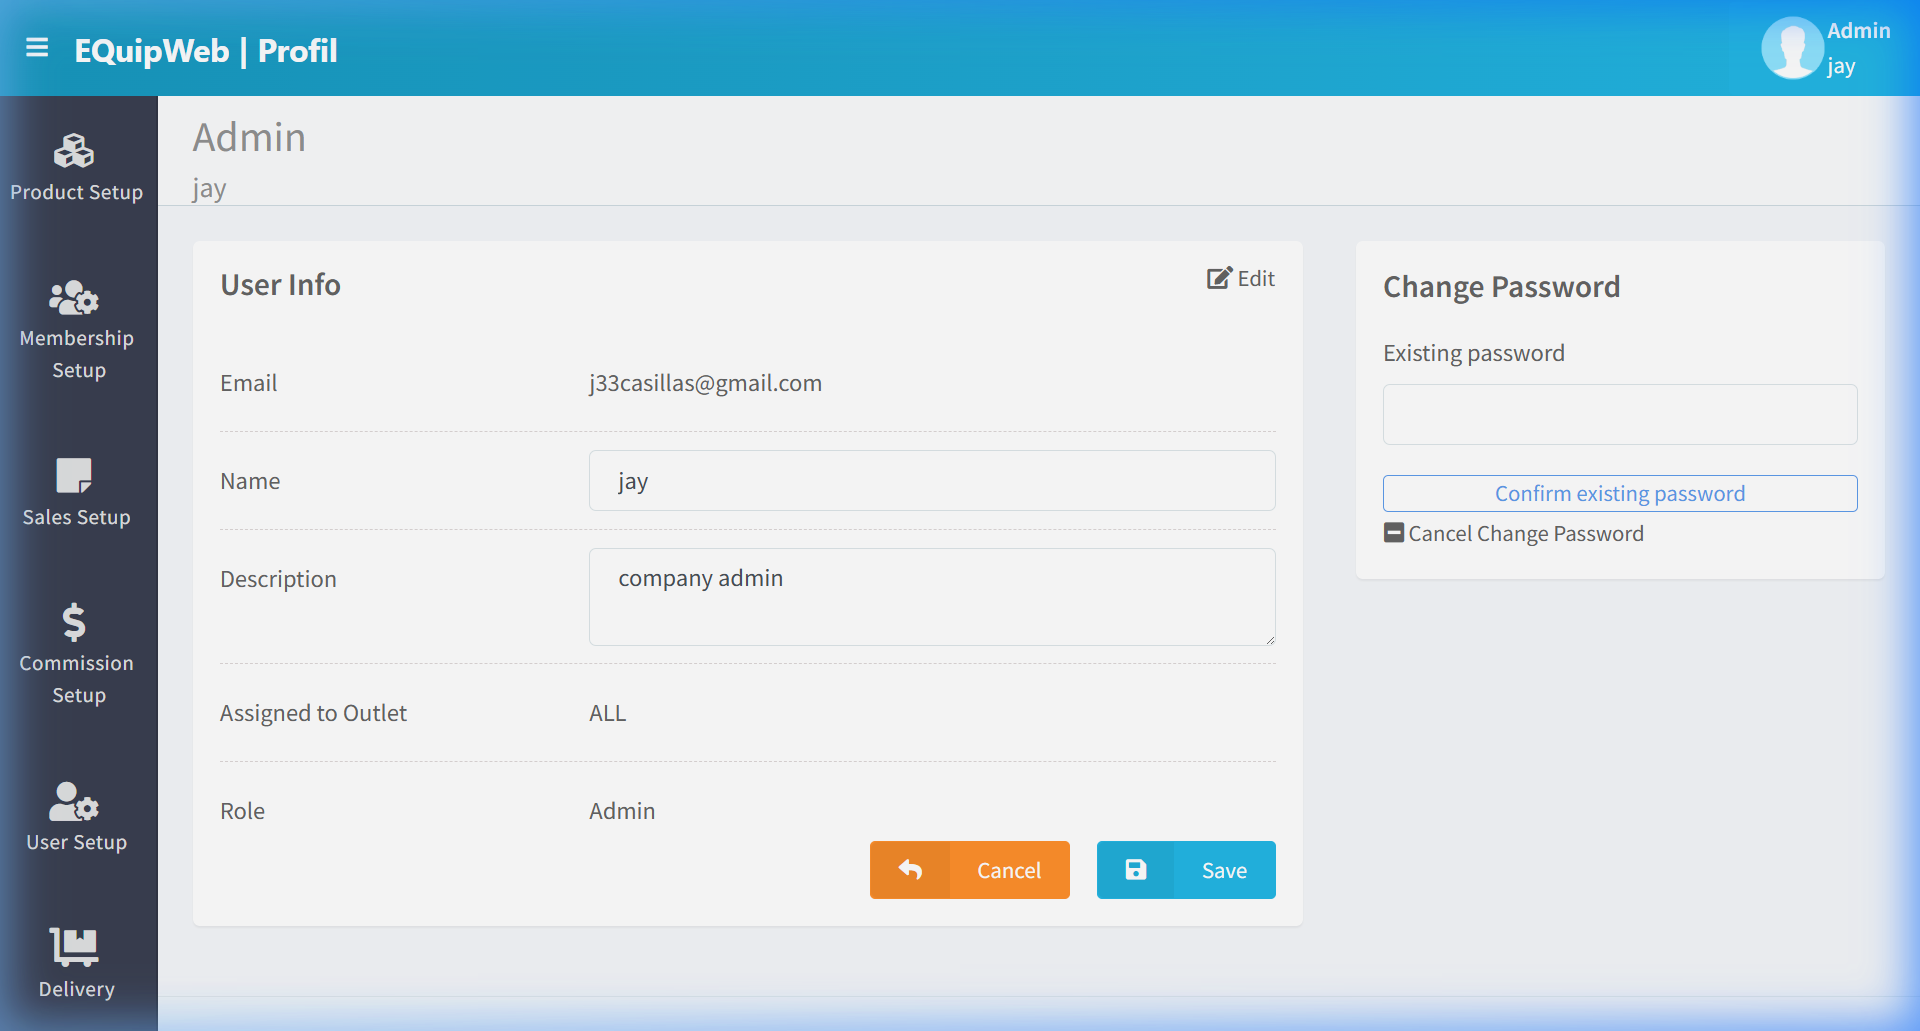 5. Click "Confirm existing password" button to verify.
 6. If verified, enter your New Password and Confirm Password.
 7. Click Save.
Expected Result: Your profile changes are saved.
Password Rules
| Rule | Description |
|---|---|
| Minimum Length | At least 8 characters (configurable by admin) |
| Complexity | May require uppercase, lowercase, numbers, and/or special characters |
| History | Some systems prevent reusing your last N passwords |
| Expiry | Password may need to be changed every N days (configurable) |
[!IMPORTANT] After changing your password, your current session remains active. However, you will need to use the new password the next time you log in. If you change your password on the web, make sure to update it on any mobile POS apps that auto-login with saved credentials.
Use Account to manage and configure this feature in your EQuipWeb system.
Portal Navigation
The Profile dropdown also provides shortcuts to the other two EQuip portals:
Report Portal
Navigates to the EQuip Report module where you can access:
- Daily/Weekly/Monthly sales reports
- Transaction history and audit trails
- Export data to Excel/PDF
- Analytics dashboards
Inventory Portal
Navigates to the EQuip Inventory module where you can access:
- Stock-in / Stock-out management
- Purchase Orders
- Stock Transfer between outlets
- Inventory adjustments and stocktaking
[!NOTE] Access to Report Portal and Inventory Portal depends on your user role and privileges. If a menu item appears grayed out or is missing, contact your administrator to request access.
Use Account to manage and configure this feature in your EQuipWeb system.
Logout
Click Logout from the profile dropdown to end your session.
What Happens on Logout
- Your JWT token is invalidated.
- You are redirected to the Login page.
- All unsaved data is lost — make sure to Save before logging out.
- Other browser tabs with EQuipWeb will also lose their session (they share the same token).
[!WARNING] Always log out when you are done, especially on shared computers. Leaving your session open on a shared device could allow unauthorized access to your account.
Use Account to manage and configure this feature in your EQuipWeb system.
Access & Permissions
| Role | View | Create | Edit | Delete |
|---|---|---|---|---|
| Admin | Yes | Yes | Yes | Yes |
| Supervisor | Yes | Yes | Yes | No |
| Cashier | No backend access | — | — | — |
[!NOTE] Exact permissions depend on the Privileges Setup configured for each role. Contact your administrator if you cannot access this page.
Use Account to manage and configure this feature in your EQuipWeb system.
FAQ
Q: I forgot my password — how do I reset it? A: Contact your system administrator to reset your password from User Setup > User List.
Q: Why can't I see all menus in the sidebar? A: Your role may not have permissions for all modules. Contact your administrator to check your assigned privileges.
Use Account to manage and configure this feature in your EQuipWeb system.
Troubleshooting
| Issue | Possible Cause | Solution |
|---|---|---|
| Cannot save the record | Required fields are empty or invalid | Check all fields marked with * and fill in valid data |
| Record not appearing in POS | POS terminal has not synced yet | Wait for the next sync cycle or manually trigger sync from Terminal Status |
| Cannot delete the record | Record is being used by other modules | Check if the record is linked to active transactions, products, or other settings |
| Changes not taking effect | Browser cache showing old data | Refresh the page (Ctrl+F5) or clear browser cache |
| "Duplicate" error on save | A record with the same name/code already exists | Search the list (including deleted records) for duplicates |
| Page not loading | Session expired or network issue | Log out and log back in. Check your internet connection |
Use Account to manage and configure this feature in your EQuipWeb system.
Related Menus
- User Setup > User List — account management
- User Setup > Role Setup — role assignment
- Setting > Feature Setup — system feature toggles
Use Account to manage and configure this feature in your EQuipWeb system.
Open Questions / Confirmation Needed
[!NOTE] The following items may vary depending on your system version and configuration:
- Exact permission settings depend on your Privileges Setup configuration
- Sync timing to POS terminals depends on network conditions and sync schedule
- Some features may require additional licensing or module activation
- Field behavior may differ between EQuip versions
If you encounter behavior not described in this manual, contact your system administrator or EQuip support team.
Related Articles
Login Page
? Backend — EQuipWebRetail ModeChapter 1: Getting Started Chapter 1: Getting Started — 1.1 Login Use Login to manage and configure this feature in your EQuipWeb system. The Login page is the secure entry point for all EQuipWeb users. It supports ...Locked User
? Backend — EQuipWebRetail ModeUser Setup Chapter 6: User Setup — 6.5 Locked User The Locked User page shows accounts that have been locked — either because someone entered the wrong password too many times, or because an admin locked it on purpose. ...How to Check the Transaction Report
This guide shows you how to open, filter, and export the Transaction Report in the EQuip Report Portal. Use it to review sales, voided, and refunded transactions and to export the data as CSV, Excel, PDF, or Flat File. 1. Open the Transaction Report ...Applications
? Backend — EQuipWebRetail ModeSetting Chapter 12: Setting — 12.6 Applications (Installer) The Applications page shows all the apps and modules available for your EQuip system. From here, you can see which apps are installed, check for updates, and ...User Setup
? Backend — EQuipWebRetail ModeUser Setup Chapter 6: User Setup — 6.1 User List Use List to manage and configure this feature in your EQuipWeb system. The User List shows everyone who has access to your EQuip system — from cashiers to managers. Here ...